This is part 2 of a small series we started to show some techniques that allow us to build a hierarchy of dashboards with Grafana. In the first part we learnt how to create links both at the panel and at the dashboard level. In this article we are going to explore how to create health status metrics that we can use in our “Top” level dashboard to get an at-a-glance view of a single system. Our dashboard will likely have one of these for every system being managed
Producing a health metric is going to require some basic math. The question is “where” do we do these calculations. Even though the calculations are not necessarily complicated the general guidance is not to do them in Grafana. What we are going to show here is how to calculate the health score as we take the measurement. Then we will store the health data along with the sensor data into the time series database as it is produced. If you want to do this in Grafana you might want to explore the “Expressions” functionality, but at a time of writing is a beta feature and you get warned that it might not be there in future versions.
I will provide some sample scripts in Python. If you don’t use Python in your environment, it doesn’t matter as the main thing now is to focus on the actual logic. In order to work with sample data we are going to create some random numbers for 3 different metrics representing the environment conditions of a certain location (a warehouse, a lab …). These metrics will be fake temperature, humidity and noise readings but you could use different metrics for your use case. Also not that the time series database we are using is InfluxDB, which is very popular these days.
When we calculate a health metric that summarizes all these readings we have 2 options.
- Combine all metrics into one
- Use the health of the worse metric
Combine all metrics into one
In this method we start with the maximum health value and then discount health points as you parse the data to find out the current health. Note how I have used 10 as the top health score. Other use cases might benefit from using 100 as the top score in which case you can interpret the health number as a percentage
import time
import random
from influxdb import InfluxDBClient
inf_db = "iot_database"
client = InfluxDBClient(host='localhost', port=8086)
client.switch_database(inf_db)

for x in range(10000):
    i = random.randint(20,45) # temperature reading
    j = random.randint(40,80) # humidity reading
    k = random.randint(40,60) # noise reading

    # Let's calculate the health based on the current readings
    health = 10 # Start with max possible health and substract from there
    if i > 30: health -= 1
    if i > 40: health -= 2
    if j > 60: health -= 1
    if j > 70: health -= 1
    if k > 50: health -= 1

    data = 'lab Temperature={},Humidity={},Noise={},Health={}'.format(i,j,k,health)
    print str(x).zfill(4) + " : " + data
    client.write([data],{'db':inf_db},204,'line')

    time.sleep(5)
Notice how I am taking health points if temperature is high and then take extra points if it is even higher. In my opinion this produces simpler code than doing double conditions such as “if i < 40 and i < 30”
We can add more penalty to metrics or conditions that are more severe. For example notice how temperatures over 40 take 2 extra points instead of 1.
If you have many metrics contributing to health and all of them are taking many points away you might end up with negative numbers. You might add another line of code that turns health to 0 if the calculated value is a negative number
We run the code and we get the following output. As we are using random numbers we get metrics swinging very wildly but it is a good thing in this case because we can see how the health parameter is reacting

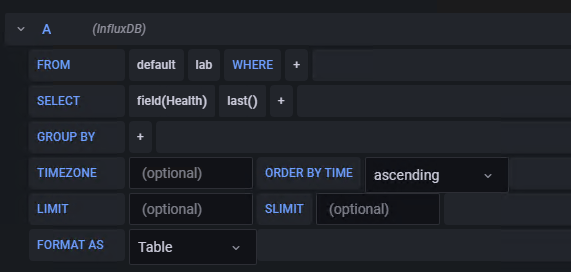
The “Health” metric is numerical so if we want to use a “stat” panel with status such as “OK” or “CRITICAL” we will need to use “Value Mapping” in Grafana. First let’s create a panel in the “Top” level dashboard. Make sure is of the type “stat”. You can configure the “query” as follows. Notice the “FORMAT AS Table”:
Then go to the “settings” in the right-pane and scroll-down to “Value mappings”. You can configure your value mappings as follows. Don’t forget to set the “Display text” and the “Color”

We can then get out of panel editing mode and observe how our “stat” panel behaves. Notice how I have added a link to another dashboard that shows the actual time series for all the variables as described in the previous post.

Since we are representing “Health” by a number, another way of presenting it in our “Top” level dashboard is with a “Gauge” panel. These types of panels are also very visual as they show you the current value in relation with the minimum and maximum values in the range. Let’s add a new “Gauge” panel and configure the query as follows, notice how we are now using “FORMAT AS Time series”

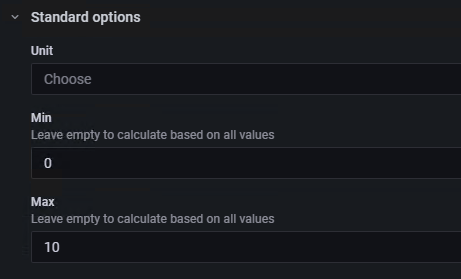
For a “Gauge” it is important to define the range of possible values. In our case this is 0 and 10 as shown below. If you have defined your health metric as a percentage you can set the range from 0 to 100 and select “Percent(0-100)” in the “Unit” field
If we get out of edit mode the changes are made right away and our new “Gauge” panel looks like this

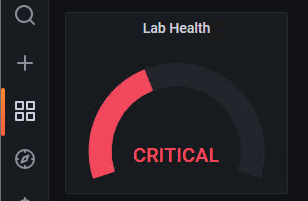
You can also use value mapping to show a health label instead of the health number, which along with the color conveys a very clear message. In the screenshots below I am using the same “Value mappings” we used for the “Stat” panel above

Use the health of the worse metric
Another way of calculating a metric would be to pick up the status of the worst metric. This approach is more conservative and it has its merits. The first thing we need to do is to calculate a different health score for each metric and then select the worst one as the overall health of the whole system. You can see some sample Python code below to illustrate the concept
import time
import random
from influxdb import InfluxDBClient
inf_db = "iot_database"
client = InfluxDBClient(host='localhost', port=8086)
client.switch_database(inf_db)

for x in range(10000):
    i = random.randint(20,45) # temperature reading
    j = random.randint(40,80) # humidity reading
    k = random.randint(40,60) # noise reading

    # Let's calculate the health based on the current readings
    temp_health  = 10
    humi_health  = 10
    noise_health = 10

    if i > 40: temp_health -= 2
    if i > 30: temp_health -= 1
    if j > 70: humi_health -= 1
    if j > 60: humi_health -= 1
    if k > 50: noise_health -= 1

    # Now let's pick the metric with the smallest value
    health = min(temp_health, humi_health, noise_health)

    data = 'lab Temperature={},Humidity={},Noise={},Health={}'.format(i,j,k,health)
    print str(x).zfill(4) + " : " + data
    client.write([data],{'db':inf_db},204,'line')

    time.sleep(5)
As before you could put more weight on a given metric if a bad situation on that subsystem tends to produce more critical situations. In our example you can see how we are discounting more health points in Temperature than the other 2 metrics
This is a sample output of the script

Notice how the last 2 intervals produce the same overall health status of 9 based on very different conditions. In interval “0006” the Temperature threshold was exceeded. Whereas in “0007” it was the humidity threshold that determined the “Health” value.
I hope it helps!
Categories: DellEMC


2 replies »