Containers are a great way to package code and dependencies in a portable package. This is fantastic in a world where dependencies keep getting bigger and more complex. But we are not here to discuss their benefits. If Google brought you here, more than likely you know already what a container is and you are trying to troubleshoot one. If that’s the case, I hope you find useful the tip I am about to tell you.
To understand the solution we must first remember that containers are designed to run a task as soon as they start. You define such task with either CMD or ENTRYPOINT. The problem is that if the task dies the container dies too and you can’t log in into it to find out what happened. Sometimes “docker logs” will give you a hint of what’s happening but other times you wish you could simply log in to the container and check things out, but of course you can’t because the container is dead
A solution I have become fond of is to override the ENTRYPOINT with a process that keeps the container alive and then open a terminal session into it. Let me give you an example.
IMPORTANT: I am using Podman but all of this will work perfectly fine with Docker as well. This is the “Dockerfile“. Notice how the main task for this container is “python app.py“
FROM python:3.10.5
WORKDIR /app
COPY . /app
RUN pip install --no-cache-dir -r requirements.txt
EXPOSE 7860
CMD ["python", "app.py"]
This is the code contained in “app.py“. It is a simple Gradio chatbot. It gets the users prompt and sends an API call to to get a response.
import gradio as gr
import os, requests, import urllib3
urllib3.disable_warnings()

appurl = os.environ["APP_URL"]

def give_response(query, history):
    payload = {"query": query}
    response = requests.post(appurl, json=payload)
    return response.json()["response"]

demo = gr.ChatInterface(
              give_response,
              type = "messages",
              title="My first Chatbot",
              description="Ask me a question, don't be shy")

demo.launch(server_name="0.0.0.0")
As you can see the code requires us to define an environment variable “APP_URL” with the URL to send the request to. Let’s say that we don’t define the variable and attempt to run the container.
pi@piper1:~$ podman run -d -p 7860:7860 localhost/blog:v1
19dc02db0b2e06c51756c7f55a3eb861c11f831a21574efdcd2e00081c9191a1
pi@piper1:~$ podman ps -a
CONTAINER ID  IMAGE              COMMAND        CREATED        STATUS      NAMES
19dc02db0b2e  localhost/blog:v1  python app.py  3 seconds ago  Exited (1)  dry_rice
As expected the container fails but here is the trick … we run it again but we use the “–entrypoint” argument to run “tail -f /dev/null“. The container is not changing we are simply overriding “python app.py” with this “tail” command which stays running and in doing so keeps the container alive. Notice the “single quote” around the square brackets.
pi@piper1:~$ podman run -d --entrypoint='["tail", "-f", "/dev/null"]' -p 7860:7860 localhost/blog:v1
e1031d4c2ecbf3d4ec244aef262e71fb2f4e227154b6e22eabf634e4e053f4a0
pi@piper1:~$ podman ps
CONTAINER ID  IMAGE              STATUS        PORTS                   NAMES
e1031d4c2ecb  localhost/blog:v1  Up 6 seconds  0.0.0.0:7860->7860/tcp  sour_soup
Now we can login into the container and do whatever checks we need to do. We can even run “python app.py” and see what’s going on live.
pi@piper1:~$ podman exec -it e1031d4c2ecb /bin/bash
root@e1031d4c2ecb:/app# ls -l
total 12
-rw-r--r-- 1 root root 518 Mar 24 04:35 Dockerfile
-rw-r--r-- 1 root root 566 Mar 24 04:35 app.py
-rw-r--r-- 1 root root 897 Mar 24 04:35 requirements.txt
root@e1031d4c2ecb:/app# python3 app.py
Traceback (most recent call last):
  File "/app/app.py", line 7, in <module>
    appurl = os.environ["APP_URL"]
  File "/usr/local/lib/python3.10/os.py", line 679, in __getitem__
    raise KeyError(key) from None
KeyError: 'APP_URL'
This was a simplistic example but you get point. There could be a file or a path missing, a typo, a permissions issue … by using this trick you can troubleshoot interactively inside the container. Once you know what the issue is you can fix your files and rebuild the container image.
The next question is, can you do this in Kubernetes as well? Yes, you can add the “command” to the “Deployment”, not to the “Pod”. This is a list of strings as you see in the last line in the simplified manifest below.
As soon as I save the changes to the deployment manifest, Openshift creates a new pod and kills the old one. Then I can terminal into the new pod and browse around. Notice I can even launch the application from the terminal session.
$ pwd
/app
$ ls -l
total 12
-rw-r--r--. 1 root root 518 Mar 24 04:35 Dockerfile
-rw-r--r--. 1 root root 566 Mar 24 04:35 app.py
-rw-r--r--. 1 root root 897 Mar 24 04:35 requirements.txt
$ ps -ef
UID          PID    PPID  C STIME TTY          TIME CMD
1000770+       1       0  0 00:00 ?        00:00:00 tail -f /dev/null
1000770+       7       0  0 00:00 pts/0    00:00:00 sh -i -c TERM=xterm sh
1000770+      13       7  0 00:00 pts/0    00:00:00 sh
1000770+      90      13  0 00:02 pts/0    00:00:00 ps -ef

$ python3 app.py
* Running on local URL:  http://0.0.0.0:7860

To create a public link, set `share=True` in `launch()`.
Of course, this is only intended for troubleshooting. Once you find out what’s wrong you can fix the image and manifest and deploy them again.
Once the image “python:3.10.5” layer is downloaded I am able to build more containers using the same version of Python without having to pause the “mfetpd” service which makes my security team happy.
I hope this helps you same some of your precious time!
In this blog post, we will install Dell EMC PowerStore collection on Ansible AWX and go through the next steps.
As we all know that Ansible has moved to Collections – a new ways of managing integrations and content management. Dell EMC has already started working towards this and have released several collections for multiple Dell EMC portfolio products, few of which are listed below.
Apart from this list you can find other Dell portfolio collections (like OpenManage) on this link
For the scope of this blog post we will focus on installing Dell EMC PowerStore Ansible collection on Ansible AWX. Technically, all the collections can be installed using similar steps.
As a Pre-Requisite, this blog post assumes that you have –
Access to operating system / machine having Ansible AWX installed
Access to PowerStore storage system (with credentials)
Additionally, if you’re getting started with Ansible AWX and/or integration with Dell EMC’s storage products then you can follow this blog series to get started from scratch.
As part of the installation collection installation steps we need to Ansible AWX machine and then connect to the awx_task docker container.
Login to the AWX machine. You can list the running AWX containers using below command
[root@awx ~]# docker container list
CONTAINER ID        IMAGE                     COMMAND                  CREATED             STATUS              PORTS                  NAMES
6ced2eccbd7b        ansible/awx_task:11.2.0   "tini -- /bin/sh -c …"   13 months ago       Up 6 days           8052/tcp               awx_task
42b14fbd15ad        ansible/awx_web:11.2.0    "tini -- /bin/sh -c …"   13 months ago       Up 6 days           0.0.0.0:80->8052/tcp   awx_web
4c08c0e39128        memcached:alpine          "docker-entrypoint.s…"   13 months ago       Up 6 days           11211/tcp              awx_memcached
42224676c21a        redis                     "docker-entrypoint.s…"   13 months ago       Up 6 days           6379/tcp               awx_redis
37d0ca0c67bc        postgres:10               "docker-entrypoint.s…"   13 months ago       Up 6 days           5432/tcp               awx_postgres
Then connect to the awx_task container using below command
# docker exec -it awx_task bash
Next, install the PowerStore Ansible Modules collection in awx_task container
# ansible-galaxy collection install dellemc.powerstore
Process install dependency map
Starting collection install process
Installing 'dellemc.powerstore:1.2.1' to '/home/awx/.ansible/collections/ansible_collections/dellemc/powerstore'
Then logout from the container.
bash-4.4# exit
Now you have successfully installed the Dell EMC PowerStore Ansible Modules collection. Next step post installing collection are
Create the PowerStore credentials on the Ansible AWX
All Dell EMC’s published collections comes with sample playbooks to test the functionality and also to get you started with integrations. When it comes to PowerStore you can see them under /home/awx/ansible-powerstore/dellemc_ansible/powerstore/samples directory
# cd /home/awx/ansible-powerstore/dellemc_ansible/powerstore/samples
# ls -l
-rw-r--r-- 1 root root 1892 Jun  4  2020 capacity_volumes.yml
-rw-r--r-- 1 root root 1042 Jun  4  2020 create_multiple_volumes_async.yml
-rw-r--r-- 1 root root  799 Jun  4  2020 create_multiple_volumes.yml
-rw-r--r-- 1 root root  790 Jun  4  2020 delete_multiple_volumes.yml
-rw-r--r-- 1 root root 1710 Jun  4  2020 find_empty_volume_groups.yml
-rw-r--r-- 1 root root 1141 Jun  4  2020 search_volumes.yml
You can re-use these sample playbooks to quickly get started with storage automation tasks. Sample playbooks in the collection has multiple variables like –
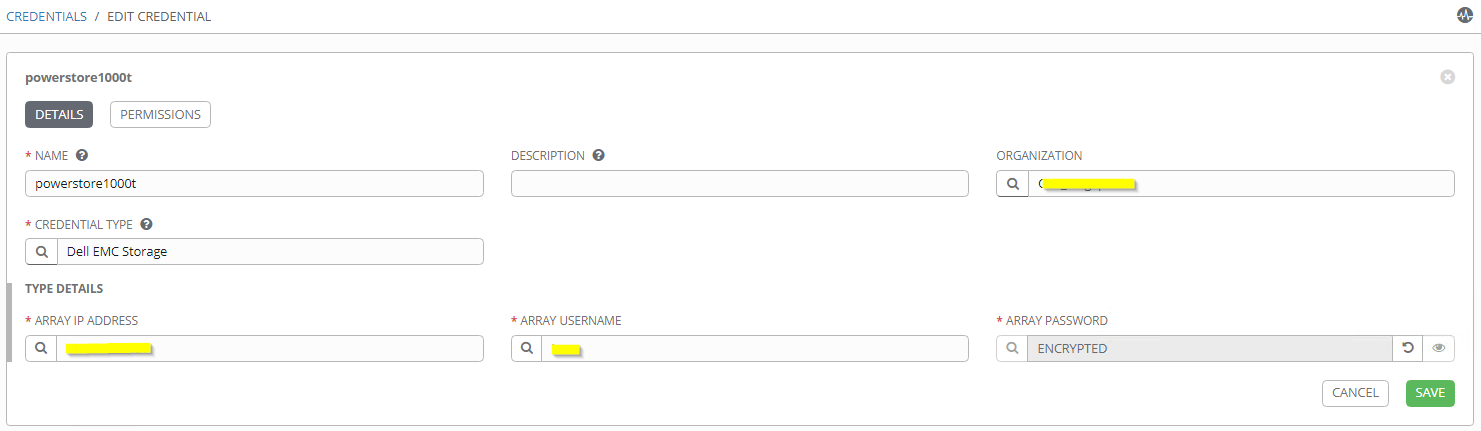
Once Dell Storage credential type is created then you can add PowerStore array details and credentials using AWX credential manager.
Ansible AWX – Dell EMC Storage Credential
After adding PowerStore credential you can use the same in the AWX automation job template creation. Additional variables (like volume names, size, host etc.) can be captured using extra_vars
Ansible AWX – Job Template Creation
Additionally you can create survey to capture the required variables and also workflow visualizer to create multi-step breakdown of the automation tasks including but not limited storage automation. Below is the example of breaking down the storage provisioning workflow in the logical steps (like approval, quota management, provisioning, etc.)
Ansible AWX – Workflow Visualizer
Hope this helps everyone.
Update: Please note that the latest version of AWX has moved to Kubernetes (instead of Docker). Please use the below steps to install the PowerStore modules.
[root@awx ~]# kubectl -n awx exec -it awx-844c574f84-bc4ww -c awx-ee -- /bin/bash
bash-4.4$ ansible-galaxy collection install dellemc.powerstore -c
Starting galaxy collection install process
Process install dependency map
Starting collection install process
Downloading https://galaxy.ansible.com/download/dellemc-powerstore-1.6.0.tar.gz to /home/runner/.ansible/tmp/ansible-local-3648wbuk4c_/tmprzm8bse6/dellemc-powerstore-1.6.0-ltamh_71
Installing 'dellemc.powerstore:1.6.0' to '/home/runner/.ansible/collections/ansible_collections/dellemc/powerstore'
dellemc.powerstore:1.6.0 was installed successfully
bash-4.4$
Recently while I was trying to install AWX using Ansible I came across below error on Centos.
Docker-compose error while installing AWX
fatal: [localhost]: FAILED! => {"changed": false, "msg": "Unable to load docker-compose. Try `pip install docker-compose`. Error: Traceback (most recent call last):\n File \"/tmp/ansible_docker_compose_payload_jNhEZ8/ansible_docker_compose_payload.zip/ansible/modules/cloud/docker/docker_compose.py\", line 483, in <module>\n File \"/usr/lib/python2.7/site-packages/compose/cli/command.py\", line 12, in <module>\n from .. import config\n File \"/usr/lib/python2.7/site-packages/compose/config/__init__.py\", line 6, in <module>\n from .config import ConfigurationError\n File \"/usr/lib/python2.7/site-packages/compose/config/config.py\", line 51, in <module>\n from .validation import match_named_volumes\n File \"/usr/lib/python2.7/site-packages/compose/config/validation.py\", line 12, in <module>\n from jsonschema import Draft4Validator\n File \"/usr/lib/python2.7/site-packages/jsonschema/__init__.py\", line 33, in <module>\n import importlib_metadata as metadata\n File \"/usr/lib/python2.7/site-packages/importlib_metadata/__init__.py\", line 9, in <module>\n import zipp\nImportError: No module named zipp\n"}
While this error was referring to missing pip package “docker-compose”, but when I tried to install the same it gave below error stating that it’s already installed.
[root@dw-test-1 installer]# pip install docker-compose
Requirement already satisfied (use --upgrade to upgrade): docker-compose in /usr/lib/python2.7/site-packages
Requirement already satisfied (use --upgrade to upgrade): texttable<2,>=0.9.0 in /usr/lib/python2.7/site-packages (from docker-compose)
Requirement already satisfied (use --upgrade to upgrade): requests<3,>=2.20.0 in /usr/lib/python2.7/site-packages (from docker-compose)
Requirement already satisfied (use --upgrade to upgrade): dockerpty<1,>=0.4.1 in /usr/lib/python2.7/site-packages (from docker-compose)
Requirement already satisfied (use --upgrade to upgrade): six<2,>=1.3.0 in /usr/lib/python2.7/site-packages (from docker-compose)
Requirement already satisfied (use --upgrade to upgrade): docopt<1,>=0.6.1 in /usr/lib/python2.7/site-packages (from docker-compose)
Requirement already satisfied (use --upgrade to upgrade): ipaddress<2,>=1.0.16; python_version < "3.3" in /usr/lib/python2.7/site-packages (from docker-compose)
Requirement already satisfied (use --upgrade to upgrade): subprocess32<4,>=3.5.4; python_version < "3.2" in /usr/lib64/python2.7/site-packages (from docker-compose)
Requirement already satisfied (use --upgrade to upgrade): enum34<2,>=1.0.4; python_version < "3.4" in /usr/lib/python2.7/site-packages (from docker-compose)
Requirement already satisfied (use --upgrade to upgrade): websocket-client<1,>=0.32.0 in /usr/lib/python2.7/site-packages (from docker-compose)
Requirement already satisfied (use --upgrade to upgrade): jsonschema<4,>=2.5.1 in /usr/lib/python2.7/site-packages (from docker-compose)
Requirement already satisfied (use --upgrade to upgrade): backports.shutil-get-terminal-size==1.0.0; python_version < "3.3" in /usr/lib/python2.7/site-packages (from docker-compose)
Requirement already satisfied (use --upgrade to upgrade): backports.ssl-match-hostname<4,>=3.5; python_version < "3.5" in /usr/lib/python2.7/site-packages (from docker-compose)
Requirement already satisfied (use --upgrade to upgrade): cached-property<2,>=1.2.0 in /usr/lib/python2.7/site-packages (from docker-compose)
Requirement already satisfied (use --upgrade to upgrade): PyYAML<6,>=3.10 in /usr/lib64/python2.7/site-packages (from docker-compose)
Requirement already satisfied (use --upgrade to upgrade): docker[ssh]<5,>=3.7.0 in /usr/lib/python2.7/site-packages (from docker-compose)
Requirement already satisfied (use --upgrade to upgrade): urllib3!=1.25.0,!=1.25.1,<1.26,>=1.21.1 in /usr/lib/python2.7/site-packages (from requests<3,>=2.20.0->docker-compose)
Requirement already satisfied (use --upgrade to upgrade): idna<3,>=2.5 in /usr/lib/python2.7/site-packages (from requests<3,>=2.20.0->docker-compose)
Requirement already satisfied (use --upgrade to upgrade): chardet<4,>=3.0.2 in /usr/lib/python2.7/site-packages (from requests<3,>=2.20.0->docker-compose)
Requirement already satisfied (use --upgrade to upgrade): certifi>=2017.4.17 in /usr/lib/python2.7/site-packages (from requests<3,>=2.20.0->docker-compose)
Requirement already satisfied (use --upgrade to upgrade): pyrsistent>=0.14.0 in /usr/lib64/python2.7/site-packages (from jsonschema<4,>=2.5.1->docker-compose)
Requirement already satisfied (use --upgrade to upgrade): setuptools in /usr/lib/python2.7/site-packages (from jsonschema<4,>=2.5.1->docker-compose)
Requirement already satisfied (use --upgrade to upgrade): attrs>=17.4.0 in /usr/lib/python2.7/site-packages (from jsonschema<4,>=2.5.1->docker-compose)
Requirement already satisfied (use --upgrade to upgrade): importlib-metadata; python_version < "3.8" in /usr/lib/python2.7/site-packages (from jsonschema<4,>=2.5.1->docker-compose)
Requirement already satisfied (use --upgrade to upgrade): functools32; python_version < "3" in /usr/lib/python2.7/site-packages (from jsonschema<4,>=2.5.1->docker-compose)
Requirement already satisfied (use --upgrade to upgrade): paramiko>=2.4.2; extra == "ssh" in /usr/lib/python2.7/site-packages (from docker[ssh]<5,>=3.7.0->docker-compose)
Collecting configparser>=3.5; python_version < "3" (from importlib-metadata; python_version < "3.8"->jsonschema<4,>=2.5.1->docker-compose)
  Using cached https://files.pythonhosted.org/packages/e5/7c/d4ccbcde76b4eea8cbd73b67b88c72578e8b4944d1270021596e80b13deb/configparser-5.0.0.tar.gz
  Running setup.py (path:/tmp/pip-build-c4RmaK/configparser/setup.py) egg_info for package configparser produced metadata for project name unknown. Fix your #egg=configparser fragments.
  Requirement already satisfied (use --upgrade to upgrade): unknown from https://files.pythonhosted.org/packages/e5/7c/d4ccbcde76b4eea8cbd73b67b88c72578e8b4944d1270021596e80b13deb/configparser-5.0.0.tar.gz#sha256=2ca44140ee259b5e3d8aaf47c79c36a7ab0d5e94d70bd4105c03ede7a20ea5a1 in /usr/lib/python2.7/site-packages (from importlib-metadata; python_version < "3.8"->jsonschema<4,>=2.5.1->docker-compose)
Collecting zipp>=0.5 (from importlib-metadata; python_version < "3.8"->jsonschema<4,>=2.5.1->docker-compose)
  Using cached https://files.pythonhosted.org/packages/ce/8c/2c5f7dc1b418f659d36c04dec9446612fc7b45c8095cc7369dd772513055/zipp-3.1.0.tar.gz
  Running setup.py (path:/tmp/pip-build-c4RmaK/zipp/setup.py) egg_info for package zipp produced metadata for project name unknown. Fix your #egg=zipp fragments.
  Requirement already satisfied (use --upgrade to upgrade): unknown from https://files.pythonhosted.org/packages/ce/8c/2c5f7dc1b418f659d36c04dec9446612fc7b45c8095cc7369dd772513055/zipp-3.1.0.tar.gz#sha256=c599e4d75c98f6798c509911d08a22e6c021d074469042177c8c86fb92eefd96 in /usr/lib/python2.7/site-packages (from importlib-metadata; python_version < "3.8"->jsonschema<4,>=2.5.1->docker-compose)
Requirement already satisfied (use --upgrade to upgrade): contextlib2; python_version < "3" in /usr/lib/python2.7/site-packages (from importlib-metadata; python_version < "3.8"->jsonschema<4,>=2.5.1->docker-compose)
Requirement already satisfied (use --upgrade to upgrade): pathlib2; python_version < "3" in /usr/lib/python2.7/site-packages (from importlib-metadata; python_version < "3.8"->jsonschema<4,>=2.5.1->docker-compose)
Requirement already satisfied (use --upgrade to upgrade): pynacl>=1.0.1 in /usr/lib64/python2.7/site-packages (from paramiko>=2.4.2; extra == "ssh"->docker[ssh]<5,>=3.7.0->docker-compose)
Requirement already satisfied (use --upgrade to upgrade): cryptography>=2.5 in /usr/lib64/python2.7/site-packages (from paramiko>=2.4.2; extra == "ssh"->docker[ssh]<5,>=3.7.0->docker-compose)
Requirement already satisfied (use --upgrade to upgrade): bcrypt>=3.1.3 in /usr/lib64/python2.7/site-packages (from paramiko>=2.4.2; extra == "ssh"->docker[ssh]<5,>=3.7.0->docker-compose)
Requirement already satisfied (use --upgrade to upgrade): scandir; python_version < "3.5" in /usr/lib64/python2.7/site-packages (from pathlib2; python_version < "3"->importlib-metadata; python_version < "3.8"->jsonschema<4,>=2.5.1->docker-compose)
Requirement already satisfied (use --upgrade to upgrade): cffi>=1.4.1 in /usr/lib64/python2.7/site-packages (from pynacl>=1.0.1->paramiko>=2.4.2; extra == "ssh"->docker[ssh]<5,>=3.7.0->docker-compose)
Requirement already satisfied (use --upgrade to upgrade): pycparser in /usr/lib/python2.7/site-packages (from cffi>=1.4.1->pynacl>=1.0.1->paramiko>=2.4.2; extra == "ssh"->docker[ssh]<5,>=3.7.0->docker-compose)
You are using pip version 8.1.2, however version 20.0.2 is available.
You should consider upgrading via the 'pip install --upgrade pip' command.
After trying multiple solutions on several forums and reinstalling everything from scratch finally I thought of upgrading pip.
Post upgrading pip to latest version I reinstalled docker-compose.
[root@dw-test-1 installer]# pip install docker-compose
DEPRECATION: Python 2.7 reached the end of its life on January 1st, 2020. Please upgrade your Python as Python 2.7 is no longer maintained. A future version of pip will drop support for Python 2.7. More details about Python 2 support in pip, can be found at https://pip.pypa.io/en/latest/development/release-process/#python-2-support
Requirement already satisfied: docker-compose in /usr/lib/python2.7/site-packages (1.25.5)
Requirement already satisfied: backports.shutil-get-terminal-size==1.0.0; python_version < "3.3" in /usr/lib/python2.7/site-packages (from docker-compose) (1.0.0)
Requirement already satisfied: six<2,>=1.3.0 in /usr/lib/python2.7/site-packages (from docker-compose) (1.9.0)
Requirement already satisfied: PyYAML<6,>=3.10 in /usr/lib64/python2.7/site-packages (from docker-compose) (3.10)
Requirement already satisfied: docker[ssh]<5,>=3.7.0 in /usr/lib/python2.7/site-packages (from docker-compose) (4.2.0)
Requirement already satisfied: dockerpty<1,>=0.4.1 in /usr/lib/python2.7/site-packages (from docker-compose) (0.4.1)
Requirement already satisfied: jsonschema<4,>=2.5.1 in /usr/lib/python2.7/site-packages (from docker-compose) (3.2.0)
Requirement already satisfied: requests<3,>=2.20.0 in /usr/lib/python2.7/site-packages (from docker-compose) (2.23.0)
Requirement already satisfied: enum34<2,>=1.0.4; python_version < "3.4" in /usr/lib/python2.7/site-packages (from docker-compose) (1.0.4)
Requirement already satisfied: websocket-client<1,>=0.32.0 in /usr/lib/python2.7/site-packages (from docker-compose) (0.57.0)
Requirement already satisfied: cached-property<2,>=1.2.0 in /usr/lib/python2.7/site-packages (from docker-compose) (1.5.1)
Requirement already satisfied: ipaddress<2,>=1.0.16; python_version < "3.3" in /usr/lib/python2.7/site-packages (from docker-compose) (1.0.16)
Requirement already satisfied: docopt<1,>=0.6.1 in /usr/lib/python2.7/site-packages (from docker-compose) (0.6.2)
Requirement already satisfied: subprocess32<4,>=3.5.4; python_version < "3.2" in /usr/lib64/python2.7/site-packages (from docker-compose) (3.5.4)
Requirement already satisfied: texttable<2,>=0.9.0 in /usr/lib/python2.7/site-packages (from docker-compose) (1.6.2)
Requirement already satisfied: backports.ssl-match-hostname<4,>=3.5; python_version < "3.5" in /usr/lib/python2.7/site-packages (from docker-compose) (3.5.0.1)
Requirement already satisfied: paramiko>=2.4.2; extra == "ssh" in /usr/lib/python2.7/site-packages (from docker[ssh]<5,>=3.7.0->docker-compose) (2.7.1)
Requirement already satisfied: setuptools in /usr/lib/python2.7/site-packages (from jsonschema<4,>=2.5.1->docker-compose) (0.9.8)
Requirement already satisfied: pyrsistent>=0.14.0 in /usr/lib64/python2.7/site-packages (from jsonschema<4,>=2.5.1->docker-compose) (0.16.0)
Requirement already satisfied: attrs>=17.4.0 in /usr/lib/python2.7/site-packages (from jsonschema<4,>=2.5.1->docker-compose) (19.3.0)
Requirement already satisfied: importlib-metadata; python_version < "3.8" in /usr/lib/python2.7/site-packages (from jsonschema<4,>=2.5.1->docker-compose) (1.6.0)
Requirement already satisfied: functools32; python_version < "3" in /usr/lib/python2.7/site-packages (from jsonschema<4,>=2.5.1->docker-compose) (3.2.3.post2)
Requirement already satisfied: idna<3,>=2.5 in /usr/lib/python2.7/site-packages (from requests<3,>=2.20.0->docker-compose) (2.9)
Requirement already satisfied: chardet<4,>=3.0.2 in /usr/lib/python2.7/site-packages (from requests<3,>=2.20.0->docker-compose) (3.0.4)
Requirement already satisfied: urllib3!=1.25.0,!=1.25.1,<1.26,>=1.21.1 in /usr/lib/python2.7/site-packages (from requests<3,>=2.20.0->docker-compose) (1.25.8)
Requirement already satisfied: certifi>=2017.4.17 in /usr/lib/python2.7/site-packages (from requests<3,>=2.20.0->docker-compose) (2020.4.5.1)
Requirement already satisfied: bcrypt>=3.1.3 in /usr/lib64/python2.7/site-packages (from paramiko>=2.4.2; extra == "ssh"->docker[ssh]<5,>=3.7.0->docker-compose) (3.1.7)
Requirement already satisfied: pynacl>=1.0.1 in /usr/lib64/python2.7/site-packages (from paramiko>=2.4.2; extra == "ssh"->docker[ssh]<5,>=3.7.0->docker-compose) (1.3.0)
Requirement already satisfied: cryptography>=2.5 in /usr/lib64/python2.7/site-packages (from paramiko>=2.4.2; extra == "ssh"->docker[ssh]<5,>=3.7.0->docker-compose) (2.9)
Requirement already satisfied: pathlib2; python_version < "3" in /usr/lib/python2.7/site-packages (from importlib-metadata; python_version < "3.8"->jsonschema<4,>=2.5.1->docker-compose) (2.3.5)
Requirement already satisfied: contextlib2; python_version < "3" in /usr/lib/python2.7/site-packages (from importlib-metadata; python_version < "3.8"->jsonschema<4,>=2.5.1->docker-compose) (0.6.0.post1)
Collecting zipp>=0.5
  Downloading zipp-1.2.0-py2.py3-none-any.whl (4.8 kB)
Collecting configparser>=3.5; python_version < "3"
  Downloading configparser-4.0.2-py2.py3-none-any.whl (22 kB)
Requirement already satisfied: cffi>=1.1 in /usr/lib64/python2.7/site-packages (from bcrypt>=3.1.3->paramiko>=2.4.2; extra == "ssh"->docker[ssh]<5,>=3.7.0->docker-compose) (1.14.0)
Requirement already satisfied: scandir; python_version < "3.5" in /usr/lib64/python2.7/site-packages (from pathlib2; python_version < "3"->importlib-metadata; python_version < "3.8"->jsonschema<4,>=2.5.1->docker-compose) (1.10.0)
Requirement already satisfied: pycparser in /usr/lib/python2.7/site-packages (from cffi>=1.1->bcrypt>=3.1.3->paramiko>=2.4.2; extra == "ssh"->docker[ssh]<5,>=3.7.0->docker-compose) (2.14)
Installing collected packages: zipp, configparser
Successfully installed configparser-4.0.2 zipp-1.2.0
This time zipp and configparser packages also got installed with docker-compose. This resolved my issue and I was able to go ahead with successful AWX installation.
In summary –
First upgrade pip to latest version
Then install docker-compose. Make sure zipp and configparser are getting installed with the same.
I recently came across a strange issue while installing Docker on CentOS (version 8) machine.
Issue –
When I tried below options to install docker on my machine I got the same error every time.
Installation Commands Used
yum install -y -q docker-ce
or
yum install -y docker-ce.x86_64
or
yum install docker-ce
Error message received
Error:
 Problem: package docker-ce-3:19.03.8-3.el7.x86_64 requires containerd.io >= 1.2.2-3, but none of the providers can be installed
  - cannot install the best candidate for the job
  - package containerd.io-1.2.10-3.2.el7.x86_64 is excluded
  - package containerd.io-1.2.13-3.1.el7.x86_64 is excluded
  - package containerd.io-1.2.2-3.3.el7.x86_64 is excluded
  - package containerd.io-1.2.2-3.el7.x86_64 is excluded
  - package containerd.io-1.2.4-3.1.el7.x86_64 is excluded
  - package containerd.io-1.2.5-3.1.el7.x86_64 is excluded
  - package containerd.io-1.2.6-3.3.el7.x86_64 is excluded
Resolution –
To resolve this issue, first we need to manually install the containerd.io package.
In this post, we will discuss automating Kubernetes deployment using Ansible.
In my example, I have used CentOS VMs (on VMware) for deploying Kubernetes. But technically Kubernetes deployment steps don’t differ irrespective of the platform you use.
Before getting started to make sure you have
Ansible server up and running on the network. Also, make sure Ansible can reach the VMware environment.
Make sure you’ve added Ansible server SSH authentication keys into VMware virtual machine before converting the same into the template. Follow this blog post for steps.
Once you have the pre-requisites in place follow the below steps.
Step 1 – Clone my GitHub repository which consists of required playbooks and instructions.
Step 2 – Edit k8s-deployment.yml file and edit below lines from VARS
common environment details
#ntp_server: - Replace with your NTP server IP/hostname
domain: "" - Replace with your DOMAIN NAME
dns_server: - Replace with your DNS server IP/hostname
vmware environment details
vcenter_ip: - Replace with your vCenter server IP/hostname
vcenter_username: - Replace with vCenter admin account username
vcenter_password: - Replace with vCenter admin account password
vmware_datacenter: - Replace with VMware datacenter you want to use
vmware_cluster: - Replace with VMware cluster you want to use
vm_network: "" - Replace with VM network you want kubernetes VMs to connect
k8s_vm_folder: - Replace with VM folder in which you want to place kubernetes VMs
k8s_template_name: - Replace with VMware CentOS template name
K8S environment details
k8s_master_ip: 192.168.172.100 - Replace IP address with kubernetes master server IP address you want to use
k8s_network_netmask: 255.255.255.0 - Replace subnet mask with netmask of kubernetes network
k8s_network_gateway: 192.168.172.1 - Replace gateway with kubernetes network gateway
k8s_node1_ip: 192.168.172.101 - Repalce IP address with kubernetes node IP address
#k8s_node2_ip: 192.168.1.102
#k8s_node3_ip: 192.168.1.103
#k8s_node4_ip: 192.168.1.104
#k8s_node5_ip: 192.168.1.105
#k8s_node6_ip: 192.168.1.106
#k8s_node7_ip: 192.168.1.107
#k8s_node8_ip: 192.168.1.108
Step 3 – Edit the /etc/ansible hosts file and insert the Kubernetes environment details. Make sure IP address details are inline with your Kubernetes environment
Containers are everywhere and they are here to stay. They are great level-playing ground to break the infrastructure dependency and allow developers to release their code to any environment.
Containers also help customers to operate at greater scales with ability to quickly scaling up and down, patching with disruptions, withstand infrastructure component failures, moving easily from on-premises to public clouds, etc.
As per the survey from sysdig lifespan of containers and container images is also very short.
At this stage of the popularity of containers there are two thought processes in the container fan club – Persistent or Non-Persistent Containers
If you explore docker hub top downloads you’ll notice that 7/10 top downloads require data persistence (snippet below)
Let’s understand persistent containers in more details.
Prior to Container Storage Integration CSI, Kubernetes provided in-tree (ie as part of the core code) plugins to support volumes but that posed a problem in that storage vendors had to align to the Kubernetes release process to fix a bug or to release new features among other problems. This also means every storage vendor had their own process to present volumes to Kubernetes.
This heterogeneous non-standard integrations were one of the biggest reasons why CSI was created. CSI was developed as a standard for exposing block and file storage storage systems to containerized workloads on Container Orchestration Systems (COs) like Kubernetes. With the adoption of the Container Storage Interface (CSI), the Kubernetes volume layer becomes truly extensible. Using CSI, third-party storage providers like DellEMC can write and deploy plugins exposing new storage systems in Kubernetes without ever having to touch the core Kubernetes code. This gives Kubernetes users more options for storage and makes the system more secure and reliable. Also this approach makes sure that every vendor has standard way of interacting with Kubernetes.
With CSI Kubernetes supports Persistent Volumes (PV). PVs life-cycle independent of any Kubernetes POD. Kubernetes supports 2 ways to provision PVs
Static – Admin Pre-provisions / creates a number of PVs
Static PV provisioning
Dynamic – Cluster “automatically” provisions a volume
Dynamic PV provisioning
No matter which is the method of PV provisioning it can support varying properties such as performance, QOS, backup policies, etc. These properties are defined by StorageClass
There are 3 access modes which are supported on PV. Storage volume cannot be mounted simultaneously in more than one access mode.
ReadWriteOnce (RWO) – Volume can be mounted as ready-write by a single node
ReadOnlyMany (ROX) – Volume can be mounted read-only by many nodes
ReadWriteMany (RWX) – Volume can be mounted as read-write by many nodes
Below is the summary of persistence
DellEMC CSI Support
DellEMC understands that that Enterprise applications require persistent storage. As of now (Nov 2019) DellEMC supports CSI plugins for below storage arrays
Part of my job is to talk about the latest geeky technologies and many times I also have to demonstrate the same – Kind of “Show me” discussions.
When I started working on getting my hands dirty on Kubernetes (aka K8S) I faced many issues to get started. Now I am at the level where deploying K8S isn’t a big deal at all. The reason I am writing this blog is that often more than not I always get into discussions where someone is just starting with the K8S journey and has the same queries and questions which I also had. Hopefully, this summary will help people to get started with K8S.
Before I get started it’s important to understand the K8S lingo 🙂 This will help understand the implementation steps. Also, note that the purpose of this page is not to re-iterate the K8S components and architecture. It’s purely intended to list the steps o have hassle-free K8S deployment
Make sure that the VMware template which will be used has Ansible master server SSH keys added before you convert the VM image to the template. I have already documented this process of enabling SSH-based authentication in this blog
Part 1 – Dependencies
Below are the list of dependencies which needs to be installed on all the K8S nodes (master and worker)
Disable SELinux
sudo setenforce 0
sudo sed -i 's/^SELINUX=enforcing$/SELINUX=permissive/' /etc/selinux/config
Turnoff swap (also remove swap entry from /etc/fstab)
At this moment your K8S master is installed and configured. Next step is to configure worker nodes and add them into the K8S cluster
Part 3 – Kubernetes Worker
Final part is to have worker nodes configured and add them in K8S cluster. This steps involves running commands on Master and Worker nodes.
Master node – For adding worker nodes into the K8S cluster we first need to get the join command from the master server. Run the below command on Master server
kubeadm token create --print-join-command
Note/copy the join command output. We need to run this join command on all worker nodes.
Finally run below command on the K8S Master. If everything was successful then you should see list of all the nodes (Master and Worker) of your K8S cluster.
kubectl get nodes
This concludes K8S installation and configuration 🙂