Tag: PowerMax

  • Using Ansible to run Terraform plans

    Yes, your eyes are not deceiving you 🙂 Usually, when the words Ansible and Terraform appear in the same sentence is for the opposite scenario. Many articles out there provide examples of using Terraform to deploy infrastructure followed by running Ansible to configure it using the local-exec provisioner. This is a good thing because, if you need some post-provisioning configuration, it is better to rely on another declarative and idempotent tool like Ansible, rather than invoking shell scripts.

    But in this post we are not going to do any of that. What we are going to do is the other way around. We are going to have an Ansible playbook that runs your Terraform plan.

    This article is a follow up from a series of posts to introduce infrastructure admins and engineers to Terraform and to explain how to use it to manage on-prem physical infrastructure in a datacenter. You can find access the full series here.

    Reasons to do it

    But why? Well, if you have an physical infrastructure background and are running a traditional datacenter more than likely you have been playing with Ansible. Chances are you started with Ansible running in the command line and hard-coding your infrastructure’s credentials inside the playbook. Then you evolved into using an external credentials file and encrypting it using “ansible-vault”. Eventually you might have deployed Ansible AWX or even RedHat AAP. At this point, you are enjoying RBAC (who can run what playbook and on what infrastructure) and amazing (there is no other way to put it) credential management.

    Then, you talk to your developers over coffee and they tell you about Terraform. But when you get familiar with it, you discover that unless you pay for a SaaS offering you are stuck in the “command-line with hard-coded credentials” scenario. Wouldn’t it be great if you could use AWX to run Terraform? You could enjoy RBAC and credential management and all the other goodness that it provides. This is possible thanks to Ansible’s Terraform module.

    First steps

    Let’s say we have a very basic Terraform project to create a storage group in Dell PowerMax. The “main.tf” shown below starts the PowerMax provider and then creates a storage group “terraform_sg”. I don’t think it is strictly necessary, but if you are interested in learning more about provisioning storage in Dell PowerMax you can check out this previous post. For simplicity we haven’t created or referenced any variables. All the information is contained into a single file, the “main.tf” shown below.

    terraform {
      required_providers {
        powermax = {
          source = "dell/powermax"
        }
      }
    }
    
    provider "powermax" {
      username      = "smc"
      password      = "TFp2ssw0rd"
      endpoint      = "https://10.1.2.3:8443"
      serial_number = "000123456789"
      pmax_version  = 100
      insecure      = true
    }
    
    resource "powermax_storagegroup" "tf_sg" {
      name          = "terraform_sg"
      srp_id         = "SRP_1"
    }

    In the same machine we have both Terraform and Ansible installed. In order to run the above Terraform plan with Ansible, we need at a minimum a playbook that looks like follows. It needs to include two mandatory parameters: “project_path” and “state”. The first parameter specifies the directory that contains the plan, ie the “main.tf” and typically any other files like “variables.tf”. My Ansible playbook is called “runtf.yml”.

    ---
    - hosts: localhost
      gather_facts: no
    
      vars:
        project_dir: "/root/powermax" # folder that contains main.tf, ...
    
      tasks:
        - name: Run terraform
          community.general.terraform:
            project_path: '{{ project_dir }}'
            state: present
          register: output
    
        - debug:
            var: output

    As you can see I have registered the output of the terraform task and then created a second task to print it out on the terminal so that we can get more details. All is left now is to run it using the “ansible-playbook” command

    root@alb-terraform:~# ansible-playbook runtf.yml
    
    PLAY [localhost] ***************************************************************************************
    
    TASK [Run terraform] ***************************************************************************************
    changed: [localhost]
    
    TASK [debug] ***************************************************************************************
    ok: [localhost] => {
        "output": {
            "changed": true,
            "command": "/usr/bin/terraform apply -no-color -input=false -auto-approve -lock=true /tmp/tmpjaojemdl.tfplan",
            "failed": false,
            "outputs": {},
            "state": "present",
            "stderr": "",
            "stderr_lines": [],
            "stdout": "powermax_storagegroup.tf_sg: Creating...\npowermax_storagegroup.tf_sg: Creation complete after 0s [id=terraform_sg]\n\nApply complete! Resources: 1 added, 0 changed, 0 destroyed.\n",
            "stdout_lines": [
                "powermax_storagegroup.tf_sg: Creating...",
                "powermax_storagegroup.tf_sg: Creation complete after 0s [id=terraform_sg]",
                "",
                "Apply complete! Resources: 1 added, 0 changed, 0 destroyed."
            ],
            "workspace": "default"
        }
    }
    
    PLAY RECAP ***************************************************************************************
    localhost  : ok=2    changed=1    unreachable=0    failed=0    skipped=0    ignored=0

    Ansible run Terraform, and Terraform managed to make the changes so as expected, Ansible reports the task as “changed”. In the “debug” task, notice the “command” parameter. This is how Ansible is invoking Terraform. This invocation includes the “-auto-approve” flag so that Terraform doesn’t look for confirmation. The “stdout” and stdout_lines” parameters show the output that has been captured from Terraform about the creation of the different resources .

    A very important feature of both Ansible and Terraform is idempotency, ie the ability to run the same code repeatedly without making any damage. Let’s run it again and observe what happens.

    root@alb-terraform:~# ansible-playbook runtf.yml
    
    PLAY [localhost] ***************************************************************************************
    
    TASK [Run terraform] ***************************************************************************************
    ok: [localhost]
    
    TASK [debug] ***************************************************************************************
    ok: [localhost] => {
        "output": {
            "changed": false,
            "command": "/usr/bin/terraform apply -no-color -input=false -auto-approve -lock=true /tmp/tmp718kkwbo.tfplan",
            "failed": false,
            "outputs": {},
            "state": "present",
            "stderr": "",
            "stderr_lines": [],
            "stdout": "powermax_storagegroup.tf_sg: Refreshing state... [id=terraform_sg]\n\nNo changes. Your infrastructure matches the configuration.\n\nTerraform has compared your real infrastructure against your configuration\nand found no differences, so no changes are needed.\n",
            "stdout_lines": [
                "powermax_storagegroup.tf_sg: Refreshing state... [id=terraform_sg]",
                "",
                "No changes. Your infrastructure matches the configuration.",
                "",
                "Terraform has compared your real infrastructure against your configuration",
                "and found no differences, so no changes are needed."
            ],
            "workspace": "default"
        }
    }
    
    PLAY RECAP ***************************************************************************************
    localhost : ok=2    changed=0    unreachable=0    failed=0    skipped=0     ignored=0
    

    As expected, Ansible is reporting “ok”, which means the current state matched the desired state and therefore no changes were made. It has also captured the relevant from Terraform stating the same thing.

    Using variables

    This is a good start but ideally we would like to have the ability to make the plan more flexible by using variables for information such as the storage group name in this case. We can modify the “main.tf” as follows. Notice how the “default” value of the variable is commented out. It doesn’t matter if it is commented or not because when we invoke Terraform with external variables we overwrite the default value defined in the variable blocks.

    terraform {
      required_providers {
        powermax = {
          source = "dell/powermax"
        }
      }
    }
    
    provider "powermax" {
      username      = "smc"
      password      = var.password
      endpoint      = "https://10.1.2.3:8443"
      serial_number = "000123456789"
      pmax_version  = 100
      insecure      = true
    }
    
    variable "sg_name" {
     description = "Name of volume to create"
     type        = string
     #default     = "terraform_sg"
    }
    
    variable "password" {
      type        = string
      description = "Stores the password of Unisphere."
      #default = ""
    }
    
    resource "powermax_storagegroup" "tf_sg" {
      name          = var.sg_name
      srp_id         = "SRP_1"
    }

    Additionally, notice how in the “provider” block we have also referenced another variable for the “password”. For security reasons we might want to have, sensitive information like that, stored in a separate file and protect it. In this case we haven’t even declared a default value because we can leverage ansible-vault or AWX to encrypt it and to pass it to Terraform at run time.

    Now, the corresponding Ansible playbook needs to use the “variables” parameter. This parameter essentially converts each of the variables into a “-var” flag when invoking Terraform.

    ---
    - hosts: localhost
      gather_facts: no
    
      vars:
        project_dir: "/root/powerstore" # folder that contains main.tf, ...
    
      tasks:
        - name: Run terraform
          community.general.terraform:
            project_path: '{{ project_dir }}'
            state: present
            variables:
              sg_name: "{{ vol_name }}"
              password: "{{ password }}"
          register: output
    
        - debug:
            var: output

    Now, at runtime we are going to select a different storage group name. The storage group is created as expected and the relevant Terraform output is captured.

    root:~# ansible-playbook runtf.yml --extra-vars "sg_name=tf-sg2 password=TFp2ssw0rd"
    
    PLAY [localhost] ***************************************************************************************
    
    TASK [Run terraform] ***************************************************************************************
    changed: [localhost]
    
    TASK [debug] ***************************************************************************************
    ok: [localhost] => {
        "output": {
            "changed": true,
            "command": "/usr/bin/terraform apply -no-color -input=false -auto-approve -lock=true /tmp/tmpimdwzdu1.tfplan",
            "failed": false,
            "outputs": {},
            "state": "present",
            "stderr": "",
            "stderr_lines": [],
            "stdout": "powermax_storagegroup.tf_sg: Creating...\npowermax_storagegroup.tf_sg: Creation complete after 5s [id=vol1]\n\nApply complete! Resources: 1 added, 0 changed, 0 destroyed.\n",
            "stdout_lines": [
                "powermax_storagegroup.tf_sg: Creating...",
                "powermax_storagegroup.tf_sg: Creation complete after 5s [id=vol1]",
                "",
                "Apply complete! Resources: 1 added, 0 changed, 0 destroyed."
            ],
            "workspace": "default"
        }
    }
    
    PLAY RECAP ***************************************************************************************
    localhost  : ok=2    changed=1    unreachable=0    failed=0    skipped=0    ignored=0

    Terraform plan

    We went straight to “terraform apply” but most Terraform workflows also include running the plan command first. This is done with Ansible by running the playbook in “check mode”. Check mode invokes “terraform plan” for us.

    root:~# ansible-playbook runtf.yml --check --extra-vars "sg_name=tf-sg3 password=TFpass"
    
    PLAY [localhost] ***************************************************************************************
    
    TASK [Run terraform] ***************************************************************************************
    ok: [localhost]
    
    TASK [debug] ***************************************************************************************
    ok: [localhost] => {
        "output": {
            "changed": false,
            "command": "/usr/bin/terraform apply -no-color -input=false -auto-approve -lock=true /tmp/tmp6f2o83k5.tfplan",
            "failed": false,
            "outputs": {},
            "state": "present",
            "stderr": "",
            "stderr_lines": [],
            "stdout": "powermax_storagegroup.tf_sg: Refreshing state... [id=tf-sg2]\n\nTerraform used the selected providers to generate the following execution\nplan. Resource actions are indicated with the following symbols:\n  ~ update in-place\n\nTerraform will perform the following actions:\n\n  # powermax_storagegroup.tf_sg will be updated in-place\n  ~ resource \"powermax_storagegroup\" \"tf_sg\" {\n      ~ cap_gb                   = 0 -> (known after apply)\n      + child_storage_group      = (known after apply)\n      ~ compression              = true -> (known after apply)\n      + compression_ratio        = (known after apply)\n      ~ compression_ratio_to_one = 0 -> (known after apply)\n      + device_emulation         = (known after apply)\n      ~ id                       = \"tf-sg2\" -> (known after apply)\n      + maskingview              = (known after apply)\n      ~ name                     = \"tf-sg2\" -> \"tf-sg3\"\n      ~ num_of_child_sgs         = 0 -> (known after apply)\n      ~ num_of_masking_views     = 0 -> (known after apply)\n      ~ num_of_parent_sgs        = 0 -> (known after apply)\n      + num_of_snapshot_policies = (known after apply)\n      ~ num_of_snapshots         = 0 -> (known after apply)\n      ~ num_of_vols              = 0 -> (known after apply)\n      + parent_storage_group     = (known after apply)\n      + service_level            = (known after apply)\n      ~ slo                      = \"NONE\" -> (known after apply)\n      ~ slo_compliance           = \"NONE\" -> (known after apply)\n      + snapshot_policies        = (known after apply)\n      + tags                     = (known after apply)\n      ~ type                     = \"Standalone\" -> (known after apply)\n      ~ unprotected              = true -> (known after apply)\n      ~ unreducible_data_gb      = 0 -> (known after apply)\n      + uuid                     = (known after apply)\n      ~ volume_ids               = [] -> (known after apply)\n      + vp_saved_percent         = (known after apply)\n      + workload                 = (known after apply)\n        # (2 unchanged attributes hidden)\n    }\n\nPlan: 0 to add, 1 to change, 0 to destroy.\n\n─────────────────────────────────────────────────────────────────────────────\n\nSaved the plan to: /tmp/tmp6f2o83k5.tfplan\n\nTo perform exactly these actions, run the following command to apply:\n    terraform apply \"/tmp/tmp6f2o83k5.tfplan\"\n",
            "stdout_lines": [
                "powermax_storagegroup.tf_sg: Refreshing state... [id=tf-sg2]",
                "",
                "Terraform used the selected providers to generate the following execution",
                "plan. Resource actions are indicated with the following symbols:",
                "  ~ update in-place",
                "",
                "Terraform will perform the following actions:",
                "",
                "  # powermax_storagegroup.tf_sg will be updated in-place",
                "  ~ resource \"powermax_storagegroup\" \"tf_sg\" {",
                "      ~ cap_gb                   = 0 -> (known after apply)",
                "      + child_storage_group      = (known after apply)",
                "      ~ compression              = true -> (known after apply)",
                "      + compression_ratio        = (known after apply)",
                "      ~ compression_ratio_to_one = 0 -> (known after apply)",
                "      + device_emulation         = (known after apply)",
                "      ~ id                       = \"tf-sg2\" -> (known after apply)",
                "      + maskingview              = (known after apply)",
                "      ~ name                     = \"tf-sg2\" -> \"tf-sg3\"",
                "      ~ num_of_child_sgs         = 0 -> (known after apply)",
                "      ~ num_of_masking_views     = 0 -> (known after apply)",
                "      ~ num_of_parent_sgs        = 0 -> (known after apply)",
                "      + num_of_snapshot_policies = (known after apply)",
                "      ~ num_of_snapshots         = 0 -> (known after apply)",
                "      ~ num_of_vols              = 0 -> (known after apply)",
                "      + parent_storage_group     = (known after apply)",
                "      + service_level            = (known after apply)",
                "      ~ slo                      = \"NONE\" -> (known after apply)",
                "      ~ slo_compliance           = \"NONE\" -> (known after apply)",
                "      + snapshot_policies        = (known after apply)",
                "      + tags                     = (known after apply)",
                "      ~ type                     = \"Standalone\" -> (known after apply)",
                "      ~ unprotected              = true -> (known after apply)",
                "      ~ unreducible_data_gb      = 0 -> (known after apply)",
                "      + uuid                     = (known after apply)",
                "      ~ volume_ids               = [] -> (known after apply)",
                "      + vp_saved_percent         = (known after apply)",
                "      + workload                 = (known after apply)",
                "        # (2 unchanged attributes hidden)",
                "    }",
                "",
                "Plan: 0 to add, 1 to change, 0 to destroy.",
                "",
                "─────────────────────────────────────────────────────────────────────────────",
                "",
                "Saved the plan to: /tmp/tmp6f2o83k5.tfplan",
                "",
                "To perform exactly these actions, run the following command to apply:",
                "    terraform apply \"/tmp/tmp6f2o83k5.tfplan\""
            ],
            "workspace": "default"
        }
    }
    
    PLAY RECAP ***************************************************************************************
    localhost   : ok=2    changed=0    unreachable=0    failed=0    skipped=0    ignored=0

    No changes are made and the Ansible module has captured the details of the changes that will be made if the plan is applied.

    Terraform destroy

    Finally we need to learn how to use “terraform destroy”. You might have guessed it by now. The native way of destroying something in Ansible is by setting the state to “absent”.

    ---
    - hosts: localhost
      gather_facts: no
    
      vars:
        project_dir: "/root/powermax" # dir that contains main.tf, ...
    
      tasks:
        - name: Run terraform
          community.general.terraform:
            project_path: '{{ project_dir }}'
            state: absent
            variables:
              sg_name: "{{ sg_name }}"
              password: "{{ password }}"
          register: output
    
        - debug:
            var: output

    Let’s run it and see what it does.

    root:~# ansible-playbook runtf.yml --extra-vars "sg_name=tf-sg2 password=TFp2ssw0rd"
    
    PLAY [localhost] ***************************************************************************************
    
    TASK [Run terraform] ***************************************************************************************
    changed: [localhost]
    
    TASK [debug] ***************************************************************************************
    ok: [localhost] => {
        "output": {
            "changed": true,
            "command": "/usr/bin/terraform destroy -no-color -auto-approve -lock=true -var sg_name=tf-sg2 -var password=smc",
            "failed": false,
            "outputs": {},
            "state": "absent",
            "stderr": "",
            "stderr_lines": [],
            "stdout": "powermax_storagegroup.tf_sg: Refreshing state... [id=tf-sg2]\n\nTerraform used the selected providers to generate the following execution\nplan. Resource actions are indicated with the following symbols:\n  - destroy\n\nTerraform will perform the following actions:\n\n  # powermax_storagegroup.tf_sg will be destroyed\n  - resource \"powermax_storagegroup\" \"tf_sg\" {\n      - cap_gb                   = 0 -> null\n      - compression              = true -> null\n      - compression_ratio_to_one = 0 -> null\n      - host_io_limit            = {} -> null\n      - id                       = \"tf-sg2\" -> null\n      - name                     = \"tf-sg2\" -> null\n      - num_of_child_sgs         = 0 -> null\n      - num_of_masking_views     = 0 -> null\n      - num_of_parent_sgs        = 0 -> null\n      - num_of_snapshots         = 0 -> null\n      - num_of_vols              = 0 -> null\n      - slo                      = \"NONE\" -> null\n      - slo_compliance           = \"NONE\" -> null\n      - srp_id                   = \"SRP_1\" -> null\n      - type                     = \"Standalone\" -> null\n      - unprotected              = true -> null\n      - unreducible_data_gb      = 0 -> null\n      - volume_ids               = [] -> null\n    }\n\nPlan: 0 to add, 0 to change, 1 to destroy.\npowermax_storagegroup.tf_sg: Destroying... [id=tf-sg2]\npowermax_storagegroup.tf_sg: Destruction complete after 0s\n\nDestroy complete! Resources: 1 destroyed.\n",
            "stdout_lines": [
                "powermax_storagegroup.tf_sg: Refreshing state... [id=tf-sg2]",
                "",
                "Terraform used the selected providers to generate the following execution",
                "plan. Resource actions are indicated with the following symbols:",
                "  - destroy",
                "",
                "Terraform will perform the following actions:",
                "",
                "  # powermax_storagegroup.tf_sg will be destroyed",
                "  - resource \"powermax_storagegroup\" \"tf_sg\" {",
                "      - cap_gb                   = 0 -> null",
                "      - compression              = true -> null",
                "      - compression_ratio_to_one = 0 -> null",
                "      - host_io_limit            = {} -> null",
                "      - id                       = \"tf-sg2\" -> null",
                "      - name                     = \"tf-sg2\" -> null",
                "      - num_of_child_sgs         = 0 -> null",
                "      - num_of_masking_views     = 0 -> null",
                "      - num_of_parent_sgs        = 0 -> null",
                "      - num_of_snapshots         = 0 -> null",
                "      - num_of_vols              = 0 -> null",
                "      - slo                      = \"NONE\" -> null",
                "      - slo_compliance           = \"NONE\" -> null",
                "      - srp_id                   = \"SRP_1\" -> null",
                "      - type                     = \"Standalone\" -> null",
                "      - unprotected              = true -> null",
                "      - unreducible_data_gb      = 0 -> null",
                "      - volume_ids               = [] -> null",
                "    }",
                "",
                "Plan: 0 to add, 0 to change, 1 to destroy.",
                "powermax_storagegroup.tf_sg: Destroying... [id=tf-sg2]",
                "powermax_storagegroup.tf_sg: Destruction complete after 0s",
                "",
                "Destroy complete! Resources: 1 destroyed."
            ],
            "workspace": "default"
        }
    }
    
    PLAY RECAP ***************************************************************************************
    localhost  : ok=2    changed=1    unreachable=0    failed=0    skipped=0     ignored=0

    The storage group resource has been destroyed and that shows in Ansible as a task with a status of “changed”. The “stdout” and “stdout_lines” parameters provide a record of what was destroyed.

    In summary, in this article we have seen how to use the terraform Ansible module to plan, apply and destroy Terraform projects. In doing that, organizations can leverage a tool like AWX or RedHat AAP to provide RBAC, strong credential management and a powerful upstream REST API and integrate with other tools like ITSM etc. AWX and AAP can also became a polyglot automation platform capable of running the two most popular automation tools out there to satisfy both traditional infrastructure teams and developers.
  • Ansible with DellEMC Storage: Part 7 – Install PowerStore Collection on AWX/Tower

    Ansible with DellEMC Storage: Part 7 – Install PowerStore Collection on AWX/Tower

    This blog is the continuation of Ansible with DellEMC storage multi-part blog.

    In the last (6th Part) of this blog series, we discussed how to prepare Ansible Tower/AWX with Dell EMC storage credentials.

    In this blog post, we will install Dell EMC PowerStore collection on Ansible AWX and go through the next steps.

    As we all know that Ansible has moved to Collections – a new ways of managing integrations and content management. Dell EMC has already started working towards this and have released several collections for multiple Dell EMC portfolio products, few of which are listed below.

    Apart from this list you can find other Dell portfolio collections (like OpenManage) on this link

    For the scope of this blog post we will focus on installing Dell EMC PowerStore Ansible collection on Ansible AWX. Technically, all the collections can be installed using similar steps.

    As a Pre-Requisite, this blog post assumes that you have –

    • Ansible AWX installed and running
    • Access to operating system / machine having Ansible AWX installed
    • Access to PowerStore storage system (with credentials)

    Additionally, if you’re getting started with Ansible AWX and/or integration with Dell EMC’s storage products then you can follow this blog series to get started from scratch.

    As part of the installation collection installation steps we need to Ansible AWX machine and then connect to the awx_task docker container.

    Login to the AWX machine. You can list the running AWX containers using below command

    [root@awx ~]# docker container list
    CONTAINER ID        IMAGE                     COMMAND                  CREATED             STATUS              PORTS                  NAMES
    6ced2eccbd7b        ansible/awx_task:11.2.0   "tini -- /bin/sh -c …"   13 months ago       Up 6 days           8052/tcp               awx_task
    42b14fbd15ad        ansible/awx_web:11.2.0    "tini -- /bin/sh -c …"   13 months ago       Up 6 days           0.0.0.0:80->8052/tcp   awx_web
    4c08c0e39128        memcached:alpine          "docker-entrypoint.s…"   13 months ago       Up 6 days           11211/tcp              awx_memcached
    42224676c21a        redis                     "docker-entrypoint.s…"   13 months ago       Up 6 days           6379/tcp               awx_redis
    37d0ca0c67bc        postgres:10               "docker-entrypoint.s…"   13 months ago       Up 6 days           5432/tcp               awx_postgres
    

    Then connect to the awx_task container using below command

    # docker exec -it awx_task bash

    Next, install the PowerStore Ansible Modules collection in awx_task container

    # ansible-galaxy collection install dellemc.powerstore
    Process install dependency map
    Starting collection install process
    Installing 'dellemc.powerstore:1.2.1' to '/home/awx/.ansible/collections/ansible_collections/dellemc/powerstore'
    

    Then logout from the container.

    bash-4.4# exit

    Now you have successfully installed the Dell EMC PowerStore Ansible Modules collection. Next step post installing collection are

    • Create the PowerStore credentials on the Ansible AWX
    • Create PowerStore Project – assuming you’ve PowerStore playbooks on content repo (like Git)
    • Configure Ansible AWX Job template / Workflow template for storage task automation

    All Dell EMC’s published collections comes with sample playbooks to test the functionality and also to get you started with integrations. When it comes to PowerStore you can see them under /home/awx/ansible-powerstore/dellemc_ansible/powerstore/samples directory

    # cd /home/awx/ansible-powerstore/dellemc_ansible/powerstore/samples
    # ls -l
    -rw-r--r-- 1 root root 1892 Jun  4  2020 capacity_volumes.yml
    -rw-r--r-- 1 root root 1042 Jun  4  2020 create_multiple_volumes_async.yml
    -rw-r--r-- 1 root root  799 Jun  4  2020 create_multiple_volumes.yml
    -rw-r--r-- 1 root root  790 Jun  4  2020 delete_multiple_volumes.yml
    -rw-r--r-- 1 root root 1710 Jun  4  2020 find_empty_volume_groups.yml
    -rw-r--r-- 1 root root 1141 Jun  4  2020 search_volumes.yml
    

    You can re-use these sample playbooks to quickly get started with storage automation tasks. Sample playbooks in the collection has multiple variables like –

    • array_ip
    • user
    • password
    • verifycert

    You can capture the storage credentials by creating Dell EMC storage credential type (screenshot below)

    Ansible AWX – Dell EMC Storage Credential Type

    Once Dell Storage credential type is created then you can add PowerStore array details and credentials using AWX credential manager.

    Ansible AWX – Dell EMC Storage Credential

    After adding PowerStore credential you can use the same in the AWX automation job template creation. Additional variables (like volume names, size, host etc.) can be captured using extra_vars

    Ansible AWX – Job Template Creation

    Additionally you can create survey to capture the required variables and also workflow visualizer to create multi-step breakdown of the automation tasks including but not limited storage automation. Below is the example of breaking down the storage provisioning workflow in the logical steps (like approval, quota management, provisioning, etc.)

    Ansible AWX – Workflow Visualizer

    Hope this helps everyone.

    Update: Please note that the latest version of AWX has moved to Kubernetes (instead of Docker). Please use the below steps to install the PowerStore modules.

    [root@awx ~]# kubectl -n awx exec -it awx-844c574f84-bc4ww -c awx-ee -- /bin/bash
    bash-4.4$ ansible-galaxy collection install dellemc.powerstore -c
    Starting galaxy collection install process
    Process install dependency map
    Starting collection install process
    Downloading https://galaxy.ansible.com/download/dellemc-powerstore-1.6.0.tar.gz to /home/runner/.ansible/tmp/ansible-local-3648wbuk4c_/tmprzm8bse6/dellemc-powerstore-1.6.0-ltamh_71
    Installing 'dellemc.powerstore:1.6.0' to '/home/runner/.ansible/collections/ansible_collections/dellemc/powerstore'
    dellemc.powerstore:1.6.0 was installed successfully
    bash-4.4$
  • Ansible with DellEMC Storage: Part 6 – Prepare Ansible Tower / AWX with Storage Credential

    Ansible with DellEMC Storage: Part 6 – Prepare Ansible Tower / AWX with Storage Credential

    This blog is the continuation of Ansible with DellEMC storage multi-part blog.

    In the last (5th part) of this blog series, we discussed how to install Ansible AWX / Tower in a docker container and Dell EMC Ansible modules inside the Ansible AWX / Tower container.

    In this blog post, we will create a new credential type for Dell EMC storage systems and then add storage credentials in Ansible AWX / Tower.

    So first let’s get started with creating a Credential type for Dell EMC storage array. Login to your Ansible AWX / Tower console. In the navigation pane (on left) click on “Credential Types”. Then click on the green “+” icon on the right to add a new credential type.

    Ansible AWX / Tower – Create New Credential 1

    In the “New Credential Type” creation page enter below details and then click on Save

    • Name – Dell EMC Storage (User Friendly Name)
    • Description – Optional Description
    • Input Configuration – Copy and Paste below text
    fields:
      - id: target
        type: string
        label: Array IP address
      - id: username
        type: string
        label: Array username
      - id: password
        type: string
        label: Array password
        secret: true
    required:
      - target
      - username
      - password
    • Injector Configuration – Copy and Paste below text
    extra_vars:
      password: '{{ password }}'
      target: '{{ target }}'
      username: '{{ username }}'
    
    Ansible AWX / Tower – Create New Credential 2

    Once Credential type is created, click on the “Credentials” in AWX / Tower navigation pane. Then click green “+” button on right to create new Credential.

    Ansible AWX / Tower – Create New Credential 3

    In the “New Credentials” page enter below details.

    • Name – User Friendly Name to identify the storage array. In this example “Production PowerMax”
    • Description – Optional description
    • Organization – You can choose appropriate Organization as per your configuration. Note that Organization can help you to mask these credentials to few users. I have selected Default in my example
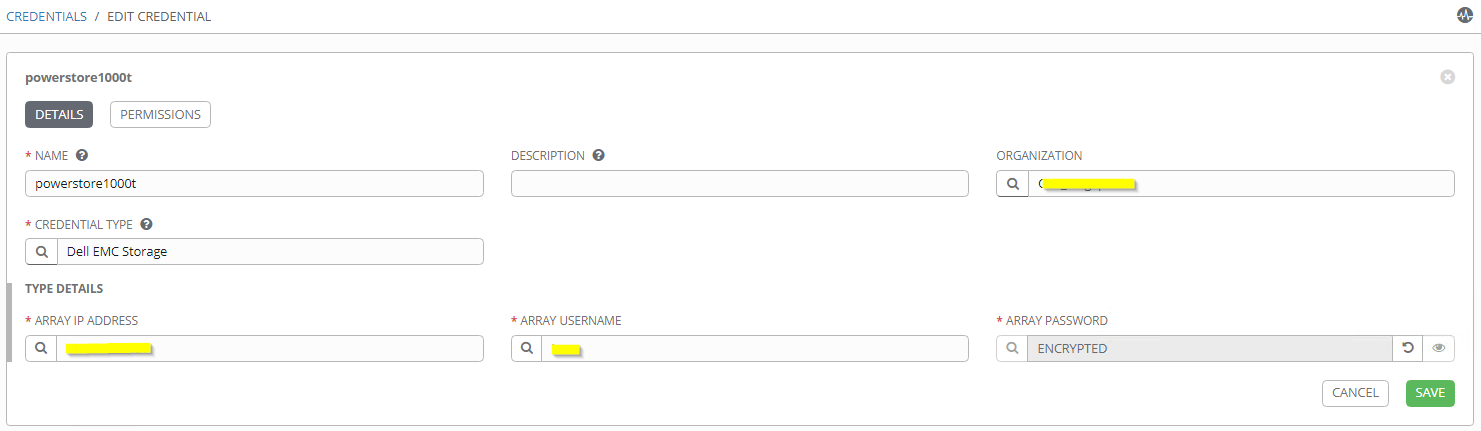
    • Credential Type – Choose “Dell EMC Storage”. This is the credential type we have created in earlier step. Credential type which we create earlier will be available on last few pages of the pop-up list. Alternatively you can search the same with “Dell EMC Storage”
    • Type Details
      • Array IP Address – Enter the management IP address of storage array
      • Array Username – Username (I suggest creating separate user for automation)
      • Array Password – Password for the entered username
    Ansible AWX / Tower – Create New Credential 4

    As per your environment you can create multiple credentials, each for one array.

    Ansible AWX / Tower – Create New Credential 5

    Once credentials are created you can now go ahead and create new Ansible AWX / Tower Templates using storage credentials we just created. In the playbook you can mention storage array credentials as variables (username and password). Using these variables you don’t have to mention array credentials as plain text in the playbooks.

    Additionally, you can add other infrastructure / application credentials using the same process.

    I hope this helps everyone. In next post I will take you through creating new Project and Template.

  • Ansible with DellEMC Storage: Part 5 – Get Started with Ansible Tower (Using AWX)

    Ansible with DellEMC Storage: Part 5 – Get Started with Ansible Tower (Using AWX)

    This blog is the continuation of Ansible with DellEMC storage multi-part blog

    In this 5th part, we will discuss about Ansible Tower (using AWX) and how to install and configure the same.

    Overview

    In my posts till now you might noticed that I have only used command line option to run any Ansible commands. There’s a reason for that. By default, when you install Ansible it only installs Ansible Engine, which only has Ansible CLI option. This is where Ansible Tower comes in picture. Note that AWX is the open source project for Ansible Tower.

    While Ansible Tower has many features, below are few features which are my personal favorites. Since data storage management operations can be data destructive, below features are the reasons I am highly recommending using Tower / AWX for automating storage tasks.

    • Web Interface – To manage Ansible using Web interface
    • REST API Support – To manage and integrate Ansible Tower in other platforms. For example – integrating Ansible Tower with Jenkins
    • Task Engine – To create scheduled job and centralized operations.
    • Role Based Access Control – To control Enterprise level access across different team member and limit their visibility to information. This will make sure only designated users are having access to critical data/tasks.

    Installing Ansible Tower (using AWX)

    Make sure that you’ve supported operating systems installed and running. In my case I am using CentOS V7 virtual machine

    Prerequisites –

    Make sure below packages are installed on your machine

    • Make sure you have set the selinux to permissive
      • sudo setenforce permissive
    • Ansible – min version 2.8+
      • yum install -y ansible
    • Docker – Recent version
      • yum install -y docker
    • Docker Python Module
      • Follow below steps for installing docker-compose
    [root@dw-test-1 installer]# sudo curl -L "https://github.com/docker/compose/releases/download/1.25.4/docker-compose-$(uname -s)-$(uname -m)" -o /usr/local/bin/docker-compose
    
    [root@dw-test-1 installer]# sudo chmod +x /usr/local/bin/docker-compose
    
    [root@dw-test-1 installer]# sudo ln -s /usr/local/bin/docker-compose /usr/bin/docker-compose
    
    [root@dw-test-1 installer]# docker-compose --version
    

    Once all the prerequisites are in place run below tasks

    • Clone the Git AWX repository using below command
    [root@dw-test-1 installer]# git clone https://github.com/ansible/awx.git

    This will create awx directory. cd into the awx/installer directory.

    [root@dw-test-1 installer]# cd awx/installer

    This folder has inventory file which has all the AWX parameters. Most important details in this file are passwords which are needed for logging into the AWX post installation. Note that AWX supports installation on Kubernetes and Openshift as well. In this example we will be using docker-compose.

    Most important parameters in inventory file are as mentioned below. In my case I created the vars.yml file with below inputs and used the same while running the installation.

    [root@dw-test-1 installer]# cat vars.yml
    admin_password: 'admin'
    pg_password: 'admin'
    secret_key: 'mysecret'

    Once you’ve checked and verified all the parameters in the inventory file, go ahead and run below command.

    [root@dw-test-1 installer]# ansible-playbook -i inventory install.yml -e @vars.yml

    Note – I faced couple of errors which running this playbook. I suggest taking a look at this link if you face the same.

    Once playbook execution is completed you can run below command to validate the installation.

    [root@dw-test-1 installer]# docker ps
    CONTAINER ID        IMAGE                     COMMAND                  CREATED             STATUS              PORTS                  NAMES
    23b236356057        ansible/awx_task:10.0.0   "/tini -- /bin/sh ..."   6 minutes ago       Up 2 minutes        8052/tcp               awx_task
    a23edc05283e        ansible/awx_web:10.0.0    "/tini -- /bin/sh ..."   6 minutes ago       Up 2 minutes        0.0.0.0:80->8052/tcp   awx_web
    385de9d395da        postgres:10               "docker-entrypoint..."   6 minutes ago       Up 2 minutes        5432/tcp               awx_postgres
    125b9e551823        redis                     "docker-entrypoint..."   2 hours ago         Up 2 minutes        6379/tcp               awx_redis
    2a8ad285e2d5        memcached:alpine          "docker-entrypoint..."   2 hours ago         Up 2 minutes        11211/tcp              awx_memcached
    

    At this point AWX is installed. It takes some time for container to start and configure the AWX. Run the below command and wait till the time you see similar output

    [root@dw-test-1 installer]# docker logs -f awx_task
    ...
    2020-04-12 12:23:18,458 DEBUG    awx.main.dispatch task 7b92a5a8-efa9-4b5e-8dc7-d4ca1d974508 starting awx.main.scheduler.tasks.run_task_manager(*[])
    2020-04-12 12:23:18,466 DEBUG    awx.main.scheduler Running Tower task manager.
    2020-04-12 12:23:18,472 DEBUG    awx.main.scheduler Starting Scheduler
    2020-04-12 12:23:28,468 DEBUG    awx.main.dispatch task ba9a6c3e-24b3-49e4-8cf1-62f90f315780 starting awx.main.tasks.awx_periodic_scheduler(*[])
    2020-04-12 12:23:28,478 DEBUG    awx.main.tasks Starting periodic scheduler
    2020-04-12 12:23:28,480 DEBUG    awx.main.tasks Last scheduler run was: 2020-04-12 12:22:58.567745+00:00
    2020-04-12 12:23:38,483 DEBUG    awx.main.dispatch task 7f4ac140-7231-4c6e-901f-34be80529707 starting awx.main.scheduler.tasks.run_task_manager(*[])
    2020-04-12 12:23:38,493 DEBUG    awx.main.scheduler Running Tower task manager.
    2020-04-12 12:23:38,502 DEBUG    awx.main.scheduler Starting Scheduler
    2020-04-12 12:23:58,522 DEBUG    awx.main.dispatch task 7ed5d956-ba67-4219-9509-1405713fa155 starting awx.main.tasks.cluster_node_heartbeat(*[])
    2020-04-12 12:23:58,632 DEBUG    awx.main.tasks Cluster node heartbeat task.
    2020-04-12 12:23:58,508 DEBUG    awx.main.dispatch task 7ca00dc2-ab9c-4c65-b505-f880afc47f65 starting awx.main.tasks.gather_analytics(*[])
    2020-04-12 12:23:58,560 DEBUG    awx.main.dispatch task 0e539914-105c-462f-89c6-20f1a50b1ec8 starting awx.main.tasks.awx_periodic_scheduler(*[])
    2020-04-12 12:23:58,693 DEBUG    awx.main.tasks Starting periodic scheduler
    2020-04-12 12:23:58,696 DEBUG    awx.main.tasks Last scheduler run was: 2020-04-12 12:23:28.480007+00:00
    2020-04-12 12:23:58,536 DEBUG    awx.main.dispatch task 5ec695f4-80f2-44a0-a18f-cdaa62215b10 starting awx.main.tasks.awx_k8s_reaper(*[])
    2020-04-12 12:23:58,622 WARNING  awx.main.dispatch scaling up worker pid:159
    2020-04-12 12:23:58,738 DEBUG    awx.main.dispatch task a643c365-145c-4bde-9536-d2f647d243f0 starting awx.main.scheduler.tasks.run_task_manager(*[])
    2020-04-12 12:23:58,747 DEBUG    awx.main.scheduler Running Tower task manager.
    2020-04-12 12:23:58,752 DEBUG    awx.main.scheduler Starting Scheduler
    RESULT 2
    OKREADY
    

    Now we will need to install prerequisites for DellEMC Ansible module – PyU4V package. Follow below steps to install DellEMC Ansible module dependencies.

    Connect to the container awx_task

    [root@dw-test-1 installer]# docker exec -it awx_task bash

    On the container prompt run below command to install PyU4V package

    bash-4.4# pip3 install PyU4V==9.1.1.0
    WARNING: Running pip install with root privileges is generally not a good idea. Try `pip3 install --user` instead.
    Collecting PyU4V==9.1.1.0
      Downloading https://files.pythonhosted.org/packages/38/83/34e7d4b823f84b74f6ac959b3cc5302882022f65c78e9f91593d531ebd1d/PyU4V-9.1.1.0-py3-none-any.whl (79kB)
        100% |████████████████████████████████| 81kB 2.4MB/s
    Collecting urllib3 (from PyU4V==9.1.1.0)
      Downloading https://files.pythonhosted.org/packages/e8/74/6e4f91745020f967d09332bb2b8b9b10090957334692eb88ea4afe91b77f/urllib3-1.25.8-py2.py3-none-any.whl (125kB)
        100% |████████████████████████████████| 133kB 3.4MB/s
    Collecting prettytable (from PyU4V==9.1.1.0)
      Downloading https://files.pythonhosted.org/packages/ef/30/4b0746848746ed5941f052479e7c23d2b56d174b82f4fd34a25e389831f5/prettytable-0.7.2.tar.bz2
    Requirement already satisfied: six in /usr/lib/python3.6/site-packages (from PyU4V==9.1.1.0)
    Requirement already satisfied: setuptools in /usr/lib/python3.6/site-packages (from PyU4V==9.1.1.0)
    Collecting requests (from PyU4V==9.1.1.0)
      Downloading https://files.pythonhosted.org/packages/1a/70/1935c770cb3be6e3a8b78ced23d7e0f3b187f5cbfab4749523ed65d7c9b1/requests-2.23.0-py2.py3-none-any.whl (58kB)
        100% |████████████████████████████████| 61kB 4.4MB/s
    Collecting chardet<4,>=3.0.2 (from requests->PyU4V==9.1.1.0)
      Downloading https://files.pythonhosted.org/packages/bc/a9/01ffebfb562e4274b6487b4bb1ddec7ca55ec7510b22e4c51f14098443b8/chardet-3.0.4-py2.py3-none-any.whl (133kB)
        100% |████████████████████████████████| 143kB 3.8MB/s
    Collecting certifi>=2017.4.17 (from requests->PyU4V==9.1.1.0)
      Downloading https://files.pythonhosted.org/packages/57/2b/26e37a4b034800c960a00c4e1b3d9ca5d7014e983e6e729e33ea2f36426c/certifi-2020.4.5.1-py2.py3-none-any.whl (157kB)
        100% |████████████████████████████████| 163kB 3.8MB/s
    Requirement already satisfied: idna<3,>=2.5 in /usr/lib/python3.6/site-packages (from requests->PyU4V==9.1.1.0)
    Installing collected packages: urllib3, prettytable, chardet, certifi, requests, PyU4V
      Running setup.py install for prettytable ... done
    Successfully installed PyU4V-9.1.1.0 certifi-2020.4.5.1 chardet-3.0.4 prettytable-0.7.2 requests-2.23.0 urllib3-1.25.8
    

    Once completed you can check installed version using

    bash-4.4# pip3 list | grep PyU4V
    PyU4V (9.1.1.0)

    At this point you have AWX up and running and can be reached on http://localhost:80.

    Tower is now running on the host at port 80.  The rest of the setup is handled by the web interface .  If you did this on the system you are using you can use http://localhost.

    If everything went well then you can see login prompt similar to the below screenshot. Login credentials for AWX are as per inventory file.

    undefined

    This concludes Ansible Tower (AWX) installation process. In next posts we will discuss on configuring Ansible Tower / AWX.

  • REST API and DellEMC Storage Part 3 – Unity

    REST API and DellEMC Storage Part 3 – Unity

    This blog post is 3rd part of REST API with DellEMC Storage blog series.

    • In the first part of this blog series, we discussed what is REST API and different usage options
    • Second part was about managing DellEMC PowerMax storage arrays using REST API

    In this post, we will discuss how you can use manage DellEMC Unity storage using REST API. We will be using the Postman tool during the entire blog series. So let’s get started with automating the DellEMC Unity storage system.

    The DellEMC Unity REST API Background

    DellEMC Unity is of the most user-friendly storage systems. The most common management tools for Unity systems are

    • Unisphere UI (Embedded) – An HTML5 graphical user interface used to manage Dell EMC Unity systems
    • Unisphere Command Line Interface (UEMCLI) – UEMCLI allows a user to perform tasks on the storage system by typing commands instead of using the graphical user interface

    The Dell EMC Unity includes complete REST API support, providing a developer-friendly way to manage Dell EMC Unity systems and automate various tasks.

    Dell EMC Unity’s REST API fully supports all the management tasks that a user can perform in the Unisphere GUI. Dell EMC Unity’s REST API response formats all communication in JSON notation. Users can send REST API requests using their favorite REST API tools to manage Dell EMC Unity systems in their environment. This provides flexibility in management and opens possibilities for more complex operations.

    DellEMC Unity Management Options

    Assessing DellEMC Unity’s REST API

    Once a Unity system is up and running, users can navigate to the following web addresses to get access to the REST API documentation:

    REST API Programmer’s Guide – https://{{unisphere_management_address}}/apidocs/programmers-guide/index.html

    REST API Reference Guide https://{{unisphere_management_address}}/apidocs/index.html

    DellEMC Unity’s REST API is available via Unisphere running on the array via the following Base URL.

    https://{{unisphere_management_address}}/api

    • {{unisphere_management_address}} – Replace with IP Unisphere IP address or hostname

    Supported DellEMC Unity REST API Operations

    DellEMC Unity’s REST API supports the following types of REST calls.

    • GET – Get information on objects. For example – Get Unity storage system’s details
    • POST – Create an Object. For example – Create new LUN/s
    • PUT – Making changes to an objects. For example – Change size of the existing LUN
    • DELETE – Remove an object. For example – Delete existing LUN/s

    Usually the REST client (like Postman) can be used to help figure out what REST calls you want to run.

    Building your REST API calls

    Now let’s get started with creating REST API calls. In this example we will create sample REST API call to list all the available storage pools.

    Before we get started make sure you’ve Postman installed and Unisphere is reachable.

    • Open Postman and click on New. Under new drop-down, select Request
    DellEMC Unity REST API – Postman tool GUI – 1
    • In New Request pop-up enter Request nameDescription (optional) and Name of the Collection. Then click on Save.
    DellEMC Unity REST API – Postman tool GUI – 2
    • Click on the request type drop-down and select GET.
      • Please note that we are selecting GET because is this example we are creating sample REST API call to list all the available storage pools.
      • This option will be different based on type of REST API operation
    DellEMC Unity REST API – Postman tool GUI – 3
    • Enter below Request URL
      • 1.1.1.1 – Replace with Unisphere IP address/hostname

    https://1.1.1.1/api/types/pool/instances

    DellEMC Unity REST API – Postman tool GUI – 4
    • Click on the Authorization. Enter Unisphere Username and Password.
    DellEMC Unity REST API – Postman tool GUI – 5
    • Note that Unity REST API GET request needs below 3 headers. Click on Headers and enter below header details as shown in the screenshot. Then click Send
      • Accept – application/json
      • Content-type – application/json
      • X-EMC-REST-CLIENT – true
    DellEMC Unity REST API – Postman tool GUI – 5
    • In the Postman Response section you’ll see REST API response. In this case you’ll see list of all the storage pools in Unity array.
    DellEMC Unity REST API – Postman tool GUI – 6

    Additionally please note that POST/PUT/DELETE requests need one additional Header – EMC-CSRF-TOKEN. This token is generated using GET request.

    So, let’s create one POST request for creating new LUN.

    • Follow above-listed GET request steps. Click on Headers under GET Response. Copy the EMC-CSRF-TOKEN from the Headers
    DellEMC Unity REST API – Postman tool GUI – 7
    • Now click on New and Under new drop-down, select Request (screenshot in GET request steps)
    • In New Request pop-up enter Request nameDescription (optional) and Name of the Collection. Then click on Save. (screenshot in GET request steps)
    • Click on the request type drop-down and select POST.
      • Please note that we are selecting POST because is this second example we are creating REST API call to create new LUN.
    • Click on the Authorization. Enter Unisphere Username and Password.
    • Under Params enter below details.
      • Name – Name of the LUN
      • Pool – Storage Pool in which LUN will be created
      • Size – LUN size
    DellEMC Unity REST API – Postman tool GUI – 7
    • Click on Headers and enter below header details as shown in the screenshot. Then click Send
      • Accept – application/json
      • Content-type – application/json
      • X-EMC-REST-CLIENT – true
      • EMC-CSRF-TOKEN – Copied from GET response
    DellEMC Unity REST API – Postman tool GUI – 8

    Dell EMC and REST API – Way Forward

    I hope this clarifies many basics for getting started with REST API and DellEMC Unity storage. You might also have understood that creating creating valid URLs is very important aspect of using REST API. Having this in mind we have created ready Postman collection for DellEMC Unity storage. Here’s the GitHub link to the repository. Feel free to download and share.

    Below are the additional resources available for taking REST API usage to next level.

    I hope this post will get you started with your Dell EMC Unity automation journey.

  • REST API and DellEMC Storage Part 2 – PowerMax

    REST API and DellEMC Storage Part 2 – PowerMax

    This blog post is 2nd part of REST API with DellEMC Storage blog series. In the first part of this blog series, we discussed what is REST API and different usage options. I highly encourage you to go through the first part before you get started with this post.

    In this post, we will discuss how you can use manage DellEMC PowerMax storage using REST API. We will be using the Postman tool during the entire blog series. So let’s get started with automating the DellEMC PowerMax storage system.

    The PowerMax REST API Background

    There are many different ways to manage the PowerMax storage system. You can refer to this link for more details around each. Traditionally many customers using the VMAX family systems are using the Solutions Enabler tool. This is a comprehensive tool that allows storage administrators to automate many different storage tasks using scripting (Bash, Perl, Shell scripts, etc.).

    PowerMax Unisphere GUI is HTML5 based management interface, it’s beautiful and functional and provides a web-based interactive experience for users.  Unisphere has a lot of automation baked in, and it’s intuitive wizards eliminate complexity and can often provide the right amount of automation for organizations where there isn’t a lot of change. With Unisphere version 8 everything you can do in the GUI is supported using REST API.

    DellEMC PowerMax Management Options

    Assessing DellEMC PowerMax REST API

    DellEMC PowerMax’s REST API is available via Unisphere (installed or embedded) running on the array via the following Base URL.

    https://{{unisphere_management_address}}:{{8443}}/univmax/restapi/{{version}}

    • {{unisphere_management_address}} – Replace with IP Unisphere IP address or hostname
    • {{8443}} – Default port of Unisphere. Change this as per your environment
    • {{version}} – Replace this with Unisphere version. For Unisphere version 9, replace as 90

    Supported DellEMC PowerMax REST API Operations

    Unisphere for PowerMax’s REST API supports the following types of REST calls.

    • GET – Get information on objects. For example – list all the PowerMax serial numbers managed using Unisphere
    • POST – Create an Object. For example – Create new LUN/s
    • PUT – Making changes to an objects. For example – Change size of the existing LUN
    • DELETE – Remove an object. For example – Delete existing LUN/s

    Usually the REST client (like Postman) can be used to help figure out what REST calls you want to run.

    Building your REST API calls

    Now let’s get started with creating REST API calls. In this example we will create sample REST API call to list all the available SRPs.

    Before we get started make sure you’ve Postman installed and Unisphere is reachable.

    • Open Postman and click on New. Under new drop-down, select Request
    DellEMC PowerMax REST API – Postman tool GUI – 1
    • In New Request pop-up enter Request name, Description (optional) and Name of the Collection. Then click on Save.
    DellEMC PowerMax REST API – Postman tool GUI – 2
    • Click on the request type drop-down and select GET.
      • Please note that we are selecting GET because is this example we are creating sample REST API call to list all the available SRPs.
      • This option will be different based on type of REST API operation
    DellEMC PowerMax REST API – Postman tool GUI – 3
    • Enter below Request URL
      • 1.1.1.1 – Replace with Unisphere IP address/hostname
      • 000123456789 – Replace with Serial number of PowerMax array

    https://1.1.1.1:8443/univmax/restapi/90/sloprovisioning/symmetrix/000123456789/srp

    DellEMC PowerMax REST API – Postman tool GUI – 4
    • Click on the Authorization. Enter Unisphere Username and Password. Then click Send
    DellEMC PowerMax REST API – Postman tool GUI – 5
    • In the Postman Response section you’ll see REST API response. In this case you’ll see list of all the SRPs in PowerMax array.
    DellEMC PowerMax REST API – Postman tool GUI – 6

    Dell EMC and REST API – Way Forward

    I hope this clarifies many basics for getting started with REST API and DellEMC storage. You might also have understood that creating creating valid URLs is very important aspect of using REST API. Having this in mind we have created ready Postman collection for DellEMC PowerMax storage. Here’s the GitHub link to the repository. Feel free to download and share.

    Below are the additional resources available for taking REST API usage to next level.

    1. REST API client for Unisphere – This is simple GUI tool which allows you to to construct REST API calls. Best part of this tool is having a tree view of all resources on the Unisphere to which the users can navigate through to select the desired REST call.
    2. DellEMC PowerMax REST API Concepts and Programmer’s Guide – This link has REST API document for Dell EMC PowerMax array.

    I hope this post will get you started with your Dell EMC PowerMax automation journey.

    Follow my blog with Bloglovin

  • Microsoft SQL DWH using DellEMC iCDM

    Recently I got engaged with one of our customer who was trying to implement data warehouse using the Microsoft SQL 2017. But they were not able to implement the same into the production environment even after successful POC and testing. When we got engaged with customer DBA teams we used DellEMC’s iCDM functionality (with XtremIO X2 system) in some unique way to help them not just solve their problem but exceeding business SLA expectations. This blog covers the details around problem and solution along with learning.

    Problem Statement

    Customer has several mission-critical MS SQL 2016 databases which are running in 24×7 operation. These databases are supporting their business critical OLTP application.

    Customer’s planned DWH approach

    Business teams were pushing application and DBA teams to create singular reporting platform which will create reporting on data from multiple MSSQL source databases.

    For this project DBA teams built MS SQL 2017 platform which will consolidate data from 3 source MS SQL databases. They created the test setup for feature testing before production roll-out, which worked as per their expectations. But when they implemented this feature in production DBA team realized that this is generating massive load on their source databases and causing performance issues for their business applications, which was completely unacceptable to business teams.

    This forced DBA teams to stop fetching data from the network and restore the data from last backup instead. This was used as workaround because this meant that data in reporting server was more than 30 hours old, which was making reporting irrelevant.

    DellEMC Solution

    When DellEMC team got involved we started with collecting DB environment data collection and business expectation understanding. Once we understood the pain points and business requirement we mentioned to DBAs that traditional way of data management techniques won’t help them. We also mentioned that since they are exiting DellEMC customer they already have the solution with them, which they never implemented.

    Every DellEMC All Flash storage solutions includes bundled copy data management software called Appsync.

    On high level AppSync allows application and database administrators to create application workflows. These workflows allows them to create on demand or scheduled protection or re-purpose copies of databases. We also mentioned that using this software you can create your copies of source MS SQL 2016 DB copies and mount it to target MS SQL 2017 DB server, scheduled or on-demand. These workflows are based on DellEMC storage in back-end and hence can be executed during even the busiest times.

    As usual customer DBA teams didn’t believe us and that’s where it comes to next section of this blog – Demonstration! 🙂

    Demonstration of the Appsync

    To demonstrate the functionality of DellEMC iCDM we installed the Appsync server on of the Windows server VM in customer environment. Below is the high level architecture

    DellEMC’s proposed solution approach for DWH project

    Once Appsync was installed we configured the same to communicate with source and target SQL servers and also DellEMC XtremIO storage. This allows Appsync to discover running databases and create the end to end database mapping.

    Post initial configuration we created the SQL re-purpose copy schedule to create the MS SQL database copy every 6 hours. This schedule was then applied to all the 3 source databases.

    Once the copy of multiple source database was created we used Appsync to mount the same into target MSSQL 2017 server. In our testing we mounted 3 source copies on single target MSSQL 2017 instance. Entire mounting operation completed within couple of minutes. This process allowed customer to save multiple days and help achieve business SLA.

    Apart from solving their most critical problem in hand this solution helped them solve couple of major production issues

    • Database RPO – We reduced production DB RPO to 2 hours instead of 30+ hours
    • Agent-free backup – iCDM helped customer to mount DB production copy on off-host backup server. This helped them completely eliminate backup load from production server.

    If you’re facing similar challenges in your DB environment then highly recommended to use iCDM approach instead of traditional methods.

    I have created another blog post to elaborate more on iCDM and advantages of the same. You can go through the same using below link.

    Databases and Integrated Copy Data Management (iCDM) with DellEMC

    Below are few reference documents for further reading on iCDM

    Dell EMC AppSync Datasheet

    Best Practices for running SQL Server on DellEMC XtremIO X2

  • Ansible with DellEMC Storage: Part 4 – DellEMC PowerMax Ansible Modules

    Ansible with DellEMC Storage: Part 4 – DellEMC PowerMax Ansible Modules

    This blog is the continuation of Ansible with DellEMC storage multi-part blog. 

    • In Part 1 of this series, we discussed getting started with the installation of dependencies for the Ansible and DellEMC Ansible module, followed by Ansible installation.
    • Part 2 was about the high-level basics of Ansible to get you started quickly.
    • Part 3 was getting you through the DellEMC PowerMax Ansible module installation.

    In this 4th part, we will discuss available Ansible modules for DellEMC
    PowerMax storage. Note that this blog is based on DellEMC PowerMax Ansible Module version 1.1 (Released in Dec 2019).

    Before you get started with automating DellEMC PowerMax make sure that you’re running below software versions

    • Software Version – 5978.221.221 / 5978.444.444
    • Unisphere version –  9.0 / 9.1

    Below depicted are the available Ansible modules for DellEMC PowerMax version 1.1.

    DellEMC PowerMax Ansible Module v1.1 – List of available modules

    Before you get started it’s important to understand the purpose of each module. Some of the modules can be data disruptive. You can get more details on each function on this link.

    On a high level, you can refer to the below architecture diagram of Symmetrix family storage provisioning (applicable to PowerMax as well). This will give you heads up on different definitions and object names used in DellEMC PowerMax.

    DellEMC Symmetrix Family – Storage Provisioning

    Assuming now we have an understanding of PowerMax definitions, let’s get started on creating Ansible playbook.

    Note that the default behavior of Ansible is to use SSH for executing tasks on managed hosts, for which we make hosts file entry. Below is the example of specifying host in the hosts file.

    - hosts: webserver

    But DellEMC PowerMax Ansible module wraps the RestAPI commands of an array, hence hosts entry isn’t needed. When creating Ansible playbooks for DellEMC PowerMax we’ll need to create the playbook like the below example.

    - hosts: localhost
      connection: local
      gather_facts: no

    Now let’s talk about how to create playbook. Below is the simple ansible playbook to create storage group.

    ---
    - hosts: localhost
      connection: local
      gather_facts: no
    
      tasks:
        - name: Create Storage Group using Ansible
          dellemc_powermax_storagegroup:
            serial_no: "000111111333"
            unispherehost: "1.1.1.1"
            universion: "90"
            verifycert: false
            user: "pm_username"
            password: "my_password"
            sg_name: "mySG"
            state: 'present'

    Let’s understand tasks parameters used in above sample playbook

    • dellemc_powermax_storagegroup – ansible module used for creating storage group
    • serial_no – Serial number of PowerMax array. Replace this with your array serial
    • unispherehost – IP or hostname of PowerMax Unisphere management. Replace this with your array’s IP/hostname
    • universion – Unisphere version
    • verifiycert – Unisphere might be running on self signed certificate. You can ask ansible to ignore the certificate verification (value = false).
    • user – Unisphere username
    • password – Password for supplied username
    • sg_name – Name of the Storage Group you want to create

    Last 2 lines is where all the magic happens. Here we are asking ansible to create new SG named “mySG”.

    Note that though we have supplied credentials and PowerMax array details in the same playbook, it’s not mandatory. You can always move the variables in the separate file and using Ansible vault to make playbooks reusable (more on this in another blog).

    I hope this helps everyone to get started with automation of DellEMC PowerMax Day 1/2 tasks using Ansible. We will discuss on more sample playbooks in next blog post.

  • Ansible with DellEMC Storage: Part 3 – Installing DellEMC PowerMax Ansible Module

    Ansible with DellEMC Storage: Part 3 – Installing DellEMC PowerMax Ansible Module

    This blog is the continuation of Ansible with DellEMC storage multi-part blog. 

    In Part 1 of this series, we discussed getting started with the installation of dependencies for the Ansible and DellEMC Ansible module, followed by Ansible installation.

    In Part 2 we discussed the high-level basics of Ansible to get you started quickly.

    The purpose of earlier blogs was to get you to familiarize yourself with Ansible. In this blog, we will talk about DellEMC PowerMax Ansible module.

    First let’s get our management server ready. Make sure following pre-requisites are in place

    • PowerMax is running with Unisphere 9.0
    • Red Hat Enterprise Linux 7.5 (or equivalent). CentOS in my case
    • Ansible is installed (min version 2.6)
    • Python 2.7.12 or higher is installed
    • Python library for Unisphere (PyU4V) 3.0.0.14 is installed

    Ansible relies on Python and the Ansible for PowerMax modules rely on the PyU4V Python library. Check this link for more details on the latest PyU4V module.

    Make sure that Python and “pip” are installed. pip is a Python package manager. Install “pip” if required and then use it to install PyU4V.

    Below commands will get pip and PyU4V installed.

    # python -V
    # pip -V
    # yum install python-pip
    # pip install PyU4V

    Once the system is ready with required packages next step is to get the PowerMax module from GitHub. To get the modules run below commands.

    # git clone https://github.com/dell/ansible-powermax
    # cd dellemc_ansible
    # ls

    This folder (dellemc_ansible) contains multiple documents including “Product Guide” and “Release Notes” for the downloaded version.

    We also need to copy a few files from downloaded modules to Ansible directories. Follow below process to complete the copy operation

    # cp utils/* /usr/lib/python2.7/site-packages/ansible/module_utils/
    # mkdir /usr/lib/python2.7/site-packages/ansible/modules/storage/dellemc/
    # cd /powermax/library
    # ls
    # cp * /usr/lib/python2.7/site-packages/ansible/modules/storage/dellemc/

    You’ll get an error in case of dellemc directory already exists, which you can ignore.

    At this point, we are ready with an Ansible server with DellEMC PowerMax modules installed.

    There are multiple files in the downloaded directory, each for different management tasks of DellEMC PowerMax (SRP, Volumes, Masking, etc.). We’ll discuss each module in the next blog post in this series.

  • Ansible with DellEMC Storage: Part 2 – Understanding Ansible

    Ansible with DellEMC Storage: Part 2 – Understanding Ansible

    This blog is the continuation of Ansible with DellEMC storage series. Earlier we discussed about getting started with installation of dependencies for Ansible and DellEMC Ansible module, followed by Ansible installation.

    In this blog let’s talk more around Ansible architecture and it’s concepts. So let’ get started.

    Similar to any other platform or software Ansible also has it’s own concepts which you should understand. This will help you get better hands-on with Ansible.

    Below diagram is the high level depiction of the Ansible concepts.

    Ansible Concepts

    On high level there are two types of nodes

    Managed Nodes (Right side of the diagram) – Managed nodes are the devices or software you’ll manage using Ansible. Note that managed nodes don’t need Ansible installed.

    Control/Master Node (Left side of the diagram) – This the machine Ansible is installed. On which you’ll login to run Ansible commands.

    Master node as multiple components which work together. Below are the high level details

    1. Inventory – This is the list of managed nodes which Ansible will talk to. Ansible always refers to node details from inventory file for executing any tasks. Inventory file support grouping, nesting, etc. which makes it easier for management and administration
    2. Modules – Each module defines certain Ansible function. You can execute modules using defining multiple tasks as part of playbooks
    3. Ansible Config – Consider this file as database of Ansible environment variables. Variables set in Ansible config supersedes any other setting configured in Ansible. Usually default configurations in this file are enough for many environments but there will be situations where you need to edit this file (/etc/ansible/ansible.cfg).
    4. Playbooks – Consider playbooks as list of many tasks which Ansible will execute in the sequence. Playbooks are written in YAML (.yml) and hence they are very easy to create and manage without the extensive knowledge of the coding.

    To simplify the playbook understanding just remember that

    • Playbooks contains Plays
      • Plays contains Tasks
        • Tasks call Modules

    Below is the example of Ansible Playbook

    sample Ansible playbook

    There are more concepts when it comes to Ansible (like Tower, Vault, Variables, etc.) but in my personal experience this is the good starting point.

    If you find this information stimulating enough and you want to read further then I would highly recommend that you start from here.

    I hope these bite sized blogs are helping you pickup Ansible faster. More to come 🙂