Tag: ansibletower

  • Ansible with DellEMC Storage: Part 7 – Install PowerStore Collection on AWX/Tower

    Ansible with DellEMC Storage: Part 7 – Install PowerStore Collection on AWX/Tower

    This blog is the continuation of Ansible with DellEMC storage multi-part blog.

    In the last (6th Part) of this blog series, we discussed how to prepare Ansible Tower/AWX with Dell EMC storage credentials.

    In this blog post, we will install Dell EMC PowerStore collection on Ansible AWX and go through the next steps.

    As we all know that Ansible has moved to Collections – a new ways of managing integrations and content management. Dell EMC has already started working towards this and have released several collections for multiple Dell EMC portfolio products, few of which are listed below.

    Apart from this list you can find other Dell portfolio collections (like OpenManage) on this link

    For the scope of this blog post we will focus on installing Dell EMC PowerStore Ansible collection on Ansible AWX. Technically, all the collections can be installed using similar steps.

    As a Pre-Requisite, this blog post assumes that you have –

    • Ansible AWX installed and running
    • Access to operating system / machine having Ansible AWX installed
    • Access to PowerStore storage system (with credentials)

    Additionally, if you’re getting started with Ansible AWX and/or integration with Dell EMC’s storage products then you can follow this blog series to get started from scratch.

    As part of the installation collection installation steps we need to Ansible AWX machine and then connect to the awx_task docker container.

    Login to the AWX machine. You can list the running AWX containers using below command

    [root@awx ~]# docker container list
    CONTAINER ID        IMAGE                     COMMAND                  CREATED             STATUS              PORTS                  NAMES
    6ced2eccbd7b        ansible/awx_task:11.2.0   "tini -- /bin/sh -c …"   13 months ago       Up 6 days           8052/tcp               awx_task
    42b14fbd15ad        ansible/awx_web:11.2.0    "tini -- /bin/sh -c …"   13 months ago       Up 6 days           0.0.0.0:80->8052/tcp   awx_web
    4c08c0e39128        memcached:alpine          "docker-entrypoint.s…"   13 months ago       Up 6 days           11211/tcp              awx_memcached
    42224676c21a        redis                     "docker-entrypoint.s…"   13 months ago       Up 6 days           6379/tcp               awx_redis
    37d0ca0c67bc        postgres:10               "docker-entrypoint.s…"   13 months ago       Up 6 days           5432/tcp               awx_postgres
    

    Then connect to the awx_task container using below command

    # docker exec -it awx_task bash

    Next, install the PowerStore Ansible Modules collection in awx_task container

    # ansible-galaxy collection install dellemc.powerstore
    Process install dependency map
    Starting collection install process
    Installing 'dellemc.powerstore:1.2.1' to '/home/awx/.ansible/collections/ansible_collections/dellemc/powerstore'
    

    Then logout from the container.

    bash-4.4# exit

    Now you have successfully installed the Dell EMC PowerStore Ansible Modules collection. Next step post installing collection are

    • Create the PowerStore credentials on the Ansible AWX
    • Create PowerStore Project – assuming you’ve PowerStore playbooks on content repo (like Git)
    • Configure Ansible AWX Job template / Workflow template for storage task automation

    All Dell EMC’s published collections comes with sample playbooks to test the functionality and also to get you started with integrations. When it comes to PowerStore you can see them under /home/awx/ansible-powerstore/dellemc_ansible/powerstore/samples directory

    # cd /home/awx/ansible-powerstore/dellemc_ansible/powerstore/samples
    # ls -l
    -rw-r--r-- 1 root root 1892 Jun  4  2020 capacity_volumes.yml
    -rw-r--r-- 1 root root 1042 Jun  4  2020 create_multiple_volumes_async.yml
    -rw-r--r-- 1 root root  799 Jun  4  2020 create_multiple_volumes.yml
    -rw-r--r-- 1 root root  790 Jun  4  2020 delete_multiple_volumes.yml
    -rw-r--r-- 1 root root 1710 Jun  4  2020 find_empty_volume_groups.yml
    -rw-r--r-- 1 root root 1141 Jun  4  2020 search_volumes.yml
    

    You can re-use these sample playbooks to quickly get started with storage automation tasks. Sample playbooks in the collection has multiple variables like –

    • array_ip
    • user
    • password
    • verifycert

    You can capture the storage credentials by creating Dell EMC storage credential type (screenshot below)

    Ansible AWX – Dell EMC Storage Credential Type

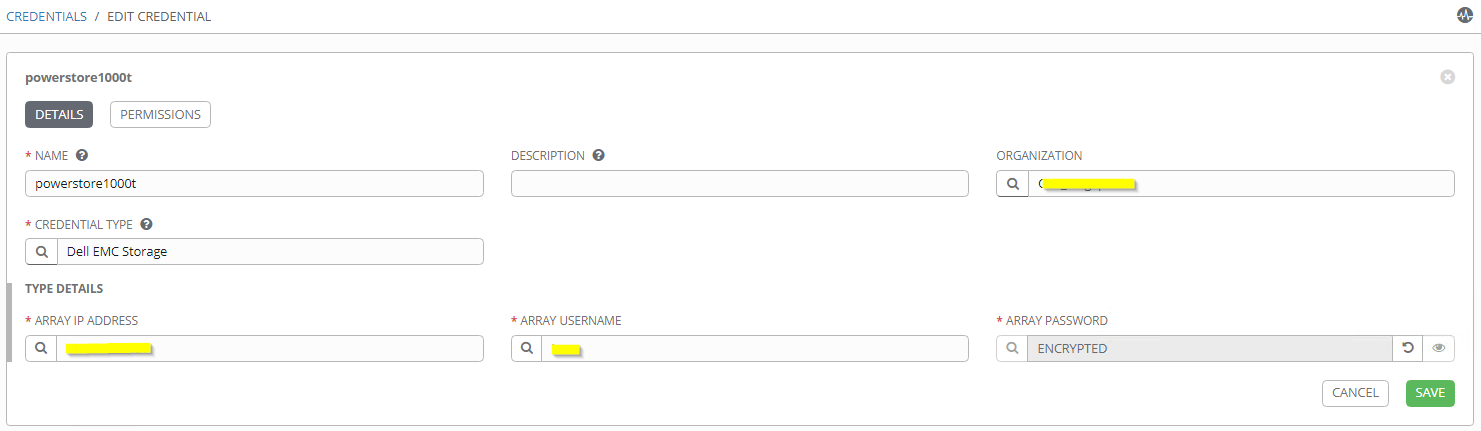
    Once Dell Storage credential type is created then you can add PowerStore array details and credentials using AWX credential manager.

    Ansible AWX – Dell EMC Storage Credential

    After adding PowerStore credential you can use the same in the AWX automation job template creation. Additional variables (like volume names, size, host etc.) can be captured using extra_vars

    Ansible AWX – Job Template Creation

    Additionally you can create survey to capture the required variables and also workflow visualizer to create multi-step breakdown of the automation tasks including but not limited storage automation. Below is the example of breaking down the storage provisioning workflow in the logical steps (like approval, quota management, provisioning, etc.)

    Ansible AWX – Workflow Visualizer

    Hope this helps everyone.

    Update: Please note that the latest version of AWX has moved to Kubernetes (instead of Docker). Please use the below steps to install the PowerStore modules.

    [root@awx ~]# kubectl -n awx exec -it awx-844c574f84-bc4ww -c awx-ee -- /bin/bash
    bash-4.4$ ansible-galaxy collection install dellemc.powerstore -c
    Starting galaxy collection install process
    Process install dependency map
    Starting collection install process
    Downloading https://galaxy.ansible.com/download/dellemc-powerstore-1.6.0.tar.gz to /home/runner/.ansible/tmp/ansible-local-3648wbuk4c_/tmprzm8bse6/dellemc-powerstore-1.6.0-ltamh_71
    Installing 'dellemc.powerstore:1.6.0' to '/home/runner/.ansible/collections/ansible_collections/dellemc/powerstore'
    dellemc.powerstore:1.6.0 was installed successfully
    bash-4.4$
  • Ansible with DellEMC Storage: Part 6 – Prepare Ansible Tower / AWX with Storage Credential

    Ansible with DellEMC Storage: Part 6 – Prepare Ansible Tower / AWX with Storage Credential

    This blog is the continuation of Ansible with DellEMC storage multi-part blog.

    In the last (5th part) of this blog series, we discussed how to install Ansible AWX / Tower in a docker container and Dell EMC Ansible modules inside the Ansible AWX / Tower container.

    In this blog post, we will create a new credential type for Dell EMC storage systems and then add storage credentials in Ansible AWX / Tower.

    So first let’s get started with creating a Credential type for Dell EMC storage array. Login to your Ansible AWX / Tower console. In the navigation pane (on left) click on “Credential Types”. Then click on the green “+” icon on the right to add a new credential type.

    Ansible AWX / Tower – Create New Credential 1

    In the “New Credential Type” creation page enter below details and then click on Save

    • Name – Dell EMC Storage (User Friendly Name)
    • Description – Optional Description
    • Input Configuration – Copy and Paste below text
    fields:
      - id: target
        type: string
        label: Array IP address
      - id: username
        type: string
        label: Array username
      - id: password
        type: string
        label: Array password
        secret: true
    required:
      - target
      - username
      - password
    • Injector Configuration – Copy and Paste below text
    extra_vars:
      password: '{{ password }}'
      target: '{{ target }}'
      username: '{{ username }}'
    
    Ansible AWX / Tower – Create New Credential 2

    Once Credential type is created, click on the “Credentials” in AWX / Tower navigation pane. Then click green “+” button on right to create new Credential.

    Ansible AWX / Tower – Create New Credential 3

    In the “New Credentials” page enter below details.

    • Name – User Friendly Name to identify the storage array. In this example “Production PowerMax”
    • Description – Optional description
    • Organization – You can choose appropriate Organization as per your configuration. Note that Organization can help you to mask these credentials to few users. I have selected Default in my example
    • Credential Type – Choose “Dell EMC Storage”. This is the credential type we have created in earlier step. Credential type which we create earlier will be available on last few pages of the pop-up list. Alternatively you can search the same with “Dell EMC Storage”
    • Type Details
      • Array IP Address – Enter the management IP address of storage array
      • Array Username – Username (I suggest creating separate user for automation)
      • Array Password – Password for the entered username
    Ansible AWX / Tower – Create New Credential 4

    As per your environment you can create multiple credentials, each for one array.

    Ansible AWX / Tower – Create New Credential 5

    Once credentials are created you can now go ahead and create new Ansible AWX / Tower Templates using storage credentials we just created. In the playbook you can mention storage array credentials as variables (username and password). Using these variables you don’t have to mention array credentials as plain text in the playbooks.

    Additionally, you can add other infrastructure / application credentials using the same process.

    I hope this helps everyone. In next post I will take you through creating new Project and Template.

  • Ansible with DellEMC Storage: Part 5 – Get Started with Ansible Tower (Using AWX)

    Ansible with DellEMC Storage: Part 5 – Get Started with Ansible Tower (Using AWX)

    This blog is the continuation of Ansible with DellEMC storage multi-part blog

    In this 5th part, we will discuss about Ansible Tower (using AWX) and how to install and configure the same.

    Overview

    In my posts till now you might noticed that I have only used command line option to run any Ansible commands. There’s a reason for that. By default, when you install Ansible it only installs Ansible Engine, which only has Ansible CLI option. This is where Ansible Tower comes in picture. Note that AWX is the open source project for Ansible Tower.

    While Ansible Tower has many features, below are few features which are my personal favorites. Since data storage management operations can be data destructive, below features are the reasons I am highly recommending using Tower / AWX for automating storage tasks.

    • Web Interface – To manage Ansible using Web interface
    • REST API Support – To manage and integrate Ansible Tower in other platforms. For example – integrating Ansible Tower with Jenkins
    • Task Engine – To create scheduled job and centralized operations.
    • Role Based Access Control – To control Enterprise level access across different team member and limit their visibility to information. This will make sure only designated users are having access to critical data/tasks.

    Installing Ansible Tower (using AWX)

    Make sure that you’ve supported operating systems installed and running. In my case I am using CentOS V7 virtual machine

    Prerequisites –

    Make sure below packages are installed on your machine

    • Make sure you have set the selinux to permissive
      • sudo setenforce permissive
    • Ansible – min version 2.8+
      • yum install -y ansible
    • Docker – Recent version
      • yum install -y docker
    • Docker Python Module
      • Follow below steps for installing docker-compose
    [root@dw-test-1 installer]# sudo curl -L "https://github.com/docker/compose/releases/download/1.25.4/docker-compose-$(uname -s)-$(uname -m)" -o /usr/local/bin/docker-compose
    
    [root@dw-test-1 installer]# sudo chmod +x /usr/local/bin/docker-compose
    
    [root@dw-test-1 installer]# sudo ln -s /usr/local/bin/docker-compose /usr/bin/docker-compose
    
    [root@dw-test-1 installer]# docker-compose --version
    

    Once all the prerequisites are in place run below tasks

    • Clone the Git AWX repository using below command
    [root@dw-test-1 installer]# git clone https://github.com/ansible/awx.git

    This will create awx directory. cd into the awx/installer directory.

    [root@dw-test-1 installer]# cd awx/installer

    This folder has inventory file which has all the AWX parameters. Most important details in this file are passwords which are needed for logging into the AWX post installation. Note that AWX supports installation on Kubernetes and Openshift as well. In this example we will be using docker-compose.

    Most important parameters in inventory file are as mentioned below. In my case I created the vars.yml file with below inputs and used the same while running the installation.

    [root@dw-test-1 installer]# cat vars.yml
    admin_password: 'admin'
    pg_password: 'admin'
    secret_key: 'mysecret'

    Once you’ve checked and verified all the parameters in the inventory file, go ahead and run below command.

    [root@dw-test-1 installer]# ansible-playbook -i inventory install.yml -e @vars.yml

    Note – I faced couple of errors which running this playbook. I suggest taking a look at this link if you face the same.

    Once playbook execution is completed you can run below command to validate the installation.

    [root@dw-test-1 installer]# docker ps
    CONTAINER ID        IMAGE                     COMMAND                  CREATED             STATUS              PORTS                  NAMES
    23b236356057        ansible/awx_task:10.0.0   "/tini -- /bin/sh ..."   6 minutes ago       Up 2 minutes        8052/tcp               awx_task
    a23edc05283e        ansible/awx_web:10.0.0    "/tini -- /bin/sh ..."   6 minutes ago       Up 2 minutes        0.0.0.0:80->8052/tcp   awx_web
    385de9d395da        postgres:10               "docker-entrypoint..."   6 minutes ago       Up 2 minutes        5432/tcp               awx_postgres
    125b9e551823        redis                     "docker-entrypoint..."   2 hours ago         Up 2 minutes        6379/tcp               awx_redis
    2a8ad285e2d5        memcached:alpine          "docker-entrypoint..."   2 hours ago         Up 2 minutes        11211/tcp              awx_memcached
    

    At this point AWX is installed. It takes some time for container to start and configure the AWX. Run the below command and wait till the time you see similar output

    [root@dw-test-1 installer]# docker logs -f awx_task
    ...
    2020-04-12 12:23:18,458 DEBUG    awx.main.dispatch task 7b92a5a8-efa9-4b5e-8dc7-d4ca1d974508 starting awx.main.scheduler.tasks.run_task_manager(*[])
    2020-04-12 12:23:18,466 DEBUG    awx.main.scheduler Running Tower task manager.
    2020-04-12 12:23:18,472 DEBUG    awx.main.scheduler Starting Scheduler
    2020-04-12 12:23:28,468 DEBUG    awx.main.dispatch task ba9a6c3e-24b3-49e4-8cf1-62f90f315780 starting awx.main.tasks.awx_periodic_scheduler(*[])
    2020-04-12 12:23:28,478 DEBUG    awx.main.tasks Starting periodic scheduler
    2020-04-12 12:23:28,480 DEBUG    awx.main.tasks Last scheduler run was: 2020-04-12 12:22:58.567745+00:00
    2020-04-12 12:23:38,483 DEBUG    awx.main.dispatch task 7f4ac140-7231-4c6e-901f-34be80529707 starting awx.main.scheduler.tasks.run_task_manager(*[])
    2020-04-12 12:23:38,493 DEBUG    awx.main.scheduler Running Tower task manager.
    2020-04-12 12:23:38,502 DEBUG    awx.main.scheduler Starting Scheduler
    2020-04-12 12:23:58,522 DEBUG    awx.main.dispatch task 7ed5d956-ba67-4219-9509-1405713fa155 starting awx.main.tasks.cluster_node_heartbeat(*[])
    2020-04-12 12:23:58,632 DEBUG    awx.main.tasks Cluster node heartbeat task.
    2020-04-12 12:23:58,508 DEBUG    awx.main.dispatch task 7ca00dc2-ab9c-4c65-b505-f880afc47f65 starting awx.main.tasks.gather_analytics(*[])
    2020-04-12 12:23:58,560 DEBUG    awx.main.dispatch task 0e539914-105c-462f-89c6-20f1a50b1ec8 starting awx.main.tasks.awx_periodic_scheduler(*[])
    2020-04-12 12:23:58,693 DEBUG    awx.main.tasks Starting periodic scheduler
    2020-04-12 12:23:58,696 DEBUG    awx.main.tasks Last scheduler run was: 2020-04-12 12:23:28.480007+00:00
    2020-04-12 12:23:58,536 DEBUG    awx.main.dispatch task 5ec695f4-80f2-44a0-a18f-cdaa62215b10 starting awx.main.tasks.awx_k8s_reaper(*[])
    2020-04-12 12:23:58,622 WARNING  awx.main.dispatch scaling up worker pid:159
    2020-04-12 12:23:58,738 DEBUG    awx.main.dispatch task a643c365-145c-4bde-9536-d2f647d243f0 starting awx.main.scheduler.tasks.run_task_manager(*[])
    2020-04-12 12:23:58,747 DEBUG    awx.main.scheduler Running Tower task manager.
    2020-04-12 12:23:58,752 DEBUG    awx.main.scheduler Starting Scheduler
    RESULT 2
    OKREADY
    

    Now we will need to install prerequisites for DellEMC Ansible module – PyU4V package. Follow below steps to install DellEMC Ansible module dependencies.

    Connect to the container awx_task

    [root@dw-test-1 installer]# docker exec -it awx_task bash

    On the container prompt run below command to install PyU4V package

    bash-4.4# pip3 install PyU4V==9.1.1.0
    WARNING: Running pip install with root privileges is generally not a good idea. Try `pip3 install --user` instead.
    Collecting PyU4V==9.1.1.0
      Downloading https://files.pythonhosted.org/packages/38/83/34e7d4b823f84b74f6ac959b3cc5302882022f65c78e9f91593d531ebd1d/PyU4V-9.1.1.0-py3-none-any.whl (79kB)
        100% |████████████████████████████████| 81kB 2.4MB/s
    Collecting urllib3 (from PyU4V==9.1.1.0)
      Downloading https://files.pythonhosted.org/packages/e8/74/6e4f91745020f967d09332bb2b8b9b10090957334692eb88ea4afe91b77f/urllib3-1.25.8-py2.py3-none-any.whl (125kB)
        100% |████████████████████████████████| 133kB 3.4MB/s
    Collecting prettytable (from PyU4V==9.1.1.0)
      Downloading https://files.pythonhosted.org/packages/ef/30/4b0746848746ed5941f052479e7c23d2b56d174b82f4fd34a25e389831f5/prettytable-0.7.2.tar.bz2
    Requirement already satisfied: six in /usr/lib/python3.6/site-packages (from PyU4V==9.1.1.0)
    Requirement already satisfied: setuptools in /usr/lib/python3.6/site-packages (from PyU4V==9.1.1.0)
    Collecting requests (from PyU4V==9.1.1.0)
      Downloading https://files.pythonhosted.org/packages/1a/70/1935c770cb3be6e3a8b78ced23d7e0f3b187f5cbfab4749523ed65d7c9b1/requests-2.23.0-py2.py3-none-any.whl (58kB)
        100% |████████████████████████████████| 61kB 4.4MB/s
    Collecting chardet<4,>=3.0.2 (from requests->PyU4V==9.1.1.0)
      Downloading https://files.pythonhosted.org/packages/bc/a9/01ffebfb562e4274b6487b4bb1ddec7ca55ec7510b22e4c51f14098443b8/chardet-3.0.4-py2.py3-none-any.whl (133kB)
        100% |████████████████████████████████| 143kB 3.8MB/s
    Collecting certifi>=2017.4.17 (from requests->PyU4V==9.1.1.0)
      Downloading https://files.pythonhosted.org/packages/57/2b/26e37a4b034800c960a00c4e1b3d9ca5d7014e983e6e729e33ea2f36426c/certifi-2020.4.5.1-py2.py3-none-any.whl (157kB)
        100% |████████████████████████████████| 163kB 3.8MB/s
    Requirement already satisfied: idna<3,>=2.5 in /usr/lib/python3.6/site-packages (from requests->PyU4V==9.1.1.0)
    Installing collected packages: urllib3, prettytable, chardet, certifi, requests, PyU4V
      Running setup.py install for prettytable ... done
    Successfully installed PyU4V-9.1.1.0 certifi-2020.4.5.1 chardet-3.0.4 prettytable-0.7.2 requests-2.23.0 urllib3-1.25.8
    

    Once completed you can check installed version using

    bash-4.4# pip3 list | grep PyU4V
    PyU4V (9.1.1.0)

    At this point you have AWX up and running and can be reached on http://localhost:80.

    Tower is now running on the host at port 80.  The rest of the setup is handled by the web interface .  If you did this on the system you are using you can use http://localhost.

    If everything went well then you can see login prompt similar to the below screenshot. Login credentials for AWX are as per inventory file.

    undefined

    This concludes Ansible Tower (AWX) installation process. In next posts we will discuss on configuring Ansible Tower / AWX.