Part of my job is to demonstrate the Red Hat OpenShift integration with Dell Technologies’ portfolio. Most of the time I repurpose my OCP infrastructure and re-install the cluster. This means using the same Bastion host to manage the new OCP cluster. There have been a couple of instances where I forgot to include bastion host SSH keys in the OCP installation and because of that, I couldn’t log in to the OCP cluster nodes.
By default, RH CoreOS gets installed with a single user (core) with the option to add SSH keys at the install time. Most of the tasks in the RH OCP environment are done from the bastion/service node without the need to log in directly on the OCP nodes. But in some cases, you might find it useful to have SSH access to OCP nodes. In my case, it was for configuring the iSCSI and multipath on OCP nodes (for CSI configuration)
Installing SSH keys post OCP installation is a bit tricky and hence the purpose of this blog. I hope this helps fellow OCP architects (and as a reference for me as well).
To start with below is the high-level Red Hat OCP setup I have created. My test OCP cluster (version 4.8.x) is having 3 nodes, which are acting as both master and worker.

Logging into the RH OCP cluster from bastion/service node
Before you get started make sure you’re able to execute OC commands from the bastion/service node. If you’re getting an error (like below) then make sure you’re logged into the newly created cluster.

For connecting the service node to the RH OCP cluster you will need an API token. For generating the API token, log into the RH OCP UI –> Click on User Name (top right corner) –> Click on Copy Login Command.
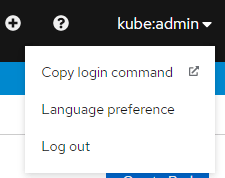
This will open a new window. Click on the Display Token link. Copy the oc login command and run it on the service node.


Update RH OCP SSH Keys
In RH OCP there are 2 MachineConfigs (99-master-ssh and 99-worker-ssh) that handle the SSH key management. You can list those using the below command. If you had given the SSH keys while installing RH OCP then it will get registered in these MachineConfigs
[root@ocp-svc ~]# oc get machineconfig | grep "ssh"
99-assisted-installer-master-ssh 3.1.0 54d
99-master-ssh 3.2.0 54d
99-worker-ssh 3.2.0 54d
First, we will start with master nodes.
The next step is to download the MachineConfig as YAML to update the SSH keys. You can run the below command to download the machine config object. In this case, I am getting the configuration from the master server.
[root@ocp-svc ~]# oc get mc 99-master-ssh -o yaml > 99-master-ssh.yamlCopy the SSH keys from the service/bastion node. You can generate the new keys (if needed using the ssh-keygen command). By default, SSH keys are stored on the /root/.ssh/id_rsa.pub location.
Edit the downloaded 99-master-ssh.yaml file and append the copied SSH key in the passwd section of the yaml file (as shown below) and save the file. Make sure you follow the YAML syntax while editing the file.
    passwd:
      users:
      - name: core
        sshAuthorizedKeys:
        - <existing SSH key>
        - <your new SSH key>
  fips: false
  kernelType: ""
  osImageURL: ""
Then run the following command to apply the new MachineConfig file with the updated SSH key. This step might restart your nodes (one by one).
[root@ocp-svc ~]# oc apply -f 99-master-ssh.yamlAt this stage, you will be able to log into the master nodes. You’ll need to run the same procedure again for the worker nodes by updating the 99-worker-ssh MachineConfig.
Additionally, if you’re reusing the bastion/service node then make sure you remove the old entries from the /root/.ssh/known_hosts file.
I hope this article helps everyone.
Categories: kubernetes, openshift

