Category: ansible

  • Integrating Generative AI in ITSM Workflows

    Integrating Generative AI in ITSM Workflows

    IT Service Management (ITSM) teams are increasingly turning to generative AI (GenAI) to streamline workflows, reduce resolution times, and improve user satisfaction. In this post, we’ll explore two architectures for integrating GenAI into platforms like ServiceNow: man-in-the-middle (human-in-the-loop) and agentic automation (autonomous AI agents).


    Why GenAI for ITSM?

    • Ticket overload: Teams handle hundreds of tickets daily, leading to burnout and delays.
    • Knowledge gaps: Agents struggle to find relevant solutions quickly.
    • Repetitive tasks: Manual triage and updates consume valuable time.

    GenAI can automate classification, suggest solutions, and even resolve incidents-but how you integrate it matters. Let’s compare two approaches.


    Architecture 1: Man-in-the-Middle (Human-in-the-Loop)

    In this approach, GenAI acts as an assistant to human agents. It analyzes tickets, suggests actions, and automates tasks but requires human approval before execution.

    Workflow Diagram:

    Use Cases:

    • High-risk scenarios (e.g., critical infrastructure changes).
    • Compliance-heavy environments (e.g., healthcare, finance).

    Implementation Steps:

    1. Set Up ServiceNow Outbound REST Integration (javascript)

    // ServiceNow Scripted REST API (Outbound)
    var request = new sn_ws.RESTMessageV2();
    request.setEndpoint('https://your-middleware.com/process-ticket');
    request.setHttpMethod('POST');
    request.setRequestBody(JSON.stringify(current));
    var response = request.execute();

    2. Build Middleware (Python/Flask Example)

    from flask import Flask, request, jsonify
    import openai

    app = Flask(__name__)
    openai.api_key = "your-api-key"

    @app.route('/process-ticket', methods=['POST'])
    def handle_ticket():
    ticket_data = request.json

    # GenAI analysis
    prompt = f"""
    Classify this ITSM ticket and suggest priority (Critical/High/Medium/Low):
    Title: {ticket_data['short_description']}
    Description: {ticket_data['description']}
    """

    response = openai.ChatCompletion.create(
    model="gpt-4",
    messages=[{"role": "user", "content": prompt}]
    )

    suggestion = response.choices[0].message['content']
    return jsonify({"suggestion": suggestion, "ticket_id": ticket_data['number']})

    3. Human Review & Action
    Agents review GenAI’s suggestions in a dashboard and approve/reject them.


    Architecture 2: GenAI Agentic Automation

    Here, GenAI agents act autonomously within guardrails. They analyze tickets, execute actions (e.g., resolving incidents, updating KBs), and only escalate exceptions to humans.

    Workflow Diagram:

    Use Cases:

    • Low-risk, repetitive tasks (e.g., password resets, FAQ responses).
    • High-volume environments needing 24/7 support.

    Implementation Steps:

    1. Autonomous Ticket Resolution with Python

    import requests
    import openai

    def resolve_ticket_automatically(ticket_id):
    # Fetch ticket from ServiceNow
    snow_url = f"https://instance.service-now.com/api/now/table/incident/{ticket_id}"
    headers = {"Accept": "application/json"}
    auth = ("admin", "password")
    response = requests.get(snow_url, headers=headers, auth=auth)
    ticket = response.json()['result']

    # GenAI analysis
    prompt = f"""
    Resolve this ticket autonomously if possible. Provide a solution and mark as closed.
    Ticket: {ticket['description']}
    """

    ai_response = openai.ChatCompletion.create(
    model="gpt-4",
    messages=[{"role": "user", "content": prompt}]
    )

    # Auto-resolve if confidence is high
    if "reset password" in ai_response.choices[0].message['content'].lower():
    update_data = {
    "state": "6", # Resolved
    "close_notes": "Automatically resolved: Password reset instructions sent."
    }
    requests.patch(snow_url, json=update_data, headers=headers, auth=auth)

    2. Guardrails for Safety

    • Limit permissions (e.g., agents can’t modify user roles).
    • Log all actions for auditing.
    • Escalate tickets containing keywords like “outage” or “data breach” to humans.

    Key Considerations

    Combined Architecture Diagram:


    Best Practices for Both Architectures

    • Data Privacy: Mask PII/PHI in tickets before sending to GenAI APIs.
    • Feedback Loops: Let agents rate AI suggestions to improve models.
    • Tooling: Use frameworks like LangChain for complex workflows.

    Conclusion

    Whether you choose man-in-the-middle or agentic automation depends on your risk tolerance and use case. Start with a hybrid approach: use autonomous agents for simple tasks (e.g., FAQs) and human-in-the-loop for critical workflows. As trust in the system grows, expand automation cautiously.

    GenAI is set to redefine ITSM, propelling organizations from automation to true intelligence. The journey is just beginning-those who embrace this shift will not only optimize IT operations but also unlock new levels of agility, resilience, and innovation. The future of ITSM is not just faster or cheaper-it’s smarter, more adaptive, and profoundly more human.

  • Infrastructure as Code (IaC) Security Best Practices

    Infrastructure as Code (IaC) Security Best Practices

    Infrastructure as Code (IaC) has revolutionized how we provision and manage infrastructure, enabling speed, repeatability, and scalability. However, as with any code, IaC introduces new security considerations. Misconfigurations, exposed secrets, and lack of visibility can lead to significant risks in production environments.

    This guide explores actionable best practices for securing your Terraform, Ansible, and other IaC pipelines-helping you build robust, compliant, and resilient infrastructure. Sample code and how-to notes included!


    1. Treat IaC Like Application Code

    Just as you would with application code, store your IaC in version control systems (e.g., Git). This enables:

    • Change tracking: Who changed what, when, and why.
    • Peer reviews: Enforce code reviews and approvals before merging.
    • Rollback: Revert to previous known-good states if issues arise.

    Tip:
    Use branch protection rules and require pull request reviews for all changes.


    2. Secrets Management

    Never hard-code secrets or sensitive data (API keys, passwords, certificates) in your IaC files. Instead:

    • Use secret management tools like HashiCorp Vault, AWS Secrets Manager, or Azure Key Vault.
    • Integrate secrets into your pipelines at runtime, not in code.
    • Leverage environment variables or encrypted files for sensitive values.

    Sample: Fetching Secrets from Vault in Terraform

    provider "vault" {
      address = "https://vault.example.com"
    }
    
    resource "vault_generic_secret" "example" {
      path = "secret/data/myapp"
    }
    
    output "db_password" {
      value = vault_generic_secret.example.data["password"]
    }

    How-to:

    • Replace https://vault.example.com with your Vault server address.
    • The vault_generic_secret resource fetches secrets dynamically.
    • Output blocks can reference secrets securely-never hardcode them!

    Sample: Encrypting Secrets in Ansible with ansible-vault

    - hosts: all
      vars_files:
        - secrets.yml
      tasks:
        - name: Use secret password
          debug:
            msg: "The password is {{ secret_password }}"

    How-to:

    • Create and encrypt the secrets file: ansible-vault create secrets.yml
    • Reference the encrypted file in your playbook under vars_files.
    • Access secrets in tasks using Jinja2 templating, e.g., {{ secret_password }}.

    3. Automated Security Scanning

    Integrate security tools into your CI/CD pipeline to catch misconfigurations and vulnerabilities early:

    Sample: Terraform Security Scanning with tfsec in GitHub Actions

    name: Terraform Security Scan
    
    on: [push]
    
    jobs:
      tfsec:
        runs-on: ubuntu-latest
        steps:
          - uses: actions/checkout@v2
          - name: Run tfsec
            uses: aquasecurity/tfsec-action@v1
            with:
              tfsec_version: 'latest'

    How-to:

    • Add this workflow to your .github/workflows directory.
    • The scan will fail the build if critical security issues are found, helping you catch problems early.

    4. Principle of Least Privilege

    Ensure that your IaC tools, pipelines, and the resources they provision follow the principle of least privilege:

    • Limit IAM permissions for automation accounts.
    • Avoid using overly broad roles or root accounts.
    • Regularly audit permissions and remove unnecessary access.

    5. Policy as Code

    Define and enforce security and compliance policies programmatically:

    • Use tools like Open Policy Agent (OPA), Sentinel (for Terraform Cloud), or Conftest.
    • Enforce rules such as “no public S3 buckets,” “encryption enabled,” or “no hardcoded credentials.”

    Example:
    OPA policies can block deployments that violate security standards before they reach production.


    6. Continuous Monitoring and Drift Detection

    Even after deployment, infrastructure can drift from the desired state:

    • Use tools like Terraform Cloud, AWS Config, or Driftctl to detect and remediate drift.
    • Set up alerts for unauthorized changes and automate remediation where possible.

    7. Regular Reviews and Updates

    IaC modules and dependencies evolve-so should your security practices:

    • Schedule regular reviews of your IaC codebase and third-party modules.
    • Update modules to patch vulnerabilities and leverage new security features.
    • Document your security practices and train your team.

    Conclusion

    Securing Infrastructure as Code is not a one-time task, but a continuous process woven into your development and deployment lifecycle. By treating IaC like application code, managing secrets securely, automating scanning, enforcing least privilege, and using policy as code, you can drastically reduce risk and build trust in your automation.

  • Send message to Teams channel with REST API or Ansible

    There is no question Microsoft Teams is everywhere these days. Many IT teams use it to collaborate on projects or even day-to-day tasks. On the other hand engineers like to know what their automation solution is doing. Therefore, sending notifications is a very welcome addition to most automation workflows and Teams is the way to go nowadays as opposed to the venerable email. This is a skill we have used in many of our latest infrastructure automation videos in the IaC Avengers YouTube channel and a something that my customers have been wanted to learn. So here we go.

    In this article I am going to cover:

    • prepare your Teams channel to accept messages programmatically
    • use the REST API to create those messages. I will demonstrate it with Postman
    • send a message to Teams using Ansible

    Prepare a Teams channel to receive Webhooks

    The easiest to accomplish this by enabling webhooks for the channel. Webhooks allow one application to notify another of an event. As you will see in the examples later, webhooks are HTTP messages that use the POST method and include a payload that is formatted in a way that makes sense for the recipient application.

    As you can see, I have created a new channel called “Alert Testing”. We can configure webhooks for this channel by easily going into the “Connectors” option

    Once in the Connectors menu you need to find the “Incoming Webhook” option . In my menu it shows up by default at the top. If it doesn’t you can click on the “Developer Tools” category or you can type “webhook” in the search box at the top-left corner

    Now the “Incoming Webhook” configuration page pops up and the only thing we need to do is to provide a name and click “Create”. As soon as you do that it provides you with a “very long” URL as you can see at the bottom on the following screenshot. This is the URL we need to send our HTTP messages to. Now simply copy the URL and keep it somewhere handy. Finally click “Done” and we are ready.

    If you missplace the URL, don’t worry you can always go back to “Connectors” and find it in the “Configured” category.

    Send Teams messages using the REST API

    I like to use Postman when I am discovering a new REST API. It helps me track of what I am discovering and it allows me to package what I have learnt as a “collection” in a format that is easy to share. And this time is no exception. I have created a Postman collection with the 2 examples we are using in this article as well as a sample Ansible playbook. They are available at this repository in GitHub.

    What determines the format and content of the message card in Teams is the payload. You will see this in the “Body” tab. As you can see it is formatted as JSON. Cards in Teams can have a lot of features and the payload can get very complicated but as you can see the basic message only requires 2 fields.

    Don’t forget to paste the webhook URL you got from the previous step so that the message to your channel. To run it simply click “Send”. You should get a “200 OK” status code and your first message will show up in the channel straight away.

    Let’s do now a more sophisticated example. Let’s say that as part of an automation workflow we have created 2 virtual machines and we want to notify a channel in Teams and provide details of the VM’s that were just created. In the example below you can see the “title” includes the actual “id” of the provisioning job. This is something you could extract from the automation workflow and introduce it here for reference.

    In this case the payload this includes a “sections” key which we hadn’t used before. The value of this key is a list, which allows you to define multiple sections in your card. In this case we added only one section and we are populating it with a 2 column table that includes two “facts”. You can have more than 2 facts in your section or you could research how to add other elements like buttons, links …

    When we click “Send” we get our second message in the channel.

    Send Teams messages using Ansible

    Going back to the previous example you might be using Ansible to automate the creation of Virtual Machines and you want to let a team know the details of their details. As you do your provisioning tasks you can register the details of the resources you are creating and then use those to populate payload.

    In Ansible we can use the “uri” module to interact with web services. This includes REST APIs. This module allows us to specify any method we need (“POST” in this case), headers, payload etc. The following screenshot shows an Ansible playbook that creates the same card as the previous example. Notice how the payload has been converted from JSON into its YAML equivalent. You have to pay careful attention indentations and hyphens. You can download the code from the GitHub repo.

    Have fun creating your own messages!

  • Ansible URI Response JSON Data Parsing

    While most of the vendors and their platforms (including DellEMC) are having Ansible modules published, but there are instances where functionality you’re trying to use isn’t covered in the available module or simply modules aren’t available at all.

    In such situations you’ve no choice than using Ansible URI module. It allows you to interact with HTTP and HTTPS web services, in this particular example REST API endpoints to be precise. There are several benefits of using URI module with REST API, including but not limited to

    • Perform automation if there’s no Ansible module available
    • Use functionality that hasn’t been implemented in Ansible modules
    • Easier to redeploy your workflow to another automation tool

    While I was using the URI module I came across issue of data parsing for REST API response payload. In case of Dell EMC platforms response payload is in JSON and based on the API endpoint response can be 1000s of lines. It’s very difficult to make sense of this data and also process the same in ansible to extract required information. In this blog post I am trying to list down the process I’ve followed to parse the JSON data and extract the required information.

    Below is the sample playbook having uri module. In this example we’re talking about GET call for sample URI endpoint – which is getting device details of the existing server (BMaaS use case).

      tasks:
      - name: listdevices
        uri:
          url: https://api.sample.com/base/version/endpoint
          method: GET
          validate_certs: no
          headers:
            X-Auth-Token: "{{ api_key }}"
          status_code: 200
        register: output
        
      - name: printoutput
        ansible.builtin.debug: 
          var: output

    In this playbook there are multiple parameters used under uri task. More on using uri module with REST API coming in another blog post.

    In above example you can see that we’ve registering the output and then printing the same. Problem with this is there could be 100s of lines which probably doesn’t make sense. So for parsing this data we will need

    Below is the sample of the GET call JSON response.

    [
        {
            "id": "2b12858454174f03aece5a71bb382318",
            "name": "Drive_0_0_11",
            "extra_details": {
                "firmware_version": "GPJ99E5Q",
                "drive_type": "NVMe_SSD",
                "encryption_status": "Supported_Locked_Cluster_PIN",
                "fips_status": "FIPS_Compliance_Level_1",
                "size": 3840755982336
            }
        },
        {
            "id": "2dd2c43f2582415585a9ce0bbb961a4f",
            "name": "Drive_0_0_0",
            "extra_details": {
                "firmware_version": "GPJ99E5Q",
                "drive_type": "NVMe_SSD",
                "encryption_status": "Supported_Locked_Cluster_PIN",
                "fips_status": "FIPS_Compliance_Level_1",
                "size": 3840755982336
            }
        },
        {
            "id": "325e5abc34ed4be398715285cf2e2826",
            "name": "Drive_0_0_8",
            "extra_details": {
                "firmware_version": "GPJ99E5Q",
                "drive_type": "NVMe_SSD",
                "encryption_status": "Supported_Locked_Cluster_PIN",
                "fips_status": "FIPS_Compliance_None",
                "size": 3840755982336
            }
        },
        {
            "id": "3c9449f55ade4c04a801e804f3872eff",
            "name": "Drive_0_0_5",
            "extra_details": {
                "firmware_version": "GPJ99E5Q",
                "drive_type": "NVMe_SSD",
                "encryption_status": "Supported_Locked_Cluster_PIN",
                "fips_status": "FIPS_Compliance_None",
                "size": 3840755982336
            }
        },
        {
            "id": "426d706ef7d443a887a450e6ac4abed5",
            "name": "Drive_0_0_23",
            "extra_details": {
                "firmware_version": "3.0.45.6",
                "drive_type": "NVMe_NVRAM",
                "encryption_status": "Supported_Locked_Cluster_PIN",
                "fips_status": "FIPS_Compliance_None",
                "size": 8484552704
            }
        },
        {
            "id": "42f2145cc5ef4a5f86ec1dfe8bdc5ca3",
            "name": "Drive_0_0_24",
            "extra_details": {
                "firmware_version": "3.0.45.6",
                "drive_type": "NVMe_NVRAM",
                "encryption_status": "Supported_Locked_Cluster_PIN",
                "fips_status": "FIPS_Compliance_None",
                "size": 8484552704
            }
        },
        {
            "id": "4ed0b8b74eff4113ad85ded6f342ab34",
            "name": "Drive_0_0_6",
            "extra_details": {
                "firmware_version": "GPJ99E5Q",
                "drive_type": "NVMe_SSD",
                "encryption_status": "Supported_Locked_Cluster_PIN",
                "fips_status": "FIPS_Compliance_None",
                "size": 3840755982336
            }
        },
        {
            "id": "5bca4db416c342ebab6d3b795c604963",
            "name": "Drive_0_0_2",
            "extra_details": {
                "firmware_version": "GPJ99E5Q",
                "drive_type": "NVMe_SSD",
                "encryption_status": "Supported_Locked_Cluster_PIN",
                "fips_status": "FIPS_Compliance_None",
                "size": 3840755982336
            }
        },
        {
            "id": "6eb66e909f4b414193922e4de63cfa9f",
            "name": "Drive_0_0_1",
            "extra_details": {
                "firmware_version": "GPJ99E5Q",
                "drive_type": "NVMe_SSD",
                "encryption_status": "Supported_Locked_Cluster_PIN",
                "fips_status": "FIPS_Compliance_None",
                "size": 3840755982336
            }
        },
        {
            "id": "b413b5e98e6245b58134c0d5a8d001e1",
            "name": "Drive_0_0_7",
            "extra_details": {
                "firmware_version": "GPJ99E5Q",
                "drive_type": "NVMe_SSD",
                "encryption_status": "Supported_Locked_Cluster_PIN",
                "fips_status": "FIPS_Compliance_None",
                "size": 3840755982336
            }
        },
        {
            "id": "bae7ed28120e43a8b322b8d8b2fedc0d",
            "name": "Drive_0_0_10",
            "extra_details": {
                "firmware_version": "GPJ99E5Q",
                "drive_type": "NVMe_SSD",
                "encryption_status": "Supported_Locked_Cluster_PIN",
                "fips_status": "FIPS_Compliance_None",
                "size": 3840755982336
            }
        },
        {
            "id": "bea9d084e49248359e3191d8f648a37c",
            "name": "Drive_0_0_3",
            "extra_details": {
                "firmware_version": "GPJ99E5Q",
                "drive_type": "NVMe_SSD",
                "encryption_status": "Supported_Locked_Cluster_PIN",
                "fips_status": "FIPS_Compliance_None",
                "size": 3840755982336
            }
        },
        {
            "id": "f3af5ea2e84d4181a9068c6e85c4b750",
            "name": "Drive_0_0_4",
            "extra_details": {
                "firmware_version": "GPJ99E5Q",
                "drive_type": "NVMe_SSD",
                "encryption_status": "Supported_Locked_Cluster_PIN",
                "fips_status": "FIPS_Compliance_None",
                "size": 3840755982336
            }
        },
        {
            "id": "fca0678677cf48f5a51c28ea1e47b514",
            "name": "Drive_0_0_9",
            "extra_details": {
                "firmware_version": "GPJ99E5Q",
                "drive_type": "NVMe_SSD",
                "encryption_status": "Supported_Locked_Cluster_PIN",
                "fips_status": "FIPS_Compliance_None",
                "size": 3840755982336
            }
        }
    ]

    In above JSON example if I have to extract only name and id from the JSON, then we will need to parse the data in playbook as a separate task. Sample task is as mentioned below.

      - name: devicenames
        set_fact: 
          devicenames: "{{ devices | json_query(jmesquery) }}"
        vars:
          jmesquery: '*.devices[*].[name, id]'

    So, overall the playbook will look like below

    ---
    - hosts: localhost
      gather_facts: no
    
      tasks:
      - name: getdevices
        uri:
          url: https://<target_api_server>/v1/definition/endpoint
          method: GET
          #body_format: json
          validate_certs: no
          headers:
            X-Auth-Token: "{{ api_key }}"
          #body:
          #- [ name, your_username ]
          #- [ password, your_password ]
          #- [ enter, Sign in ]
          status_code: 200
        register: devices
        
      #- name: save the json as variable
      #  set_fact: 
      #    jsondata: "{{ devices.stdout | from_json }}"
      
      - name: devicenames
        set_fact: 
          devicenames: "{{ devices | json_query(jmesquery) }}"
        vars:
          jmesquery: '*.devices[*].[hostname, id]'
          
      - name: print devicenames
        debug:
          msg: "{{ item }}"
        with_items:
        - "{{ devicenames }}"

    In this example I’ve printed the captured device value. But in real life scenario it can be captured as a variable and use as input for subsequent tasks.

  • Ansible with DellEMC Storage: Part 7 – Install PowerStore Collection on AWX/Tower

    Ansible with DellEMC Storage: Part 7 – Install PowerStore Collection on AWX/Tower

    This blog is the continuation of Ansible with DellEMC storage multi-part blog.

    In the last (6th Part) of this blog series, we discussed how to prepare Ansible Tower/AWX with Dell EMC storage credentials.

    In this blog post, we will install Dell EMC PowerStore collection on Ansible AWX and go through the next steps.

    As we all know that Ansible has moved to Collections – a new ways of managing integrations and content management. Dell EMC has already started working towards this and have released several collections for multiple Dell EMC portfolio products, few of which are listed below.

    Apart from this list you can find other Dell portfolio collections (like OpenManage) on this link

    For the scope of this blog post we will focus on installing Dell EMC PowerStore Ansible collection on Ansible AWX. Technically, all the collections can be installed using similar steps.

    As a Pre-Requisite, this blog post assumes that you have –

    • Ansible AWX installed and running
    • Access to operating system / machine having Ansible AWX installed
    • Access to PowerStore storage system (with credentials)

    Additionally, if you’re getting started with Ansible AWX and/or integration with Dell EMC’s storage products then you can follow this blog series to get started from scratch.

    As part of the installation collection installation steps we need to Ansible AWX machine and then connect to the awx_task docker container.

    Login to the AWX machine. You can list the running AWX containers using below command

    [root@awx ~]# docker container list
    CONTAINER ID        IMAGE                     COMMAND                  CREATED             STATUS              PORTS                  NAMES
    6ced2eccbd7b        ansible/awx_task:11.2.0   "tini -- /bin/sh -c …"   13 months ago       Up 6 days           8052/tcp               awx_task
    42b14fbd15ad        ansible/awx_web:11.2.0    "tini -- /bin/sh -c …"   13 months ago       Up 6 days           0.0.0.0:80->8052/tcp   awx_web
    4c08c0e39128        memcached:alpine          "docker-entrypoint.s…"   13 months ago       Up 6 days           11211/tcp              awx_memcached
    42224676c21a        redis                     "docker-entrypoint.s…"   13 months ago       Up 6 days           6379/tcp               awx_redis
    37d0ca0c67bc        postgres:10               "docker-entrypoint.s…"   13 months ago       Up 6 days           5432/tcp               awx_postgres
    

    Then connect to the awx_task container using below command

    # docker exec -it awx_task bash

    Next, install the PowerStore Ansible Modules collection in awx_task container

    # ansible-galaxy collection install dellemc.powerstore
    Process install dependency map
    Starting collection install process
    Installing 'dellemc.powerstore:1.2.1' to '/home/awx/.ansible/collections/ansible_collections/dellemc/powerstore'
    

    Then logout from the container.

    bash-4.4# exit

    Now you have successfully installed the Dell EMC PowerStore Ansible Modules collection. Next step post installing collection are

    • Create the PowerStore credentials on the Ansible AWX
    • Create PowerStore Project – assuming you’ve PowerStore playbooks on content repo (like Git)
    • Configure Ansible AWX Job template / Workflow template for storage task automation

    All Dell EMC’s published collections comes with sample playbooks to test the functionality and also to get you started with integrations. When it comes to PowerStore you can see them under /home/awx/ansible-powerstore/dellemc_ansible/powerstore/samples directory

    # cd /home/awx/ansible-powerstore/dellemc_ansible/powerstore/samples
    # ls -l
    -rw-r--r-- 1 root root 1892 Jun  4  2020 capacity_volumes.yml
    -rw-r--r-- 1 root root 1042 Jun  4  2020 create_multiple_volumes_async.yml
    -rw-r--r-- 1 root root  799 Jun  4  2020 create_multiple_volumes.yml
    -rw-r--r-- 1 root root  790 Jun  4  2020 delete_multiple_volumes.yml
    -rw-r--r-- 1 root root 1710 Jun  4  2020 find_empty_volume_groups.yml
    -rw-r--r-- 1 root root 1141 Jun  4  2020 search_volumes.yml
    

    You can re-use these sample playbooks to quickly get started with storage automation tasks. Sample playbooks in the collection has multiple variables like –

    • array_ip
    • user
    • password
    • verifycert

    You can capture the storage credentials by creating Dell EMC storage credential type (screenshot below)

    Ansible AWX – Dell EMC Storage Credential Type

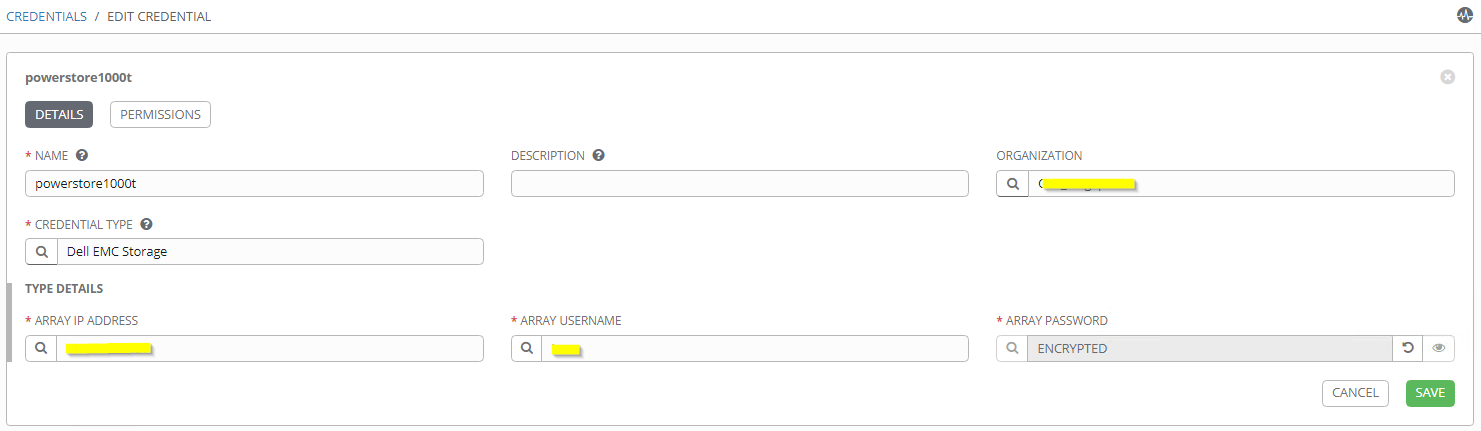
    Once Dell Storage credential type is created then you can add PowerStore array details and credentials using AWX credential manager.

    Ansible AWX – Dell EMC Storage Credential

    After adding PowerStore credential you can use the same in the AWX automation job template creation. Additional variables (like volume names, size, host etc.) can be captured using extra_vars

    Ansible AWX – Job Template Creation

    Additionally you can create survey to capture the required variables and also workflow visualizer to create multi-step breakdown of the automation tasks including but not limited storage automation. Below is the example of breaking down the storage provisioning workflow in the logical steps (like approval, quota management, provisioning, etc.)

    Ansible AWX – Workflow Visualizer

    Hope this helps everyone.

    Update: Please note that the latest version of AWX has moved to Kubernetes (instead of Docker). Please use the below steps to install the PowerStore modules.

    [root@awx ~]# kubectl -n awx exec -it awx-844c574f84-bc4ww -c awx-ee -- /bin/bash
    bash-4.4$ ansible-galaxy collection install dellemc.powerstore -c
    Starting galaxy collection install process
    Process install dependency map
    Starting collection install process
    Downloading https://galaxy.ansible.com/download/dellemc-powerstore-1.6.0.tar.gz to /home/runner/.ansible/tmp/ansible-local-3648wbuk4c_/tmprzm8bse6/dellemc-powerstore-1.6.0-ltamh_71
    Installing 'dellemc.powerstore:1.6.0' to '/home/runner/.ansible/collections/ansible_collections/dellemc/powerstore'
    dellemc.powerstore:1.6.0 was installed successfully
    bash-4.4$
  • Ansible with DellEMC Storage: Part 6 – Prepare Ansible Tower / AWX with Storage Credential

    Ansible with DellEMC Storage: Part 6 – Prepare Ansible Tower / AWX with Storage Credential

    This blog is the continuation of Ansible with DellEMC storage multi-part blog.

    In the last (5th part) of this blog series, we discussed how to install Ansible AWX / Tower in a docker container and Dell EMC Ansible modules inside the Ansible AWX / Tower container.

    In this blog post, we will create a new credential type for Dell EMC storage systems and then add storage credentials in Ansible AWX / Tower.

    So first let’s get started with creating a Credential type for Dell EMC storage array. Login to your Ansible AWX / Tower console. In the navigation pane (on left) click on “Credential Types”. Then click on the green “+” icon on the right to add a new credential type.

    Ansible AWX / Tower – Create New Credential 1

    In the “New Credential Type” creation page enter below details and then click on Save

    • Name – Dell EMC Storage (User Friendly Name)
    • Description – Optional Description
    • Input Configuration – Copy and Paste below text
    fields:
      - id: target
        type: string
        label: Array IP address
      - id: username
        type: string
        label: Array username
      - id: password
        type: string
        label: Array password
        secret: true
    required:
      - target
      - username
      - password
    • Injector Configuration – Copy and Paste below text
    extra_vars:
      password: '{{ password }}'
      target: '{{ target }}'
      username: '{{ username }}'
    
    Ansible AWX / Tower – Create New Credential 2

    Once Credential type is created, click on the “Credentials” in AWX / Tower navigation pane. Then click green “+” button on right to create new Credential.

    Ansible AWX / Tower – Create New Credential 3

    In the “New Credentials” page enter below details.

    • Name – User Friendly Name to identify the storage array. In this example “Production PowerMax”
    • Description – Optional description
    • Organization – You can choose appropriate Organization as per your configuration. Note that Organization can help you to mask these credentials to few users. I have selected Default in my example
    • Credential Type – Choose “Dell EMC Storage”. This is the credential type we have created in earlier step. Credential type which we create earlier will be available on last few pages of the pop-up list. Alternatively you can search the same with “Dell EMC Storage”
    • Type Details
      • Array IP Address – Enter the management IP address of storage array
      • Array Username – Username (I suggest creating separate user for automation)
      • Array Password – Password for the entered username
    Ansible AWX / Tower – Create New Credential 4

    As per your environment you can create multiple credentials, each for one array.

    Ansible AWX / Tower – Create New Credential 5

    Once credentials are created you can now go ahead and create new Ansible AWX / Tower Templates using storage credentials we just created. In the playbook you can mention storage array credentials as variables (username and password). Using these variables you don’t have to mention array credentials as plain text in the playbooks.

    Additionally, you can add other infrastructure / application credentials using the same process.

    I hope this helps everyone. In next post I will take you through creating new Project and Template.

  • Ansible with DellEMC Storage: Part 5 – Get Started with Ansible Tower (Using AWX)

    Ansible with DellEMC Storage: Part 5 – Get Started with Ansible Tower (Using AWX)

    This blog is the continuation of Ansible with DellEMC storage multi-part blog

    In this 5th part, we will discuss about Ansible Tower (using AWX) and how to install and configure the same.

    Overview

    In my posts till now you might noticed that I have only used command line option to run any Ansible commands. There’s a reason for that. By default, when you install Ansible it only installs Ansible Engine, which only has Ansible CLI option. This is where Ansible Tower comes in picture. Note that AWX is the open source project for Ansible Tower.

    While Ansible Tower has many features, below are few features which are my personal favorites. Since data storage management operations can be data destructive, below features are the reasons I am highly recommending using Tower / AWX for automating storage tasks.

    • Web Interface – To manage Ansible using Web interface
    • REST API Support – To manage and integrate Ansible Tower in other platforms. For example – integrating Ansible Tower with Jenkins
    • Task Engine – To create scheduled job and centralized operations.
    • Role Based Access Control – To control Enterprise level access across different team member and limit their visibility to information. This will make sure only designated users are having access to critical data/tasks.

    Installing Ansible Tower (using AWX)

    Make sure that you’ve supported operating systems installed and running. In my case I am using CentOS V7 virtual machine

    Prerequisites –

    Make sure below packages are installed on your machine

    • Make sure you have set the selinux to permissive
      • sudo setenforce permissive
    • Ansible – min version 2.8+
      • yum install -y ansible
    • Docker – Recent version
      • yum install -y docker
    • Docker Python Module
      • Follow below steps for installing docker-compose
    [root@dw-test-1 installer]# sudo curl -L "https://github.com/docker/compose/releases/download/1.25.4/docker-compose-$(uname -s)-$(uname -m)" -o /usr/local/bin/docker-compose
    
    [root@dw-test-1 installer]# sudo chmod +x /usr/local/bin/docker-compose
    
    [root@dw-test-1 installer]# sudo ln -s /usr/local/bin/docker-compose /usr/bin/docker-compose
    
    [root@dw-test-1 installer]# docker-compose --version
    

    Once all the prerequisites are in place run below tasks

    • Clone the Git AWX repository using below command
    [root@dw-test-1 installer]# git clone https://github.com/ansible/awx.git

    This will create awx directory. cd into the awx/installer directory.

    [root@dw-test-1 installer]# cd awx/installer

    This folder has inventory file which has all the AWX parameters. Most important details in this file are passwords which are needed for logging into the AWX post installation. Note that AWX supports installation on Kubernetes and Openshift as well. In this example we will be using docker-compose.

    Most important parameters in inventory file are as mentioned below. In my case I created the vars.yml file with below inputs and used the same while running the installation.

    [root@dw-test-1 installer]# cat vars.yml
    admin_password: 'admin'
    pg_password: 'admin'
    secret_key: 'mysecret'

    Once you’ve checked and verified all the parameters in the inventory file, go ahead and run below command.

    [root@dw-test-1 installer]# ansible-playbook -i inventory install.yml -e @vars.yml

    Note – I faced couple of errors which running this playbook. I suggest taking a look at this link if you face the same.

    Once playbook execution is completed you can run below command to validate the installation.

    [root@dw-test-1 installer]# docker ps
    CONTAINER ID        IMAGE                     COMMAND                  CREATED             STATUS              PORTS                  NAMES
    23b236356057        ansible/awx_task:10.0.0   "/tini -- /bin/sh ..."   6 minutes ago       Up 2 minutes        8052/tcp               awx_task
    a23edc05283e        ansible/awx_web:10.0.0    "/tini -- /bin/sh ..."   6 minutes ago       Up 2 minutes        0.0.0.0:80->8052/tcp   awx_web
    385de9d395da        postgres:10               "docker-entrypoint..."   6 minutes ago       Up 2 minutes        5432/tcp               awx_postgres
    125b9e551823        redis                     "docker-entrypoint..."   2 hours ago         Up 2 minutes        6379/tcp               awx_redis
    2a8ad285e2d5        memcached:alpine          "docker-entrypoint..."   2 hours ago         Up 2 minutes        11211/tcp              awx_memcached
    

    At this point AWX is installed. It takes some time for container to start and configure the AWX. Run the below command and wait till the time you see similar output

    [root@dw-test-1 installer]# docker logs -f awx_task
    ...
    2020-04-12 12:23:18,458 DEBUG    awx.main.dispatch task 7b92a5a8-efa9-4b5e-8dc7-d4ca1d974508 starting awx.main.scheduler.tasks.run_task_manager(*[])
    2020-04-12 12:23:18,466 DEBUG    awx.main.scheduler Running Tower task manager.
    2020-04-12 12:23:18,472 DEBUG    awx.main.scheduler Starting Scheduler
    2020-04-12 12:23:28,468 DEBUG    awx.main.dispatch task ba9a6c3e-24b3-49e4-8cf1-62f90f315780 starting awx.main.tasks.awx_periodic_scheduler(*[])
    2020-04-12 12:23:28,478 DEBUG    awx.main.tasks Starting periodic scheduler
    2020-04-12 12:23:28,480 DEBUG    awx.main.tasks Last scheduler run was: 2020-04-12 12:22:58.567745+00:00
    2020-04-12 12:23:38,483 DEBUG    awx.main.dispatch task 7f4ac140-7231-4c6e-901f-34be80529707 starting awx.main.scheduler.tasks.run_task_manager(*[])
    2020-04-12 12:23:38,493 DEBUG    awx.main.scheduler Running Tower task manager.
    2020-04-12 12:23:38,502 DEBUG    awx.main.scheduler Starting Scheduler
    2020-04-12 12:23:58,522 DEBUG    awx.main.dispatch task 7ed5d956-ba67-4219-9509-1405713fa155 starting awx.main.tasks.cluster_node_heartbeat(*[])
    2020-04-12 12:23:58,632 DEBUG    awx.main.tasks Cluster node heartbeat task.
    2020-04-12 12:23:58,508 DEBUG    awx.main.dispatch task 7ca00dc2-ab9c-4c65-b505-f880afc47f65 starting awx.main.tasks.gather_analytics(*[])
    2020-04-12 12:23:58,560 DEBUG    awx.main.dispatch task 0e539914-105c-462f-89c6-20f1a50b1ec8 starting awx.main.tasks.awx_periodic_scheduler(*[])
    2020-04-12 12:23:58,693 DEBUG    awx.main.tasks Starting periodic scheduler
    2020-04-12 12:23:58,696 DEBUG    awx.main.tasks Last scheduler run was: 2020-04-12 12:23:28.480007+00:00
    2020-04-12 12:23:58,536 DEBUG    awx.main.dispatch task 5ec695f4-80f2-44a0-a18f-cdaa62215b10 starting awx.main.tasks.awx_k8s_reaper(*[])
    2020-04-12 12:23:58,622 WARNING  awx.main.dispatch scaling up worker pid:159
    2020-04-12 12:23:58,738 DEBUG    awx.main.dispatch task a643c365-145c-4bde-9536-d2f647d243f0 starting awx.main.scheduler.tasks.run_task_manager(*[])
    2020-04-12 12:23:58,747 DEBUG    awx.main.scheduler Running Tower task manager.
    2020-04-12 12:23:58,752 DEBUG    awx.main.scheduler Starting Scheduler
    RESULT 2
    OKREADY
    

    Now we will need to install prerequisites for DellEMC Ansible module – PyU4V package. Follow below steps to install DellEMC Ansible module dependencies.

    Connect to the container awx_task

    [root@dw-test-1 installer]# docker exec -it awx_task bash

    On the container prompt run below command to install PyU4V package

    bash-4.4# pip3 install PyU4V==9.1.1.0
    WARNING: Running pip install with root privileges is generally not a good idea. Try `pip3 install --user` instead.
    Collecting PyU4V==9.1.1.0
      Downloading https://files.pythonhosted.org/packages/38/83/34e7d4b823f84b74f6ac959b3cc5302882022f65c78e9f91593d531ebd1d/PyU4V-9.1.1.0-py3-none-any.whl (79kB)
        100% |████████████████████████████████| 81kB 2.4MB/s
    Collecting urllib3 (from PyU4V==9.1.1.0)
      Downloading https://files.pythonhosted.org/packages/e8/74/6e4f91745020f967d09332bb2b8b9b10090957334692eb88ea4afe91b77f/urllib3-1.25.8-py2.py3-none-any.whl (125kB)
        100% |████████████████████████████████| 133kB 3.4MB/s
    Collecting prettytable (from PyU4V==9.1.1.0)
      Downloading https://files.pythonhosted.org/packages/ef/30/4b0746848746ed5941f052479e7c23d2b56d174b82f4fd34a25e389831f5/prettytable-0.7.2.tar.bz2
    Requirement already satisfied: six in /usr/lib/python3.6/site-packages (from PyU4V==9.1.1.0)
    Requirement already satisfied: setuptools in /usr/lib/python3.6/site-packages (from PyU4V==9.1.1.0)
    Collecting requests (from PyU4V==9.1.1.0)
      Downloading https://files.pythonhosted.org/packages/1a/70/1935c770cb3be6e3a8b78ced23d7e0f3b187f5cbfab4749523ed65d7c9b1/requests-2.23.0-py2.py3-none-any.whl (58kB)
        100% |████████████████████████████████| 61kB 4.4MB/s
    Collecting chardet<4,>=3.0.2 (from requests->PyU4V==9.1.1.0)
      Downloading https://files.pythonhosted.org/packages/bc/a9/01ffebfb562e4274b6487b4bb1ddec7ca55ec7510b22e4c51f14098443b8/chardet-3.0.4-py2.py3-none-any.whl (133kB)
        100% |████████████████████████████████| 143kB 3.8MB/s
    Collecting certifi>=2017.4.17 (from requests->PyU4V==9.1.1.0)
      Downloading https://files.pythonhosted.org/packages/57/2b/26e37a4b034800c960a00c4e1b3d9ca5d7014e983e6e729e33ea2f36426c/certifi-2020.4.5.1-py2.py3-none-any.whl (157kB)
        100% |████████████████████████████████| 163kB 3.8MB/s
    Requirement already satisfied: idna<3,>=2.5 in /usr/lib/python3.6/site-packages (from requests->PyU4V==9.1.1.0)
    Installing collected packages: urllib3, prettytable, chardet, certifi, requests, PyU4V
      Running setup.py install for prettytable ... done
    Successfully installed PyU4V-9.1.1.0 certifi-2020.4.5.1 chardet-3.0.4 prettytable-0.7.2 requests-2.23.0 urllib3-1.25.8
    

    Once completed you can check installed version using

    bash-4.4# pip3 list | grep PyU4V
    PyU4V (9.1.1.0)

    At this point you have AWX up and running and can be reached on http://localhost:80.

    Tower is now running on the host at port 80.  The rest of the setup is handled by the web interface .  If you did this on the system you are using you can use http://localhost.

    If everything went well then you can see login prompt similar to the below screenshot. Login credentials for AWX are as per inventory file.

    undefined

    This concludes Ansible Tower (AWX) installation process. In next posts we will discuss on configuring Ansible Tower / AWX.

  • Installation of AWX using Ansible fails with error – “Unable to load docker-compose. Try `pip install docker-compose`, ImportError: No module named zipp, ImportError: No module named configparser

    Installation of AWX using Ansible fails with error – “Unable to load docker-compose. Try `pip install docker-compose`, ImportError: No module named zipp, ImportError: No module named configparser

    Recently while I was trying to install AWX using Ansible I came across below error on Centos.

    Docker-compose error while installing AWX
    fatal: [localhost]: FAILED! => {"changed": false, "msg": "Unable to load docker-compose. Try `pip install docker-compose`. Error: Traceback (most recent call last):\n  File \"/tmp/ansible_docker_compose_payload_jNhEZ8/ansible_docker_compose_payload.zip/ansible/modules/cloud/docker/docker_compose.py\", line 483, in <module>\n  File \"/usr/lib/python2.7/site-packages/compose/cli/command.py\", line 12, in <module>\n    from .. import config\n  File \"/usr/lib/python2.7/site-packages/compose/config/__init__.py\", line 6, in <module>\n    from .config import ConfigurationError\n  File \"/usr/lib/python2.7/site-packages/compose/config/config.py\", line 51, in <module>\n    from .validation import match_named_volumes\n  File \"/usr/lib/python2.7/site-packages/compose/config/validation.py\", line 12, in <module>\n    from jsonschema import Draft4Validator\n  File \"/usr/lib/python2.7/site-packages/jsonschema/__init__.py\", line 33, in <module>\n    import importlib_metadata as metadata\n  File \"/usr/lib/python2.7/site-packages/importlib_metadata/__init__.py\", line 9, in <module>\n    import zipp\nImportError: No module named zipp\n"}

    While this error was referring to missing pip package “docker-compose”, but when I tried to install the same it gave below error stating that it’s already installed.

    [root@dw-test-1 installer]# pip install docker-compose
    Requirement already satisfied (use --upgrade to upgrade): docker-compose in /usr/lib/python2.7/site-packages
    Requirement already satisfied (use --upgrade to upgrade): texttable<2,>=0.9.0 in /usr/lib/python2.7/site-packages (from docker-compose)
    Requirement already satisfied (use --upgrade to upgrade): requests<3,>=2.20.0 in /usr/lib/python2.7/site-packages (from docker-compose)
    Requirement already satisfied (use --upgrade to upgrade): dockerpty<1,>=0.4.1 in /usr/lib/python2.7/site-packages (from docker-compose)
    Requirement already satisfied (use --upgrade to upgrade): six<2,>=1.3.0 in /usr/lib/python2.7/site-packages (from docker-compose)
    Requirement already satisfied (use --upgrade to upgrade): docopt<1,>=0.6.1 in /usr/lib/python2.7/site-packages (from docker-compose)
    Requirement already satisfied (use --upgrade to upgrade): ipaddress<2,>=1.0.16; python_version < "3.3" in /usr/lib/python2.7/site-packages (from docker-compose)
    Requirement already satisfied (use --upgrade to upgrade): subprocess32<4,>=3.5.4; python_version < "3.2" in /usr/lib64/python2.7/site-packages (from docker-compose)
    Requirement already satisfied (use --upgrade to upgrade): enum34<2,>=1.0.4; python_version < "3.4" in /usr/lib/python2.7/site-packages (from docker-compose)
    Requirement already satisfied (use --upgrade to upgrade): websocket-client<1,>=0.32.0 in /usr/lib/python2.7/site-packages (from docker-compose)
    Requirement already satisfied (use --upgrade to upgrade): jsonschema<4,>=2.5.1 in /usr/lib/python2.7/site-packages (from docker-compose)
    Requirement already satisfied (use --upgrade to upgrade): backports.shutil-get-terminal-size==1.0.0; python_version < "3.3" in /usr/lib/python2.7/site-packages (from docker-compose)
    Requirement already satisfied (use --upgrade to upgrade): backports.ssl-match-hostname<4,>=3.5; python_version < "3.5" in /usr/lib/python2.7/site-packages (from docker-compose)
    Requirement already satisfied (use --upgrade to upgrade): cached-property<2,>=1.2.0 in /usr/lib/python2.7/site-packages (from docker-compose)
    Requirement already satisfied (use --upgrade to upgrade): PyYAML<6,>=3.10 in /usr/lib64/python2.7/site-packages (from docker-compose)
    Requirement already satisfied (use --upgrade to upgrade): docker[ssh]<5,>=3.7.0 in /usr/lib/python2.7/site-packages (from docker-compose)
    Requirement already satisfied (use --upgrade to upgrade): urllib3!=1.25.0,!=1.25.1,<1.26,>=1.21.1 in /usr/lib/python2.7/site-packages (from requests<3,>=2.20.0->docker-compose)
    Requirement already satisfied (use --upgrade to upgrade): idna<3,>=2.5 in /usr/lib/python2.7/site-packages (from requests<3,>=2.20.0->docker-compose)
    Requirement already satisfied (use --upgrade to upgrade): chardet<4,>=3.0.2 in /usr/lib/python2.7/site-packages (from requests<3,>=2.20.0->docker-compose)
    Requirement already satisfied (use --upgrade to upgrade): certifi>=2017.4.17 in /usr/lib/python2.7/site-packages (from requests<3,>=2.20.0->docker-compose)
    Requirement already satisfied (use --upgrade to upgrade): pyrsistent>=0.14.0 in /usr/lib64/python2.7/site-packages (from jsonschema<4,>=2.5.1->docker-compose)
    Requirement already satisfied (use --upgrade to upgrade): setuptools in /usr/lib/python2.7/site-packages (from jsonschema<4,>=2.5.1->docker-compose)
    Requirement already satisfied (use --upgrade to upgrade): attrs>=17.4.0 in /usr/lib/python2.7/site-packages (from jsonschema<4,>=2.5.1->docker-compose)
    Requirement already satisfied (use --upgrade to upgrade): importlib-metadata; python_version < "3.8" in /usr/lib/python2.7/site-packages (from jsonschema<4,>=2.5.1->docker-compose)
    Requirement already satisfied (use --upgrade to upgrade): functools32; python_version < "3" in /usr/lib/python2.7/site-packages (from jsonschema<4,>=2.5.1->docker-compose)
    Requirement already satisfied (use --upgrade to upgrade): paramiko>=2.4.2; extra == "ssh" in /usr/lib/python2.7/site-packages (from docker[ssh]<5,>=3.7.0->docker-compose)
    Collecting configparser>=3.5; python_version < "3" (from importlib-metadata; python_version < "3.8"->jsonschema<4,>=2.5.1->docker-compose)
      Using cached https://files.pythonhosted.org/packages/e5/7c/d4ccbcde76b4eea8cbd73b67b88c72578e8b4944d1270021596e80b13deb/configparser-5.0.0.tar.gz
      Running setup.py (path:/tmp/pip-build-c4RmaK/configparser/setup.py) egg_info for package configparser produced metadata for project name unknown. Fix your #egg=configparser fragments.
      Requirement already satisfied (use --upgrade to upgrade): unknown from https://files.pythonhosted.org/packages/e5/7c/d4ccbcde76b4eea8cbd73b67b88c72578e8b4944d1270021596e80b13deb/configparser-5.0.0.tar.gz#sha256=2ca44140ee259b5e3d8aaf47c79c36a7ab0d5e94d70bd4105c03ede7a20ea5a1 in /usr/lib/python2.7/site-packages (from importlib-metadata; python_version < "3.8"->jsonschema<4,>=2.5.1->docker-compose)
    Collecting zipp>=0.5 (from importlib-metadata; python_version < "3.8"->jsonschema<4,>=2.5.1->docker-compose)
      Using cached https://files.pythonhosted.org/packages/ce/8c/2c5f7dc1b418f659d36c04dec9446612fc7b45c8095cc7369dd772513055/zipp-3.1.0.tar.gz
      Running setup.py (path:/tmp/pip-build-c4RmaK/zipp/setup.py) egg_info for package zipp produced metadata for project name unknown. Fix your #egg=zipp fragments.
      Requirement already satisfied (use --upgrade to upgrade): unknown from https://files.pythonhosted.org/packages/ce/8c/2c5f7dc1b418f659d36c04dec9446612fc7b45c8095cc7369dd772513055/zipp-3.1.0.tar.gz#sha256=c599e4d75c98f6798c509911d08a22e6c021d074469042177c8c86fb92eefd96 in /usr/lib/python2.7/site-packages (from importlib-metadata; python_version < "3.8"->jsonschema<4,>=2.5.1->docker-compose)
    Requirement already satisfied (use --upgrade to upgrade): contextlib2; python_version < "3" in /usr/lib/python2.7/site-packages (from importlib-metadata; python_version < "3.8"->jsonschema<4,>=2.5.1->docker-compose)
    Requirement already satisfied (use --upgrade to upgrade): pathlib2; python_version < "3" in /usr/lib/python2.7/site-packages (from importlib-metadata; python_version < "3.8"->jsonschema<4,>=2.5.1->docker-compose)
    Requirement already satisfied (use --upgrade to upgrade): pynacl>=1.0.1 in /usr/lib64/python2.7/site-packages (from paramiko>=2.4.2; extra == "ssh"->docker[ssh]<5,>=3.7.0->docker-compose)
    Requirement already satisfied (use --upgrade to upgrade): cryptography>=2.5 in /usr/lib64/python2.7/site-packages (from paramiko>=2.4.2; extra == "ssh"->docker[ssh]<5,>=3.7.0->docker-compose)
    Requirement already satisfied (use --upgrade to upgrade): bcrypt>=3.1.3 in /usr/lib64/python2.7/site-packages (from paramiko>=2.4.2; extra == "ssh"->docker[ssh]<5,>=3.7.0->docker-compose)
    Requirement already satisfied (use --upgrade to upgrade): scandir; python_version < "3.5" in /usr/lib64/python2.7/site-packages (from pathlib2; python_version < "3"->importlib-metadata; python_version < "3.8"->jsonschema<4,>=2.5.1->docker-compose)
    Requirement already satisfied (use --upgrade to upgrade): cffi>=1.4.1 in /usr/lib64/python2.7/site-packages (from pynacl>=1.0.1->paramiko>=2.4.2; extra == "ssh"->docker[ssh]<5,>=3.7.0->docker-compose)
    Requirement already satisfied (use --upgrade to upgrade): pycparser in /usr/lib/python2.7/site-packages (from cffi>=1.4.1->pynacl>=1.0.1->paramiko>=2.4.2; extra == "ssh"->docker[ssh]<5,>=3.7.0->docker-compose)
    You are using pip version 8.1.2, however version 20.0.2 is available.
    You should consider upgrading via the 'pip install --upgrade pip' command.
    

    After trying multiple solutions on several forums and reinstalling everything from scratch finally I thought of upgrading pip.

    [root@dw-test-1 installer]# pip install --upgrade pip
    Collecting pip
      Downloading https://files.pythonhosted.org/packages/54/0c/d01aa759fdc501a58f431eb594a17495f15b88da142ce14b5845662c13f3/pip-20.0.2-py2.py3-none-any.whl (1.4MB)
        100% |████████████████████████████████| 1.4MB 787kB/s
    Installing collected packages: pip
      Found existing installation: pip 8.1.2
        Uninstalling pip-8.1.2:
          Successfully uninstalled pip-8.1.2
    Successfully installed pip-20.0.2

    Post upgrading pip to latest version I reinstalled docker-compose.

    [root@dw-test-1 installer]# pip install docker-compose
    DEPRECATION: Python 2.7 reached the end of its life on January 1st, 2020. Please upgrade your Python as Python 2.7 is no longer maintained. A future version of pip will drop support for Python 2.7. More details about Python 2 support in pip, can be found at https://pip.pypa.io/en/latest/development/release-process/#python-2-support
    Requirement already satisfied: docker-compose in /usr/lib/python2.7/site-packages (1.25.5)
    Requirement already satisfied: backports.shutil-get-terminal-size==1.0.0; python_version < "3.3" in /usr/lib/python2.7/site-packages (from docker-compose) (1.0.0)
    Requirement already satisfied: six<2,>=1.3.0 in /usr/lib/python2.7/site-packages (from docker-compose) (1.9.0)
    Requirement already satisfied: PyYAML<6,>=3.10 in /usr/lib64/python2.7/site-packages (from docker-compose) (3.10)
    Requirement already satisfied: docker[ssh]<5,>=3.7.0 in /usr/lib/python2.7/site-packages (from docker-compose) (4.2.0)
    Requirement already satisfied: dockerpty<1,>=0.4.1 in /usr/lib/python2.7/site-packages (from docker-compose) (0.4.1)
    Requirement already satisfied: jsonschema<4,>=2.5.1 in /usr/lib/python2.7/site-packages (from docker-compose) (3.2.0)
    Requirement already satisfied: requests<3,>=2.20.0 in /usr/lib/python2.7/site-packages (from docker-compose) (2.23.0)
    Requirement already satisfied: enum34<2,>=1.0.4; python_version < "3.4" in /usr/lib/python2.7/site-packages (from docker-compose) (1.0.4)
    Requirement already satisfied: websocket-client<1,>=0.32.0 in /usr/lib/python2.7/site-packages (from docker-compose) (0.57.0)
    Requirement already satisfied: cached-property<2,>=1.2.0 in /usr/lib/python2.7/site-packages (from docker-compose) (1.5.1)
    Requirement already satisfied: ipaddress<2,>=1.0.16; python_version < "3.3" in /usr/lib/python2.7/site-packages (from docker-compose) (1.0.16)
    Requirement already satisfied: docopt<1,>=0.6.1 in /usr/lib/python2.7/site-packages (from docker-compose) (0.6.2)
    Requirement already satisfied: subprocess32<4,>=3.5.4; python_version < "3.2" in /usr/lib64/python2.7/site-packages (from docker-compose) (3.5.4)
    Requirement already satisfied: texttable<2,>=0.9.0 in /usr/lib/python2.7/site-packages (from docker-compose) (1.6.2)
    Requirement already satisfied: backports.ssl-match-hostname<4,>=3.5; python_version < "3.5" in /usr/lib/python2.7/site-packages (from docker-compose) (3.5.0.1)
    Requirement already satisfied: paramiko>=2.4.2; extra == "ssh" in /usr/lib/python2.7/site-packages (from docker[ssh]<5,>=3.7.0->docker-compose) (2.7.1)
    Requirement already satisfied: setuptools in /usr/lib/python2.7/site-packages (from jsonschema<4,>=2.5.1->docker-compose) (0.9.8)
    Requirement already satisfied: pyrsistent>=0.14.0 in /usr/lib64/python2.7/site-packages (from jsonschema<4,>=2.5.1->docker-compose) (0.16.0)
    Requirement already satisfied: attrs>=17.4.0 in /usr/lib/python2.7/site-packages (from jsonschema<4,>=2.5.1->docker-compose) (19.3.0)
    Requirement already satisfied: importlib-metadata; python_version < "3.8" in /usr/lib/python2.7/site-packages (from jsonschema<4,>=2.5.1->docker-compose) (1.6.0)
    Requirement already satisfied: functools32; python_version < "3" in /usr/lib/python2.7/site-packages (from jsonschema<4,>=2.5.1->docker-compose) (3.2.3.post2)
    Requirement already satisfied: idna<3,>=2.5 in /usr/lib/python2.7/site-packages (from requests<3,>=2.20.0->docker-compose) (2.9)
    Requirement already satisfied: chardet<4,>=3.0.2 in /usr/lib/python2.7/site-packages (from requests<3,>=2.20.0->docker-compose) (3.0.4)
    Requirement already satisfied: urllib3!=1.25.0,!=1.25.1,<1.26,>=1.21.1 in /usr/lib/python2.7/site-packages (from requests<3,>=2.20.0->docker-compose) (1.25.8)
    Requirement already satisfied: certifi>=2017.4.17 in /usr/lib/python2.7/site-packages (from requests<3,>=2.20.0->docker-compose) (2020.4.5.1)
    Requirement already satisfied: bcrypt>=3.1.3 in /usr/lib64/python2.7/site-packages (from paramiko>=2.4.2; extra == "ssh"->docker[ssh]<5,>=3.7.0->docker-compose) (3.1.7)
    Requirement already satisfied: pynacl>=1.0.1 in /usr/lib64/python2.7/site-packages (from paramiko>=2.4.2; extra == "ssh"->docker[ssh]<5,>=3.7.0->docker-compose) (1.3.0)
    Requirement already satisfied: cryptography>=2.5 in /usr/lib64/python2.7/site-packages (from paramiko>=2.4.2; extra == "ssh"->docker[ssh]<5,>=3.7.0->docker-compose) (2.9)
    Requirement already satisfied: pathlib2; python_version < "3" in /usr/lib/python2.7/site-packages (from importlib-metadata; python_version < "3.8"->jsonschema<4,>=2.5.1->docker-compose) (2.3.5)
    Requirement already satisfied: contextlib2; python_version < "3" in /usr/lib/python2.7/site-packages (from importlib-metadata; python_version < "3.8"->jsonschema<4,>=2.5.1->docker-compose) (0.6.0.post1)
    Collecting zipp>=0.5
      Downloading zipp-1.2.0-py2.py3-none-any.whl (4.8 kB)
    Collecting configparser>=3.5; python_version < "3"
      Downloading configparser-4.0.2-py2.py3-none-any.whl (22 kB)
    Requirement already satisfied: cffi>=1.1 in /usr/lib64/python2.7/site-packages (from bcrypt>=3.1.3->paramiko>=2.4.2; extra == "ssh"->docker[ssh]<5,>=3.7.0->docker-compose) (1.14.0)
    Requirement already satisfied: scandir; python_version < "3.5" in /usr/lib64/python2.7/site-packages (from pathlib2; python_version < "3"->importlib-metadata; python_version < "3.8"->jsonschema<4,>=2.5.1->docker-compose) (1.10.0)
    Requirement already satisfied: pycparser in /usr/lib/python2.7/site-packages (from cffi>=1.1->bcrypt>=3.1.3->paramiko>=2.4.2; extra == "ssh"->docker[ssh]<5,>=3.7.0->docker-compose) (2.14)
    Installing collected packages: zipp, configparser
    Successfully installed configparser-4.0.2 zipp-1.2.0
    

    This time zipp and configparser packages also got installed with docker-compose. This resolved my issue and I was able to go ahead with successful AWX installation.

    In summary –

    • First upgrade pip to latest version
    • Then install docker-compose. Make sure zipp and configparser are getting installed with the same.

    Cheers and happy automating!

  • [WARNING]: The value 1 (type int) in a string field was converted to u’1′ (type string)

    [WARNING]: The value 1 (type int) in a string field was converted to u’1′ (type string)

    I have seen this error multiple times during my Ansible playbooks execution but always ignored it because I always got the expected result.

    Eventually, I wanted to get rid of any errors/warnings from my final version of the playbook and wanted to take care of this error as well. Hence I had to do little readings in this error/warning.

    [WARNING]: The value 1 (type int) in a string field was converted to u'1' (type string). If this does not look like what you expect, quote the entire value to ensure it does
    not change.

    As per the Ansible official documentation this is the Default behavior of starting Ansible version 2.8. Ansible will warn if a module expects a string, but a non-string value is passed and automatically converted to a string.

    For example – If your playbook inputs a value version number 1.10 (parsed as float value) would be converted to '1.1'. Such conversions can result in unexpected behavior depending on context and also will/might change playbook’s expected outcomes

    There are two solutions to address this issue.

    1. ANSIBLE_STRING_CONVERSION_ACTION Environment Variable

    This behavior can be changed to be an error or to be ignored by setting the ANSIBLE_STRING_CONVERSION_ACTION environment variable, or by setting the string_conversion_action configuration in the defaults section of ansible.cfg.

    You can refer to this link to change the string_conversion_action parameter in defaults section of Ansible.cfg. This will make sure Ansible will not change the input to String

    2. Quote the input values in playbook

    I personally prefer this method instead of editing Ansible.cfg file. To make sure you’re not getting string field conversion Warning message you can simply quote the input value. Below is the example for the same.

      - name: Sample sysctl task
        sysctl:
         name: net.bridge.bridge-nf-call-iptables
         value: '1'
         state: present

    Below are the playbook screen captures of before and after quoting the values in playbook

    The value 1 (type int) in a string field was converted to u'1' (type string) - Before Solution
    The value 1 (type int) in a string field was converted to u’1′ (type string) –
    Before making changes
    The value 1 (type int) in a string field was converted to u'1' (type string) - After Solution
    The value 1 (type int) in a string field was converted to u’1′ (type string) – After making changes

    I hope this helps everyone.

  • Fix Error – Failed to reload sysctl: sysctl: cannot stat /proc/sys/net/bridge/bridge-nf-call-ip6tables

    Fix Error – Failed to reload sysctl: sysctl: cannot stat /proc/sys/net/bridge/bridge-nf-call-ip6tables

    I have been working with Ansible for automating Kubernetes deployment using CentOS VM templates. As a pre-requisite we need to ensure net.bridge.bridge-nf-call-iptables and net.bridge.bridge-nf-call-ip6tables is set to 1.

    I created below tasks in my Ansible role playbook.

    # Set net.bridge.bridge-nf-call-ip6tables value to 1 all K8S cluster nodes
      - name: ensure net.bridge.bridge-nf-call-ip6tables is set to 1
        sysctl:
         name: net.bridge.bridge-nf-call-ip6tables
         value: 1
         state: present
       
    # Set net.bridge.bridge-nf-call-iptables value to 1 all K8S cluster nodes
      - name: ensure net.bridge.bridge-nf-call-iptables is set to 1
        sysctl:
         name: net.bridge.bridge-nf-call-iptables
         value: 1
         state: present
       

    But when I executed this playbook I got below error

    fatal: [prod-k8s-master01]: FAILED! => {"changed": false, "msg": "Failed to reload sysctl: sysctl: cannot stat /proc/sys/net/bridge/bridge-nf-call-ip6tables: No such file or dire                                                ctory\nsysctl: cannot stat /proc/sys/net/bridge/bridge-nf-call-iptables: No such file or directory\n"}
    fatal: [prod-k8s-worker01]: FAILED! => {"changed": false, "msg": "Failed to reload sysctl: sysctl: cannot stat /proc/sys/net/bridge/bridge-nf-call-ip6tables: No such file or dire                                                ctory\nsysctl: cannot stat /proc/sys/net/bridge/bridge-nf-call-iptables: No such file or directory\n"}

    After lots of reading and researching I found that I did not escalate the privileges on in my main YML file. After adding Become: yes in the main YML resolved my issue. Below is the syntax of my main playbook.

    - hosts: all
      gather_facts: false
      become: yes
      vars_files:
        - answerfile.yml

    Sometimes common mistakes are the most time consuming because we take it for granted.

    Note that in my example I am using CentOS.