Tag: postman

  • ServiceNow catalog request with Postman

    In this blog post we will explore how to order items from a ServiceNow catalog using the ServiceNow REST API. There are a few examples out there that use “REST API Explorer” inside ServiceNow. I will focus here on how to do it from an external tool. In particular I am going to provide instructions for Postman. This post is the stepping stone for this follow up post where I try to solve an interesting use case of providing multi-cloud with governance through ServiceNow. You can get the Postman collection I am using from this GitHub repo.

    This is the latest addition to a series of popular ServiceNow related posts:

    There is also a follow up post that uses what I am covering here to allow developers to provision multi-cloud IT resources while observing any governance that might have been implemented in ServiceNow.

    In the post about creating Incidents we covered the “REST API Explorer” tool in more detail. Please refer to that one if you are new to it. In this post we will use the “Service Catalog API“. In this screenshot you can see it is a very extensive API. It provides 47 API calls as of time of this writing.

    Postman

    Now let’s move to Postman. Feel free to use any other REST API developer tool you are used to. If you want to follow along you can retrieve my Postman collection from this GitHub repo. The Postman collection provides 3 folders. In this post we will use the “Catalog Request” folder. The other 2 folders contain the API calls that were used in 2 previous posts in this series mentioned above.

    Requesting items from catalogs can be done in two ways that mimic the behavior of the user in the GUI:

    • order now
    • add to cart and submit the cart

    Add to Cart and Submit order

    This is a 2-step process but it might be more convenient if you are planning to order multiple items in the same request.

    • add an item to the cart
    • submit the cart

    Adding an item to the cart is done with the following API call. Please replace {instance} with your particular ServiceNow instance.

    There are 3 things you need to include:

    • sys_id“. This is the “sys_id” of the item itself. As you can see it needs to be included in the URL
    • sysparm_quantity“. This is the quantity of this item you want to add to the cart. It is included in the “Body” parameter and it is required
    • variables“. This is also in the “Body” and needs to include all the information that you would normally provide through the GUI when creating the request. In my case this catalog entry allows me to request the installation of an application on a virtual machine. At a minimum you will need to include all variables that are defined as “mandatory” in your catalog. In my example below I am going to request the installation of an application on an existing virtual machine. You can see I am requesting the installation of Apache web server on a VM called “albtest3_01” which lives in my “sin” datacenter

    If all goes well, you should get a status code of 200 and the details of the cart will be provided in the response.

    You can find out the “sys_id” of the catalog item by browsing to the item itself in your catalog. It will be included in the URL itself as seen here

    Alternatively you can use other calls in the “Service Catalog API” to get it programmatically. One example could be executing this call and looking for the “name” of the item you want:

    You can also find out programmatically what variables you need to include with the following API call. It returns information about every parameter the specific item defined by “sys_id”. Use the “name” fields as the keys in your “Body” parameter. Also pay attention to whether variables show as “mandatory: true“.

    Notice how the response is providing even the valid “choices” for a variable that has been configured as a “select box”.

    At this point you have an item in the cart. You could potentially add other items to the cart but if you need things to be ordered in a certain sequence order 1 item at a time and orchestrate them all in your Infrastructure as Code tool of choice. The final step is to “submit the order”. This is done with the following API call

    This API call is also part of the Postman collection you downloaded. As you can see in the screenshot below, even though this is a POST call, it doesn’t require a “Body” payload. If successful you should get a status code of 200 and the “Body” of the response will contain the “requests number”.

    Order now

    This is the most straight forward process as it consists of a single REST API call. It uses the “Buy Item (POST)” call. This is the call as shown in REST API Explorer.

    This call needs the same payload that we used to add an item to the cart, ie the quantity and the specific variables that are typically provided in the form in the GUI.

    As you can see, this API call returned a request number instead of cart details because the request was created in a single step. In the following screenshot we can see the request in the “Requests” application in the GUI.

    And in the details of the “Request Item” we can see that the information we specified in the body of the API call was used to create the request.

    Next steps

    Postman allows you to generate code in your language of choice, ex: Python, Golang, etc. You can use this to include what we have covered into a larger script that runs additional tasks.

    Alternatively, you might want to use configuration management or provisioning tools like Ansible or Terraform to order items from the ServiceNow catalog.

  • Send message to Teams channel with REST API or Ansible

    There is no question Microsoft Teams is everywhere these days. Many IT teams use it to collaborate on projects or even day-to-day tasks. On the other hand engineers like to know what their automation solution is doing. Therefore, sending notifications is a very welcome addition to most automation workflows and Teams is the way to go nowadays as opposed to the venerable email. This is a skill we have used in many of our latest infrastructure automation videos in the IaC Avengers YouTube channel and a something that my customers have been wanted to learn. So here we go.

    In this article I am going to cover:

    • prepare your Teams channel to accept messages programmatically
    • use the REST API to create those messages. I will demonstrate it with Postman
    • send a message to Teams using Ansible

    Prepare a Teams channel to receive Webhooks

    The easiest to accomplish this by enabling webhooks for the channel. Webhooks allow one application to notify another of an event. As you will see in the examples later, webhooks are HTTP messages that use the POST method and include a payload that is formatted in a way that makes sense for the recipient application.

    As you can see, I have created a new channel called “Alert Testing”. We can configure webhooks for this channel by easily going into the “Connectors” option

    Once in the Connectors menu you need to find the “Incoming Webhook” option . In my menu it shows up by default at the top. If it doesn’t you can click on the “Developer Tools” category or you can type “webhook” in the search box at the top-left corner

    Now the “Incoming Webhook” configuration page pops up and the only thing we need to do is to provide a name and click “Create”. As soon as you do that it provides you with a “very long” URL as you can see at the bottom on the following screenshot. This is the URL we need to send our HTTP messages to. Now simply copy the URL and keep it somewhere handy. Finally click “Done” and we are ready.

    If you missplace the URL, don’t worry you can always go back to “Connectors” and find it in the “Configured” category.

    Send Teams messages using the REST API

    I like to use Postman when I am discovering a new REST API. It helps me track of what I am discovering and it allows me to package what I have learnt as a “collection” in a format that is easy to share. And this time is no exception. I have created a Postman collection with the 2 examples we are using in this article as well as a sample Ansible playbook. They are available at this repository in GitHub.

    What determines the format and content of the message card in Teams is the payload. You will see this in the “Body” tab. As you can see it is formatted as JSON. Cards in Teams can have a lot of features and the payload can get very complicated but as you can see the basic message only requires 2 fields.

    Don’t forget to paste the webhook URL you got from the previous step so that the message to your channel. To run it simply click “Send”. You should get a “200 OK” status code and your first message will show up in the channel straight away.

    Let’s do now a more sophisticated example. Let’s say that as part of an automation workflow we have created 2 virtual machines and we want to notify a channel in Teams and provide details of the VM’s that were just created. In the example below you can see the “title” includes the actual “id” of the provisioning job. This is something you could extract from the automation workflow and introduce it here for reference.

    In this case the payload this includes a “sections” key which we hadn’t used before. The value of this key is a list, which allows you to define multiple sections in your card. In this case we added only one section and we are populating it with a 2 column table that includes two “facts”. You can have more than 2 facts in your section or you could research how to add other elements like buttons, links …

    When we click “Send” we get our second message in the channel.

    Send Teams messages using Ansible

    Going back to the previous example you might be using Ansible to automate the creation of Virtual Machines and you want to let a team know the details of their details. As you do your provisioning tasks you can register the details of the resources you are creating and then use those to populate payload.

    In Ansible we can use the “uri” module to interact with web services. This includes REST APIs. This module allows us to specify any method we need (“POST” in this case), headers, payload etc. The following screenshot shows an Ansible playbook that creates the same card as the previous example. Notice how the payload has been converted from JSON into its YAML equivalent. You have to pay careful attention indentations and hyphens. You can download the code from the GitHub repo.

    Have fun creating your own messages!

  • ServiceNow CMDB REST API Tutorial

    In this tutorial we are going to use a practical example to show you how to use the ServiceNow REST API. I personally find ServiceNow has great online documentation but I like to see some examples to understand how other people are using it. This is the motivation for this tutorial and for the previous one on ServiceNow incidents with REST API. Let’s get to it!

    Introduction

    The CMDB (Configuration Management Database) in ServiceNow is a key component that underpins multiple services. Most organizations nowadays have a requirement to automate services delivery in order to achieve greater agility and efficiency. If we are going to implement automation in ServiceNow sooner or later we need to deal with the CMDB and the way to do this is to use the REST API.

    In this tutorial we will explore this by using a Postman collection you can find in this GitHub repo. If you need code in a specific language, Postman can help you generate code for any of the API calls in the collection. The collection also contains REST API calls to manage Incidents in ServiceNow. These calls were used in a previous tutorial called “Creating ServiceNow Incidents via REST API” which showed some examples on how to address one of the most common tasks organizations are willing to automate in ServiceNow.

    If you are reading this more than likely you know what a CMDB now, so I won’t provide much detail here. The main thing to know is that the CMDB is organized in a large hierarchy of tables. At the top of the hierarchy we have the “cmdb” table and from that a single child called “cmdb_ci”. This last table is the parent for everything else. (services, applications, servers, networks, databases …).

    All objects in this database are called “Configuration Items” or “CI” for short. You can show all the items by typing “cmdb_ci.list” in the “Navigator”. My developer instance has more than 2800 CI’s. The “class” parameter tells us what type of CI it is and as you will see it is a very important detail when dealing with the REST API.

    The CMDB is accessed in the ServiceNow interface with the “configuration” application. Once you type “configuration” in the “Navigator” you can scroll down to see everything it contains.

    The REST API

    When working with a new REST API, the first step is to learn how to authenticate. In that regard, the ServiceNow REST API is straight forward as you can use basic authentication, ie username and password.

    There are two main tools available to learn what API calls are available: the online product documentation and the REST API Explorer. In the online documentation you have to find the “REST API Reference” and then scroll down to “CMDB Instance API“. This is publicly accessible. In the following screenshot you can see it contains 7 REST API calls that allow you to do a range of CRUD operations.

    Notice how the API calls have the “classname” URL parameter. This corresponds to the “class” we mentioned earlier. Every piece of information one would expect to find (parameters, headers, status codes …) is provided in this documentation

    The second tool is the “REST API Explorer”. This a a great tool that allows you to build your API calls in a graphical manner, including the “body” payload for POST /PUT/PATCH calls. I showed how to use it in the previous tutorial “Creating ServiceNow Incidents via REST API“. However, given the sheer amount of attributes available for all classes of CI’s I am going to suggest a different way of doing this

    Learning with a practical example

    Let’s say we have an automation script that creates and configures a Linux virtual machine and as part of the same script now we want to add an entry for the virtual machine in the CMDB. The following API call is the one we need to use in order to create the CI:

    POST /now/cmdb/instance/cmdb_ci_linux_server

    This POST call requires a request “body” parameter which can have a large number of attributes as well as inbound/outbound relation information, ie how this CI is related to other CI’s. To help us configure the “body” we are going to:

    • create manually a sample resource of the same class (ie. a Linux server in this case) and configure it the way we need it. It is important to configure every attribute we want to use
    • use a GET call for that resource. The response will serve you as a very good reference for the “body” of the POST call we want to automate

    We type “configuration” and scroll down to “Servers” and click on “Linux”. Once in “Linux Servers”, click “New” to create a new Linux server. I have filled in those fields that are relevant to my use case.

    Once ready, you can click submit and the new CI will be created.

    At this point, you might want to add information on how this CI is related to other CI’s. This will be very useful for example to see what services/applications are impacted if there is an incident on this CI. In my example let’s say I want to show that this Linux server depends on a storage volume. Follow these steps:

    • Open the CI you have just created
    • Scroll down to “Related Items”
    • On the right click the “+” symbol next to “Search for CI” to open the “Relationship Editor”

    This opens the “Relationship Editor” as seen below. Now you can select the type of relationship and use the filter tool to search for the CI it depends on, ie a storage volume in our example. Then tick the CI and click the “+” symbol to add the relationship

    In my case I have also created an additional relationship with an application named “Alberto Inventory app”. For the application I chose the “Used by” relationship, meaning that the application is the one that “depends on” the Linux server. In the resulting “Relationships” table below you can see both relationships and the parent/child relationship:

    Back in Linux server record we can see at a glance the resulting relationships in the “Related Items” section. Notice how this is showing an additional relationship “Used by – Alberto Inventory Service”. I didn’t explicitly declared this relationship but I had an existing relationship between this service and the application. So in the end the service also depends on this Linux server

    Now it is time to use Postman to see what the payload looks like. Download the collection and create 2 environment variables “pwd” and “instance” as instructed in the GitHub repo. At this point you can open the “Get CMDB Linux servers” call and click “Send”. This will return a list of Linux servers. But for each of them only the “sys_id” and the “name” are displayed.

    Copy the the “sys_id” of your newly created Linux server CI and open the “GET CMDB Linux server details” call in Postman. In the URL you can the “sys_id” to the end of the URL (see highlighted in yellow) and click “Send”

    This is now showing a very good approximation of the “body” parameter we were after including attributes as well as inbound/outbound relations. Notice though, how it is nested under “result”. Notice also how the JSON payload is showing all the attributes, including attributes were not displayed in the form when we created the resource. Any attribute we didn’t specify during CI creation will be empty. At this point you can make a note of any extra attributes you want to include in your payload.

    Now in Postman let’s open the “select the “POST Create CMDB Linux server” call. This will create a second server called “alblinux02” with the same relationships as the server we created manually. Open the “Body” tab to see the JSON payload.

    The most significant change we need to make to the output of the GET call is to modify those attributes whose value was a “dictionary” with three keys (“display_value”, “link” and “value”). These kind of attributes are in the “attributes” section as well as in the “inbound and outbound relations” sections. What we need to do is to replace the whole dictionary value with just the “sys_id” which happens to be the “value” field in the GET call output

    Now we can click “Send” and the new Linux server CI will be created. You will get the status code “201 Created”. Now in the Linux servers app you should see both Linux servers.

    And if you want to see the whole stack end-to-end you can go to the “application” and click on “Show Dependency views”

    Supplementary API calls

    You might have noticed in the request “Body” of the POST call that I included several “sys_id”. While you can get “sys_id” in the ServiceNow GUI by using right-click, ultimately if you want to automate a process you will have to get that information programmatically. For that purpose the Postman collection includes three API calls to help you get “sys_id” you need:

    • CMDB relationship types
    • CMDB users
    • CMDB CI

    In the screenshot below you can see the three supplementary API calls highlighted in yellow. In the response to the “relationship types” call you would have to locate the item in the list with the “name” of the relationship you need and then extract its “sys_id”.

    The process is very similar if you need to extract the “sys_id” of a “user” or a “CI” with the other two API calls

    Tips and tricks

    It might happen that when you build the payload for a POST call, like the “Create CMDB Linux server” you might accidentally omit a mandatory attribute. You could go to the documentation to see what the mandatory attributes are, but one thing I found really useful is that the ServiceNow REST API let’s you know what you are missing in the error message. In the screenshot below I removed the “discovery_source” attribute and sent the API call. As you can see the error message let’s me know exactly what the problem is.

    One thing to bear in mind is that by default GET api calls return only 1000 records. If you are looking for a certain “CI” in order to extract its “sys_id” it might well happen that you have more than 1000 CI’s in the CMDB and the CI is not in the output. In that case you can use the “sysparm_query” parameters to narrow down the search or use the parameter “sysparm_limit” to retrieve more than 1000 records. You will notice in the Postman collection how the “Get CMDB CI” call is using “sysparm_limit” to retrieve 10000 records.

    That was a long post! Thanks for putting up with me for the last 15 mins 😉 I hope you found this tutorial useful.

  • Dell EMC VxRAIL – Using REST API

    Dell EMC VxRAIL – Using REST API

    There are many use cases where VxRAIL manager, VMware vCenter Console, or vSuite will not be enough for your goals in mind. So, for monitoring and management of your VxRAIL cluster, you can utilize the VxRAIL REST API for achieving your end goal in mind.

    There are multiple ways to get your hands around the VxRAIL REST API

    1. VxRAIL REST API Cookbook – PDF Guide
    2. VxRAIL SwaggerUI

    VxRAIL Swagger UI is always (default) runs on the VxRAIL cluster and can be accessed using a browser. Link for accessing the VxRAIL Swagger UI is – https://<VxRAIL_Manager_IP>/rest/vxm/api-doc.html

    VxRAIL – Swagger UI

    From the Swagger UI (top right – Select a definition drop-down) you can select the categories of API calls. By default, Swagger UI opens into the Day 1 Bring Up Configuration.

    Additionally VxRAIL Swagger UI allows you to play with the APIs on the same page. For this you’ll need to Authorize the page using VxRAIL manager credentials. This is to make sure that user is restricted to the right level of authorization based on their user type.

    For executing / trying the APIs on the VxRAIL cluster you can simply choose the definition from the drop-down. In this case I’ve selected Cluster definition.

    VxRAIL – Select Definition

    If you expand the selected API it will show you multiple sections (Cluster Information in this example)

    VxRAIL – Cluster Information
    • Parameters – Some APIs needs parameters as input for the successful exectution. If applicable they will be listed here
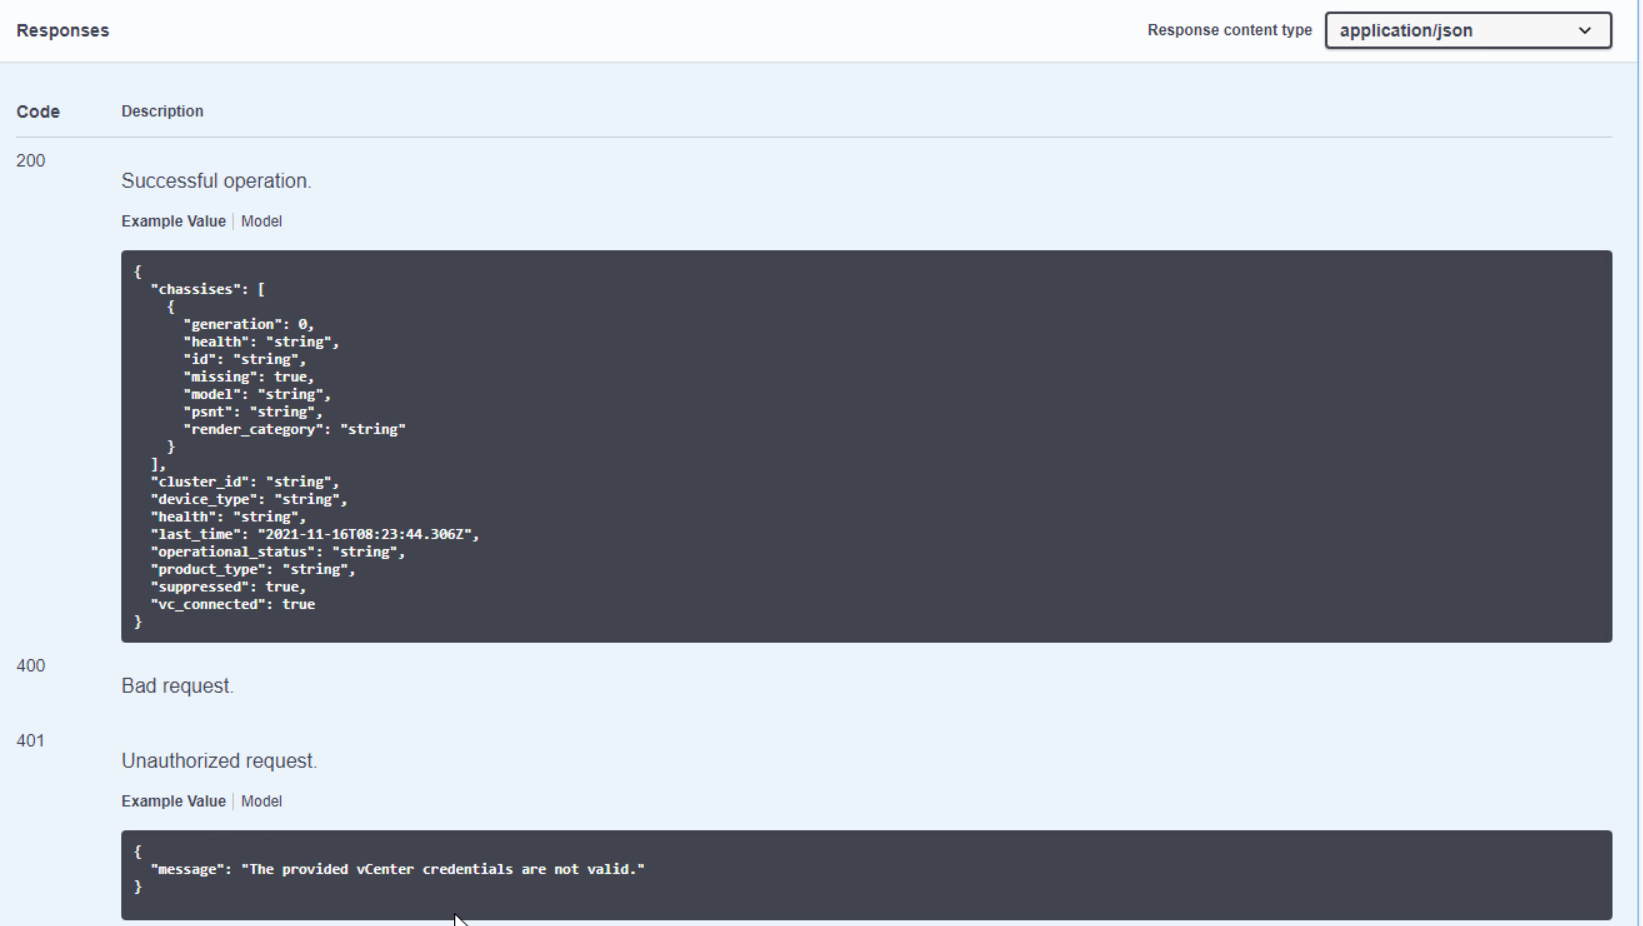
    • Responses – This section shows you the possible response codes for selected API with example output snippet.

    When you click on the Try it out button page gets into the run-mode. Once you enter required parameters (not required in this example) you can click on Execute. At this point request will be sent to VxRAIL manage and response (body and headers) will be shown on the same screen.

    Way Forward

    I hope this gave you the high level overview of VxRAIL APIs and how to access them. Though Swagger has built-in option to try the APIs, but that is the just a API explorer tool. Additionally you can also use the REST clients – like Postman – to interact with the API. Eventually you’ll integrate these APIs with your automation tools – those can be VMware vRA, Ansible, Terraform, or it can be your own developed tool. Technically speaking you can use any tool as far as it has option to interact with REST API.

    More on this coming in next blog posts 🙂

  • Creating ServiceNow Incidents via REST API

    Creating ServiceNow Incidents via REST API

    In this article we will explore how to create incidents in ServiceNow using the REST API. This article was a stepping stone for this video that shows how to integrate ServiceNow, Microsoft Teams and alerts from infrastructure. You might also be interested in the second post in this series: ServiceNow CMDB REST API tutorial

    The very first thing to do when working with a REST API is to get your hands on the reference guide and hopefully the getting started guide if there is one. The first thing to look for is how to authenticate with the API and whether there are any requirements for special headers or things like that. Afterwards things tend to flow faster and easier. Fortunately, ServiceNow supports basic authentication so there is no learning curve there, although it does support more secure authentication through OAuth if you need it

    In terms of documentation the online help is great. Here you can get an overview of the API. And this is the starting point for the online REST API reference. There are many branches or child API’s hanging of this root. In the screenshot below you can see how, for every call, the online help shows the URL (default or for a specific version) and parameters (path, query and request body). Further down it shows headers for the request and the response and even two coding examples for curl and python … as complete as it gets

    But the tool you will learn to love very quickly is the “REST API Explorer”. Please note that this is a tool that you can only access from within your instance. Once you log in go to “System Web Services” and then locate “REST API Explorer” as shown here

    You will then end up with a menu like this. Notice how you can select the specific child API in the top-left corner and the version of your environment.

    ServiceNow stores all data in tables. This is also true for Incidents which unsurprisingly are stored in the “incident” table. To manipulate tables we need to use the Table API. Different HTTP methods will enable us to do the various CRUD operations. For example if we want to create an incident we will have to use the POST method. Notice in the previous image how I have selected the “Table API” and within that API the “Create a record (POST)” call. Then on the right I have selected the “incident” table.

    When you scroll down you can see a dialog that allows you to build the request body for the incident creation. With the drop-down menu you can select from all the available fields. As you select new fields and assign values, the REST API Explorer builds the body for you in the text box immediately below. At the very bottom you can generate code in multiple languages

    We have grouped the API calls we are using in this article into a Postman collection. You can download the collection from the following the following GitHub repo :

    https://github.com/cermegno/postman-servicenow

    The collection uses 2 variables that you must add to an environment. If you are new to Postman environments check out this older article:

    • {{pwd}}. This is the password for the “admin” user of your ServiceNow instance. If you need to use a different user, you can change it in the collection settings
    • {{instance}}. This is your ServiceNow instance name, i.e. excluding the “.service-now.com” suffix. If you don’t have one or you cannot test this with your production instance, you can open your very own developer instance with ServiceNow

    The collection provides 4 calls and a saved example for each call:

    • Get details for all incidents. This will produce a 98 line JSON structure for each incident
    • Get details for a single incident. This requires you to pass the “sys_id” of the incident as part of the URL as shown below. You can get the “sys_id” for a specific incident from the body of the response during the creation (POST) operation
    • Create incident (POST). The JSON Body parameter can take “a lot” of fields but you can start small. For example the following Body produces the incident below:
    • Modify incident (PUT). This will allow you to make changes to incidents. In particular you can use it to resolve/close incidents by setting the state to “7” as shown in the screenshot below. This call also requires you to pass the “sys_id” of the incident you are modifying as part of the URL

    In this article we have used the REST API to interact with ServiceNow because this is the way I will do it in the upcoming video demo. But depending on what you are trying to do you might want to use Ansible. In that case you can use the official Ansible modules provided by ServiceNow themselves. The collection is available in Ansible Galaxy and provides just two modules designed to interact with ServiceNow tables. Follow the instructions in the Ansible Galaxy page to install the dependencies including the “pysnow” Python library

    As a next step you can visit the second post in this series: ServiceNow CMDB REST API tutorial

    We hope you find this article helpful. Let us know your thoughts in the comment section.