This blog is the continuation of Ansible with DellEMC storage multi-part blog.
- In Part 1 of this series, we discussed getting started with the installation of dependencies for the Ansible and DellEMC Ansible module, followed by Ansible installation.
- Part 2 was about the high-level basics of Ansible to get you started quickly.
- Part 3 was getting you through the DellEMC PowerMax Ansible module installation.
In this 4th part, we will discuss available Ansible modules for DellEMC
PowerMax storage. Note that this blog is based on DellEMC PowerMax Ansible Module version 1.1 (Released in Dec 2019).
Before you get started with automating DellEMC PowerMax make sure that you’re running below software versions
- Software Version – 5978.221.221 / 5978.444.444
- Unisphere version – 9.0 / 9.1
Below depicted are the available Ansible modules for DellEMC PowerMax version 1.1.
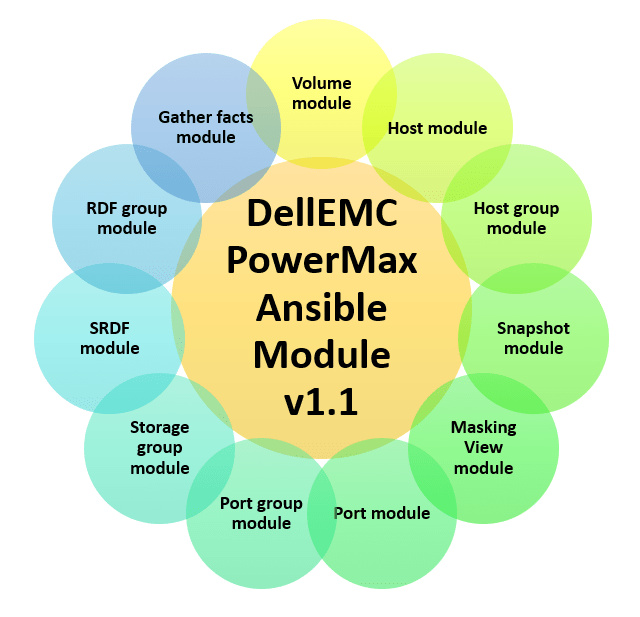
Before you get started it’s important to understand the purpose of each module. Some of the modules can be data disruptive. You can get more details on each function on this link.
On a high level, you can refer to the below architecture diagram of Symmetrix family storage provisioning (applicable to PowerMax as well). This will give you heads up on different definitions and object names used in DellEMC PowerMax.
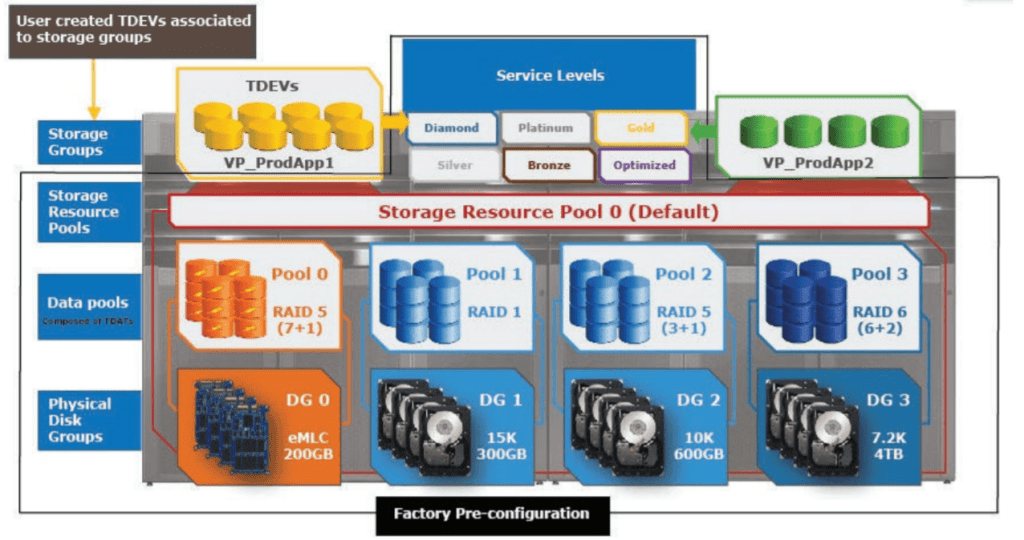
Assuming now we have an understanding of PowerMax definitions, let’s get started on creating Ansible playbook.
Note that the default behavior of Ansible is to use SSH for executing tasks on managed hosts, for which we make hosts file entry. Below is the example of specifying host in the hosts file.
- hosts: webserver
But DellEMC PowerMax Ansible module wraps the RestAPI commands of an array, hence hosts entry isn’t needed. When creating Ansible playbooks for DellEMC PowerMax we’ll need to create the playbook like the below example.
- hosts: localhost
  connection: local
  gather_facts: no
Now let’s talk about how to create playbook. Below is the simple ansible playbook to create storage group.
---
- hosts: localhost
  connection: local
  gather_facts: no

  tasks:
    - name: Create Storage Group using Ansible
      dellemc_powermax_storagegroup:
        serial_no: "000111111333"
        unispherehost: "1.1.1.1"
        universion: "90"
        verifycert: false
        user: "pm_username"
        password: "my_password"
        sg_name: "mySG"
        state: 'present'
Let’s understand tasks parameters used in above sample playbook
- dellemc_powermax_storagegroup – ansible module used for creating storage group
- serial_no – Serial number of PowerMax array. Replace this with your array serial
- unispherehost – IP or hostname of PowerMax Unisphere management. Replace this with your array’s IP/hostname
- universion – Unisphere version
- verifiycert – Unisphere might be running on self signed certificate. You can ask ansible to ignore the certificate verification (value = false).
- user – Unisphere username
- password – Password for supplied username
- sg_name – Name of the Storage Group you want to create
Last 2 lines is where all the magic happens. Here we are asking ansible to create new SG named “mySG”.
Note that though we have supplied credentials and PowerMax array details in the same playbook, it’s not mandatory. You can always move the variables in the separate file and using Ansible vault to make playbooks reusable (more on this in another blog).
I hope this helps everyone to get started with automation of DellEMC PowerMax Day 1/2 tasks using Ansible. We will discuss on more sample playbooks in next blog post.
- Part 1 – Installing Ansible
- Part 2 – Understanding Ansible
- Part 3 – Installing DellEMC PowerMax Ansible Module
- Part 4 – DellEMC PowerMax Ansible Modules


Hi, thanks for sharing. Is there any guide of powermax module integration with AWX ?I use ansible playbooks on my linux host, I needed to copy modules exactly where it needs to be, but could not find any source for integration with AWX.
LikeLike
Hi Dilara, Happy new year to you and your loved ones. For integration with AWX best way is to integration with Galaxy collection. DellEMC is currently publishing new collections for multiple arrays. I am in process of writing new blog on this topic. Stay tuned for this 🙂
LikeLike
Also check below link to install and configure DellEMC ansible module with AWX – https://vexpose.blog/2020/04/12/ansible-with-dellemc-storage-part-5-get-started-with-ansible-tower-using-awx/
LikeLike