Blog

  • Ansible with DellEMC Storage: Part 7 – Install PowerStore Collection on AWX/Tower

    Ansible with DellEMC Storage: Part 7 – Install PowerStore Collection on AWX/Tower

    This blog is the continuation of Ansible with DellEMC storage multi-part blog.

    In the last (6th Part) of this blog series, we discussed how to prepare Ansible Tower/AWX with Dell EMC storage credentials.

    In this blog post, we will install Dell EMC PowerStore collection on Ansible AWX and go through the next steps.

    As we all know that Ansible has moved to Collections – a new ways of managing integrations and content management. Dell EMC has already started working towards this and have released several collections for multiple Dell EMC portfolio products, few of which are listed below.

    Apart from this list you can find other Dell portfolio collections (like OpenManage) on this link

    For the scope of this blog post we will focus on installing Dell EMC PowerStore Ansible collection on Ansible AWX. Technically, all the collections can be installed using similar steps.

    As a Pre-Requisite, this blog post assumes that you have –

    • Ansible AWX installed and running
    • Access to operating system / machine having Ansible AWX installed
    • Access to PowerStore storage system (with credentials)

    Additionally, if you’re getting started with Ansible AWX and/or integration with Dell EMC’s storage products then you can follow this blog series to get started from scratch.

    As part of the installation collection installation steps we need to Ansible AWX machine and then connect to the awx_task docker container.

    Login to the AWX machine. You can list the running AWX containers using below command

    [root@awx ~]# docker container list
    CONTAINER ID        IMAGE                     COMMAND                  CREATED             STATUS              PORTS                  NAMES
    6ced2eccbd7b        ansible/awx_task:11.2.0   "tini -- /bin/sh -c …"   13 months ago       Up 6 days           8052/tcp               awx_task
    42b14fbd15ad        ansible/awx_web:11.2.0    "tini -- /bin/sh -c …"   13 months ago       Up 6 days           0.0.0.0:80->8052/tcp   awx_web
    4c08c0e39128        memcached:alpine          "docker-entrypoint.s…"   13 months ago       Up 6 days           11211/tcp              awx_memcached
    42224676c21a        redis                     "docker-entrypoint.s…"   13 months ago       Up 6 days           6379/tcp               awx_redis
    37d0ca0c67bc        postgres:10               "docker-entrypoint.s…"   13 months ago       Up 6 days           5432/tcp               awx_postgres
    

    Then connect to the awx_task container using below command

    # docker exec -it awx_task bash

    Next, install the PowerStore Ansible Modules collection in awx_task container

    # ansible-galaxy collection install dellemc.powerstore
    Process install dependency map
    Starting collection install process
    Installing 'dellemc.powerstore:1.2.1' to '/home/awx/.ansible/collections/ansible_collections/dellemc/powerstore'
    

    Then logout from the container.

    bash-4.4# exit

    Now you have successfully installed the Dell EMC PowerStore Ansible Modules collection. Next step post installing collection are

    • Create the PowerStore credentials on the Ansible AWX
    • Create PowerStore Project – assuming you’ve PowerStore playbooks on content repo (like Git)
    • Configure Ansible AWX Job template / Workflow template for storage task automation

    All Dell EMC’s published collections comes with sample playbooks to test the functionality and also to get you started with integrations. When it comes to PowerStore you can see them under /home/awx/ansible-powerstore/dellemc_ansible/powerstore/samples directory

    # cd /home/awx/ansible-powerstore/dellemc_ansible/powerstore/samples
    # ls -l
    -rw-r--r-- 1 root root 1892 Jun  4  2020 capacity_volumes.yml
    -rw-r--r-- 1 root root 1042 Jun  4  2020 create_multiple_volumes_async.yml
    -rw-r--r-- 1 root root  799 Jun  4  2020 create_multiple_volumes.yml
    -rw-r--r-- 1 root root  790 Jun  4  2020 delete_multiple_volumes.yml
    -rw-r--r-- 1 root root 1710 Jun  4  2020 find_empty_volume_groups.yml
    -rw-r--r-- 1 root root 1141 Jun  4  2020 search_volumes.yml
    

    You can re-use these sample playbooks to quickly get started with storage automation tasks. Sample playbooks in the collection has multiple variables like –

    • array_ip
    • user
    • password
    • verifycert

    You can capture the storage credentials by creating Dell EMC storage credential type (screenshot below)
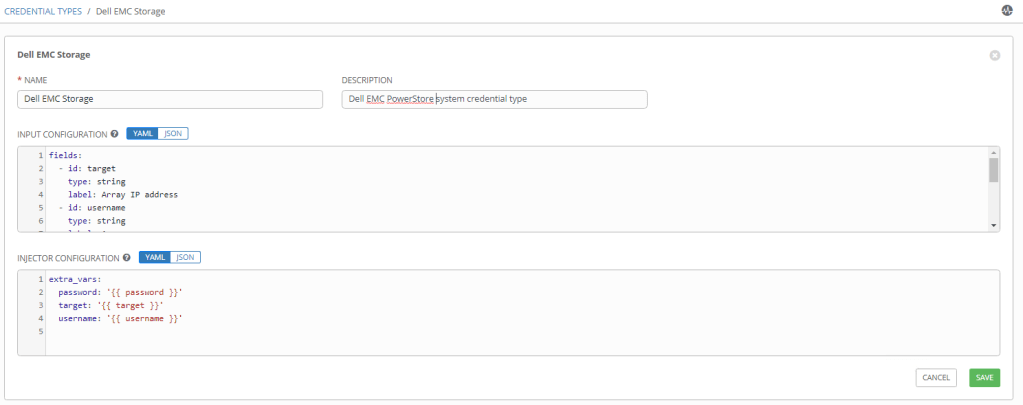
    Ansible AWX – Dell EMC Storage Credential Type

    Once Dell Storage credential type is created then you can add PowerStore array details and credentials using AWX credential manager.
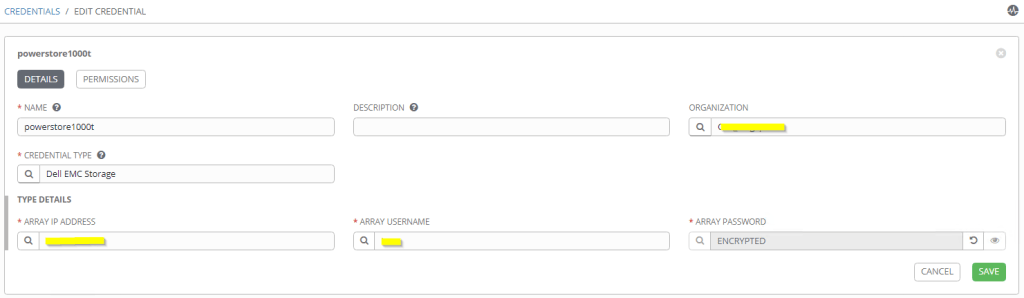
    Ansible AWX – Dell EMC Storage Credential

    After adding PowerStore credential you can use the same in the AWX automation job template creation. Additional variables (like volume names, size, host etc.) can be captured using extra_vars
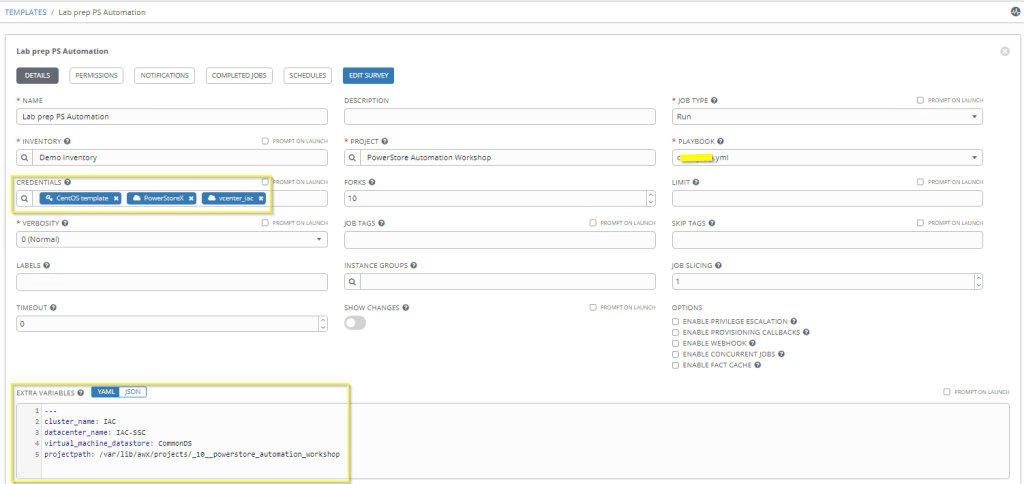
    Ansible AWX – Job Template Creation

    Additionally you can create survey to capture the required variables and also workflow visualizer to create multi-step breakdown of the automation tasks including but not limited storage automation. Below is the example of breaking down the storage provisioning workflow in the logical steps (like approval, quota management, provisioning, etc.)
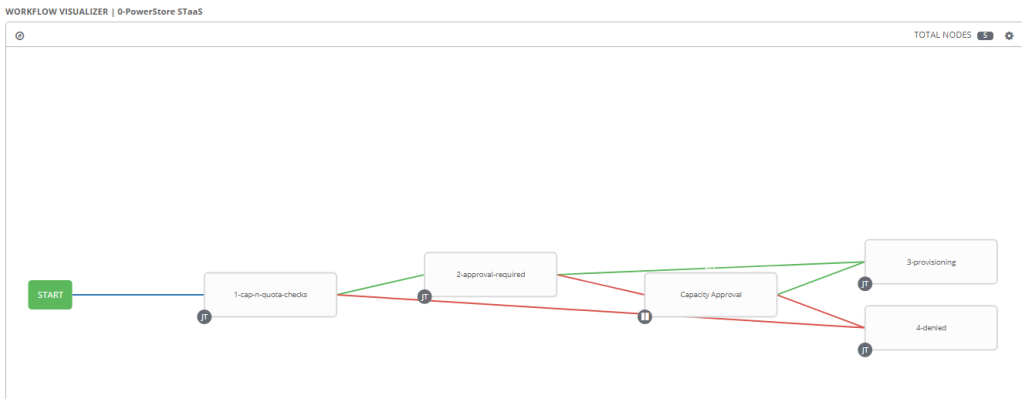
    Ansible AWX – Workflow Visualizer

    Hope this helps everyone.

    Update: Please note that the latest version of AWX has moved to Kubernetes (instead of Docker). Please use the below steps to install the PowerStore modules.

    [root@awx ~]# kubectl -n awx exec -it awx-844c574f84-bc4ww -c awx-ee -- /bin/bash
    bash-4.4$ ansible-galaxy collection install dellemc.powerstore -c
    Starting galaxy collection install process
    Process install dependency map
    Starting collection install process
    Downloading https://galaxy.ansible.com/download/dellemc-powerstore-1.6.0.tar.gz to /home/runner/.ansible/tmp/ansible-local-3648wbuk4c_/tmprzm8bse6/dellemc-powerstore-1.6.0-ltamh_71
    Installing 'dellemc.powerstore:1.6.0' to '/home/runner/.ansible/collections/ansible_collections/dellemc/powerstore'
    dellemc.powerstore:1.6.0 was installed successfully
    bash-4.4$
  • Dell EMC VxRAIL – Using REST API

    Dell EMC VxRAIL – Using REST API

    There are many use cases where VxRAIL manager, VMware vCenter Console, or vSuite will not be enough for your goals in mind. So, for monitoring and management of your VxRAIL cluster, you can utilize the VxRAIL REST API for achieving your end goal in mind.

    There are multiple ways to get your hands around the VxRAIL REST API

    1. VxRAIL REST API Cookbook – PDF Guide
    2. VxRAIL SwaggerUI

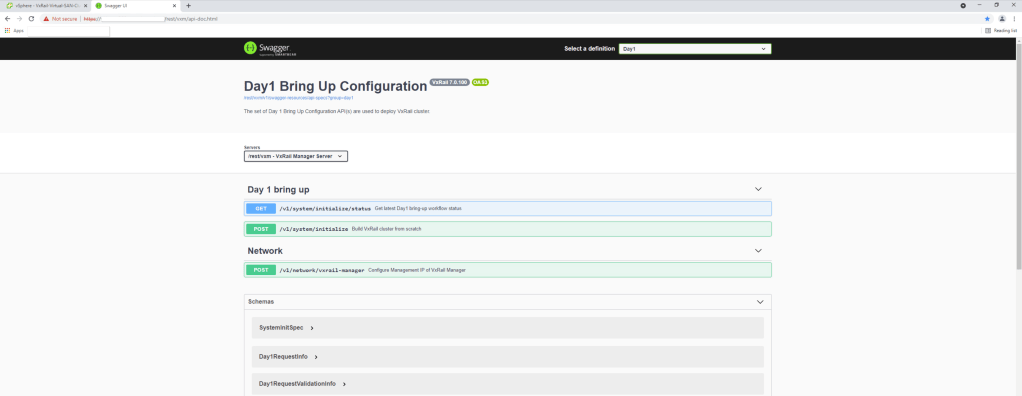
    VxRAIL Swagger UI is always (default) runs on the VxRAIL cluster and can be accessed using a browser. Link for accessing the VxRAIL Swagger UI is – https://<VxRAIL_Manager_IP>/rest/vxm/api-doc.html

    VxRAIL – Swagger UI

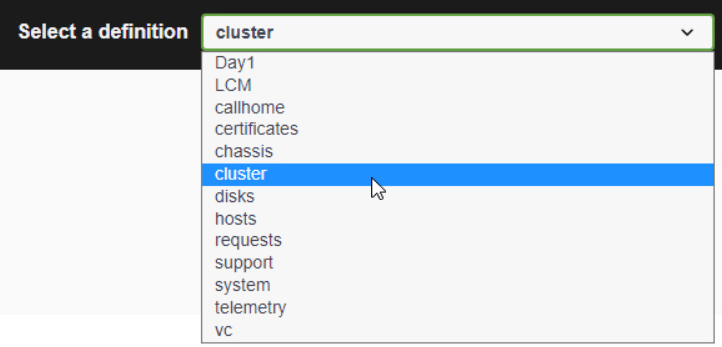
    From the Swagger UI (top right – Select a definition drop-down) you can select the categories of API calls. By default, Swagger UI opens into the Day 1 Bring Up Configuration.

    Additionally VxRAIL Swagger UI allows you to play with the APIs on the same page. For this you’ll need to Authorize the page using VxRAIL manager credentials. This is to make sure that user is restricted to the right level of authorization based on their user type.

    For executing / trying the APIs on the VxRAIL cluster you can simply choose the definition from the drop-down. In this case I’ve selected Cluster definition.

    VxRAIL – Select Definition

    If you expand the selected API it will show you multiple sections (Cluster Information in this example)

    VxRAIL – Cluster Information
    • Parameters – Some APIs needs parameters as input for the successful exectution. If applicable they will be listed here
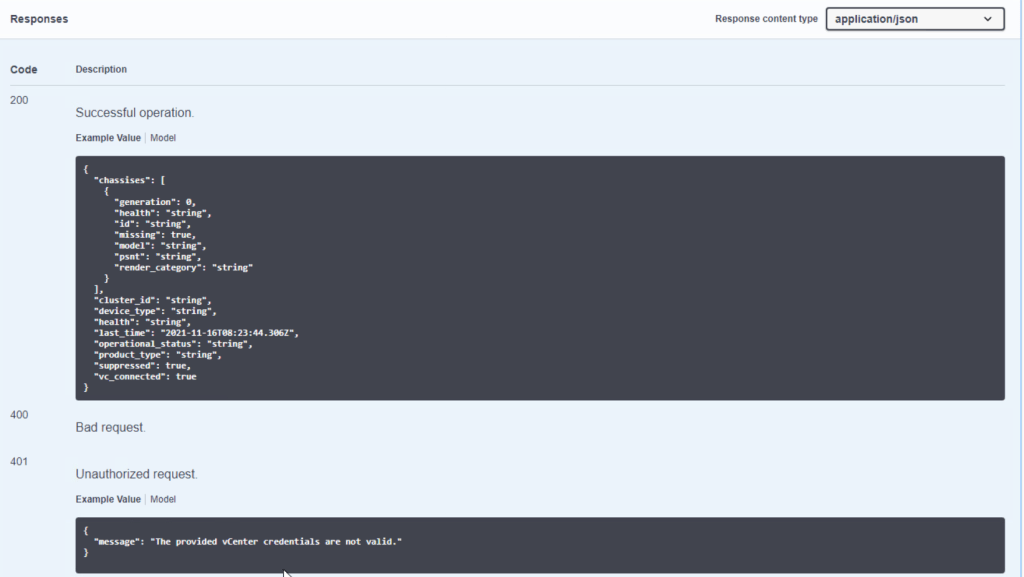
    • Responses – This section shows you the possible response codes for selected API with example output snippet.

    When you click on the Try it out button page gets into the run-mode. Once you enter required parameters (not required in this example) you can click on Execute. At this point request will be sent to VxRAIL manage and response (body and headers) will be shown on the same screen.

    Way Forward

    I hope this gave you the high level overview of VxRAIL APIs and how to access them. Though Swagger has built-in option to try the APIs, but that is the just a API explorer tool. Additionally you can also use the REST clients – like Postman – to interact with the API. Eventually you’ll integrate these APIs with your automation tools – those can be VMware vRA, Ansible, Terraform, or it can be your own developed tool. Technically speaking you can use any tool as far as it has option to interact with REST API.

    More on this coming in next blog posts 🙂

  • Creating ServiceNow Incidents via REST API

    Creating ServiceNow Incidents via REST API

    In this article we will explore how to create incidents in ServiceNow using the REST API. This article was a stepping stone for this video that shows how to integrate ServiceNow, Microsoft Teams and alerts from infrastructure. You might also be interested in the second post in this series: ServiceNow CMDB REST API tutorial

    The very first thing to do when working with a REST API is to get your hands on the reference guide and hopefully the getting started guide if there is one. The first thing to look for is how to authenticate with the API and whether there are any requirements for special headers or things like that. Afterwards things tend to flow faster and easier. Fortunately, ServiceNow supports basic authentication so there is no learning curve there, although it does support more secure authentication through OAuth if you need it

    In terms of documentation the online help is great. Here you can get an overview of the API. And this is the starting point for the online REST API reference. There are many branches or child API’s hanging of this root. In the screenshot below you can see how, for every call, the online help shows the URL (default or for a specific version) and parameters (path, query and request body). Further down it shows headers for the request and the response and even two coding examples for curl and python … as complete as it gets

    But the tool you will learn to love very quickly is the “REST API Explorer”. Please note that this is a tool that you can only access from within your instance. Once you log in go to “System Web Services” and then locate “REST API Explorer” as shown here

    You will then end up with a menu like this. Notice how you can select the specific child API in the top-left corner and the version of your environment.

    ServiceNow stores all data in tables. This is also true for Incidents which unsurprisingly are stored in the “incident” table. To manipulate tables we need to use the Table API. Different HTTP methods will enable us to do the various CRUD operations. For example if we want to create an incident we will have to use the POST method. Notice in the previous image how I have selected the “Table API” and within that API the “Create a record (POST)” call. Then on the right I have selected the “incident” table.

    When you scroll down you can see a dialog that allows you to build the request body for the incident creation. With the drop-down menu you can select from all the available fields. As you select new fields and assign values, the REST API Explorer builds the body for you in the text box immediately below. At the very bottom you can generate code in multiple languages

    We have grouped the API calls we are using in this article into a Postman collection. You can download the collection from the following the following GitHub repo :

    https://github.com/cermegno/postman-servicenow

    The collection uses 2 variables that you must add to an environment. If you are new to Postman environments check out this older article:

    • {{pwd}}. This is the password for the “admin” user of your ServiceNow instance. If you need to use a different user, you can change it in the collection settings
    • {{instance}}. This is your ServiceNow instance name, i.e. excluding the “.service-now.com” suffix. If you don’t have one or you cannot test this with your production instance, you can open your very own developer instance with ServiceNow

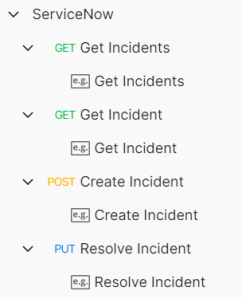
    The collection provides 4 calls and a saved example for each call:

    • Get details for all incidents. This will produce a 98 line JSON structure for each incident
    • Get details for a single incident. This requires you to pass the “sys_id” of the incident as part of the URL as shown below. You can get the “sys_id” for a specific incident from the body of the response during the creation (POST) operation
    • Create incident (POST). The JSON Body parameter can take “a lot” of fields but you can start small. For example the following Body produces the incident below:
    • Modify incident (PUT). This will allow you to make changes to incidents. In particular you can use it to resolve/close incidents by setting the state to “7” as shown in the screenshot below. This call also requires you to pass the “sys_id” of the incident you are modifying as part of the URL

    In this article we have used the REST API to interact with ServiceNow because this is the way I will do it in the upcoming video demo. But depending on what you are trying to do you might want to use Ansible. In that case you can use the official Ansible modules provided by ServiceNow themselves. The collection is available in Ansible Galaxy and provides just two modules designed to interact with ServiceNow tables. Follow the instructions in the Ansible Galaxy page to install the dependencies including the “pysnow” Python library

    As a next step you can visit the second post in this series: ServiceNow CMDB REST API tutorial

    We hope you find this article helpful. Let us know your thoughts in the comment section.

  • Ansible with DellEMC Storage: Part 6 – Prepare Ansible Tower / AWX with Storage Credential

    Ansible with DellEMC Storage: Part 6 – Prepare Ansible Tower / AWX with Storage Credential

    This blog is the continuation of Ansible with DellEMC storage multi-part blog.

    In the last (5th part) of this blog series, we discussed how to install Ansible AWX / Tower in a docker container and Dell EMC Ansible modules inside the Ansible AWX / Tower container.

    In this blog post, we will create a new credential type for Dell EMC storage systems and then add storage credentials in Ansible AWX / Tower.

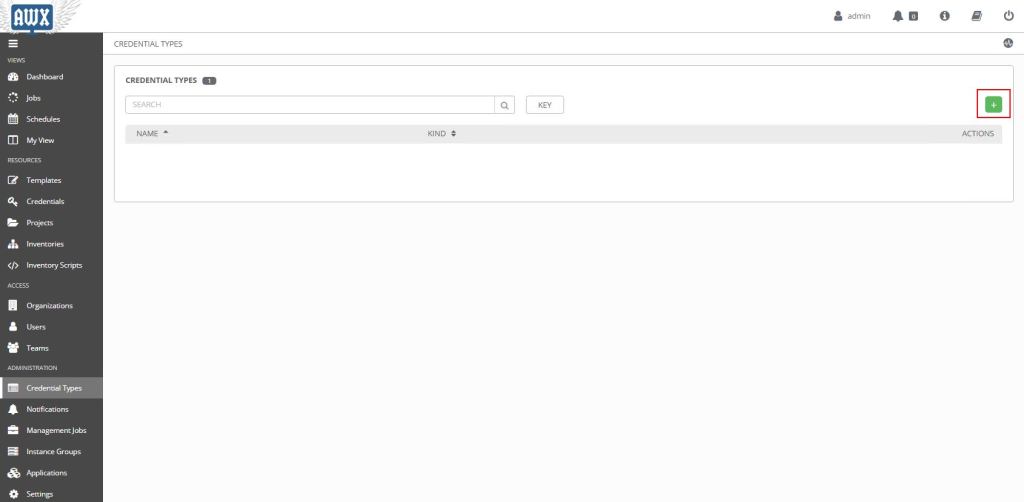
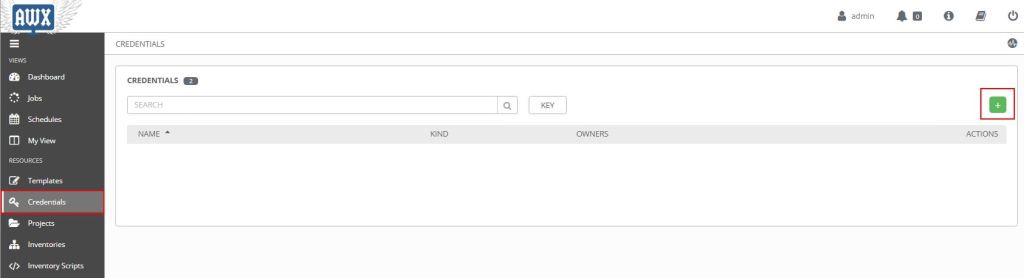
    So first let’s get started with creating a Credential type for Dell EMC storage array. Login to your Ansible AWX / Tower console. In the navigation pane (on left) click on “Credential Types”. Then click on the green “+” icon on the right to add a new credential type.

    Ansible AWX / Tower – Create New Credential 1

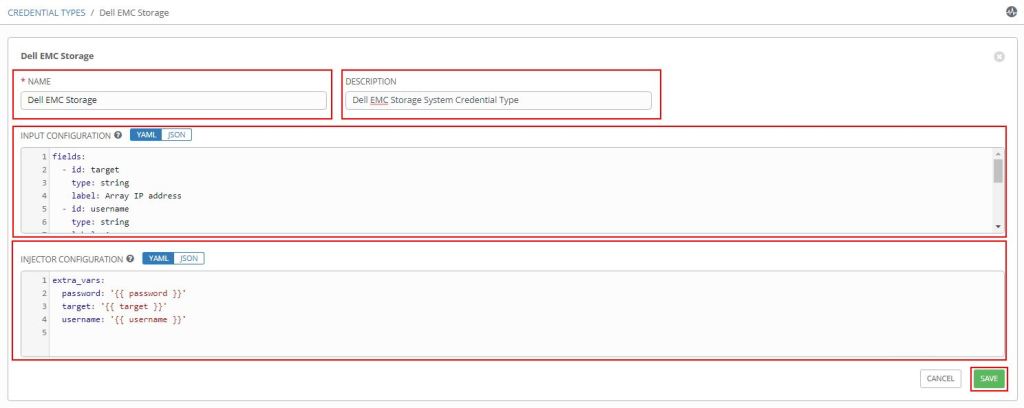
    In the “New Credential Type” creation page enter below details and then click on Save

    • Name – Dell EMC Storage (User Friendly Name)
    • Description – Optional Description
    • Input Configuration – Copy and Paste below text
    fields:
      - id: target
        type: string
        label: Array IP address
      - id: username
        type: string
        label: Array username
      - id: password
        type: string
        label: Array password
        secret: true
    required:
      - target
      - username
      - password
    • Injector Configuration – Copy and Paste below text
    extra_vars:
      password: '{{ password }}'
      target: '{{ target }}'
      username: '{{ username }}'
    
    Ansible AWX / Tower – Create New Credential 2

    Once Credential type is created, click on the “Credentials” in AWX / Tower navigation pane. Then click green “+” button on right to create new Credential.

    Ansible AWX / Tower – Create New Credential 3

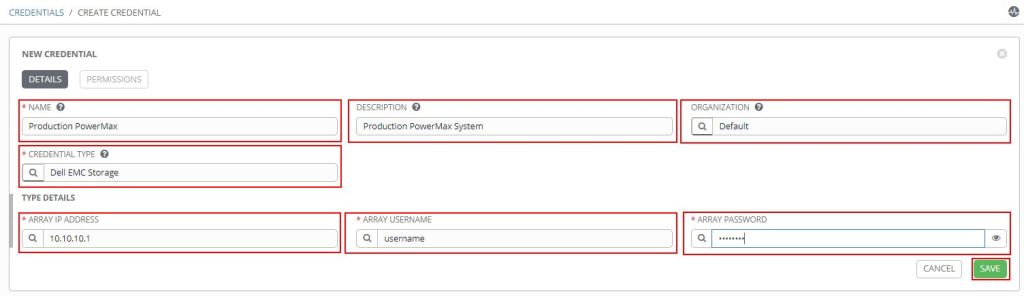
    In the “New Credentials” page enter below details.

    • Name – User Friendly Name to identify the storage array. In this example “Production PowerMax”
    • Description – Optional description
    • Organization – You can choose appropriate Organization as per your configuration. Note that Organization can help you to mask these credentials to few users. I have selected Default in my example
    • Credential Type – Choose “Dell EMC Storage”. This is the credential type we have created in earlier step. Credential type which we create earlier will be available on last few pages of the pop-up list. Alternatively you can search the same with “Dell EMC Storage”
    • Type Details
      • Array IP Address – Enter the management IP address of storage array
      • Array Username – Username (I suggest creating separate user for automation)
      • Array Password – Password for the entered username
    Ansible AWX / Tower – Create New Credential 4

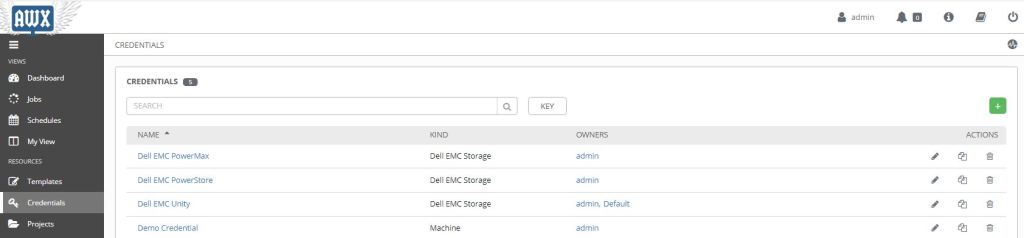
    As per your environment you can create multiple credentials, each for one array.

    Ansible AWX / Tower – Create New Credential 5

    Once credentials are created you can now go ahead and create new Ansible AWX / Tower Templates using storage credentials we just created. In the playbook you can mention storage array credentials as variables (username and password). Using these variables you don’t have to mention array credentials as plain text in the playbooks.

    Additionally, you can add other infrastructure / application credentials using the same process.

    I hope this helps everyone. In next post I will take you through creating new Project and Template.

  • Ansible with DellEMC Storage: Part 5 – Get Started with Ansible Tower (Using AWX)

    Ansible with DellEMC Storage: Part 5 – Get Started with Ansible Tower (Using AWX)

    This blog is the continuation of Ansible with DellEMC storage multi-part blog

    In this 5th part, we will discuss about Ansible Tower (using AWX) and how to install and configure the same.

    Overview

    In my posts till now you might noticed that I have only used command line option to run any Ansible commands. There’s a reason for that. By default, when you install Ansible it only installs Ansible Engine, which only has Ansible CLI option. This is where Ansible Tower comes in picture. Note that AWX is the open source project for Ansible Tower.

    While Ansible Tower has many features, below are few features which are my personal favorites. Since data storage management operations can be data destructive, below features are the reasons I am highly recommending using Tower / AWX for automating storage tasks.

    • Web Interface – To manage Ansible using Web interface
    • REST API Support – To manage and integrate Ansible Tower in other platforms. For example – integrating Ansible Tower with Jenkins
    • Task Engine – To create scheduled job and centralized operations.
    • Role Based Access Control – To control Enterprise level access across different team member and limit their visibility to information. This will make sure only designated users are having access to critical data/tasks.

    Installing Ansible Tower (using AWX)

    Make sure that you’ve supported operating systems installed and running. In my case I am using CentOS V7 virtual machine

    Prerequisites –

    Make sure below packages are installed on your machine

    • Make sure you have set the selinux to permissive
      • sudo setenforce permissive
    • Ansible – min version 2.8+
      • yum install -y ansible
    • Docker – Recent version
      • yum install -y docker
    • Docker Python Module
      • Follow below steps for installing docker-compose
    [root@dw-test-1 installer]# sudo curl -L "https://github.com/docker/compose/releases/download/1.25.4/docker-compose-$(uname -s)-$(uname -m)" -o /usr/local/bin/docker-compose
    
    [root@dw-test-1 installer]# sudo chmod +x /usr/local/bin/docker-compose
    
    [root@dw-test-1 installer]# sudo ln -s /usr/local/bin/docker-compose /usr/bin/docker-compose
    
    [root@dw-test-1 installer]# docker-compose --version
    

    Once all the prerequisites are in place run below tasks

    • Clone the Git AWX repository using below command
    [root@dw-test-1 installer]# git clone https://github.com/ansible/awx.git

    This will create awx directory. cd into the awx/installer directory.

    [root@dw-test-1 installer]# cd awx/installer

    This folder has inventory file which has all the AWX parameters. Most important details in this file are passwords which are needed for logging into the AWX post installation. Note that AWX supports installation on Kubernetes and Openshift as well. In this example we will be using docker-compose.

    Most important parameters in inventory file are as mentioned below. In my case I created the vars.yml file with below inputs and used the same while running the installation.

    [root@dw-test-1 installer]# cat vars.yml
    admin_password: 'admin'
    pg_password: 'admin'
    secret_key: 'mysecret'

    Once you’ve checked and verified all the parameters in the inventory file, go ahead and run below command.

    [root@dw-test-1 installer]# ansible-playbook -i inventory install.yml -e @vars.yml

    Note – I faced couple of errors which running this playbook. I suggest taking a look at this link if you face the same.

    Once playbook execution is completed you can run below command to validate the installation.

    [root@dw-test-1 installer]# docker ps
    CONTAINER ID        IMAGE                     COMMAND                  CREATED             STATUS              PORTS                  NAMES
    23b236356057        ansible/awx_task:10.0.0   "/tini -- /bin/sh ..."   6 minutes ago       Up 2 minutes        8052/tcp               awx_task
    a23edc05283e        ansible/awx_web:10.0.0    "/tini -- /bin/sh ..."   6 minutes ago       Up 2 minutes        0.0.0.0:80->8052/tcp   awx_web
    385de9d395da        postgres:10               "docker-entrypoint..."   6 minutes ago       Up 2 minutes        5432/tcp               awx_postgres
    125b9e551823        redis                     "docker-entrypoint..."   2 hours ago         Up 2 minutes        6379/tcp               awx_redis
    2a8ad285e2d5        memcached:alpine          "docker-entrypoint..."   2 hours ago         Up 2 minutes        11211/tcp              awx_memcached
    

    At this point AWX is installed. It takes some time for container to start and configure the AWX. Run the below command and wait till the time you see similar output

    [root@dw-test-1 installer]# docker logs -f awx_task
    ...
    2020-04-12 12:23:18,458 DEBUG    awx.main.dispatch task 7b92a5a8-efa9-4b5e-8dc7-d4ca1d974508 starting awx.main.scheduler.tasks.run_task_manager(*[])
    2020-04-12 12:23:18,466 DEBUG    awx.main.scheduler Running Tower task manager.
    2020-04-12 12:23:18,472 DEBUG    awx.main.scheduler Starting Scheduler
    2020-04-12 12:23:28,468 DEBUG    awx.main.dispatch task ba9a6c3e-24b3-49e4-8cf1-62f90f315780 starting awx.main.tasks.awx_periodic_scheduler(*[])
    2020-04-12 12:23:28,478 DEBUG    awx.main.tasks Starting periodic scheduler
    2020-04-12 12:23:28,480 DEBUG    awx.main.tasks Last scheduler run was: 2020-04-12 12:22:58.567745+00:00
    2020-04-12 12:23:38,483 DEBUG    awx.main.dispatch task 7f4ac140-7231-4c6e-901f-34be80529707 starting awx.main.scheduler.tasks.run_task_manager(*[])
    2020-04-12 12:23:38,493 DEBUG    awx.main.scheduler Running Tower task manager.
    2020-04-12 12:23:38,502 DEBUG    awx.main.scheduler Starting Scheduler
    2020-04-12 12:23:58,522 DEBUG    awx.main.dispatch task 7ed5d956-ba67-4219-9509-1405713fa155 starting awx.main.tasks.cluster_node_heartbeat(*[])
    2020-04-12 12:23:58,632 DEBUG    awx.main.tasks Cluster node heartbeat task.
    2020-04-12 12:23:58,508 DEBUG    awx.main.dispatch task 7ca00dc2-ab9c-4c65-b505-f880afc47f65 starting awx.main.tasks.gather_analytics(*[])
    2020-04-12 12:23:58,560 DEBUG    awx.main.dispatch task 0e539914-105c-462f-89c6-20f1a50b1ec8 starting awx.main.tasks.awx_periodic_scheduler(*[])
    2020-04-12 12:23:58,693 DEBUG    awx.main.tasks Starting periodic scheduler
    2020-04-12 12:23:58,696 DEBUG    awx.main.tasks Last scheduler run was: 2020-04-12 12:23:28.480007+00:00
    2020-04-12 12:23:58,536 DEBUG    awx.main.dispatch task 5ec695f4-80f2-44a0-a18f-cdaa62215b10 starting awx.main.tasks.awx_k8s_reaper(*[])
    2020-04-12 12:23:58,622 WARNING  awx.main.dispatch scaling up worker pid:159
    2020-04-12 12:23:58,738 DEBUG    awx.main.dispatch task a643c365-145c-4bde-9536-d2f647d243f0 starting awx.main.scheduler.tasks.run_task_manager(*[])
    2020-04-12 12:23:58,747 DEBUG    awx.main.scheduler Running Tower task manager.
    2020-04-12 12:23:58,752 DEBUG    awx.main.scheduler Starting Scheduler
    RESULT 2
    OKREADY
    

    Now we will need to install prerequisites for DellEMC Ansible module – PyU4V package. Follow below steps to install DellEMC Ansible module dependencies.

    Connect to the container awx_task

    [root@dw-test-1 installer]# docker exec -it awx_task bash

    On the container prompt run below command to install PyU4V package

    bash-4.4# pip3 install PyU4V==9.1.1.0
    WARNING: Running pip install with root privileges is generally not a good idea. Try `pip3 install --user` instead.
    Collecting PyU4V==9.1.1.0
      Downloading https://files.pythonhosted.org/packages/38/83/34e7d4b823f84b74f6ac959b3cc5302882022f65c78e9f91593d531ebd1d/PyU4V-9.1.1.0-py3-none-any.whl (79kB)
        100% |████████████████████████████████| 81kB 2.4MB/s
    Collecting urllib3 (from PyU4V==9.1.1.0)
      Downloading https://files.pythonhosted.org/packages/e8/74/6e4f91745020f967d09332bb2b8b9b10090957334692eb88ea4afe91b77f/urllib3-1.25.8-py2.py3-none-any.whl (125kB)
        100% |████████████████████████████████| 133kB 3.4MB/s
    Collecting prettytable (from PyU4V==9.1.1.0)
      Downloading https://files.pythonhosted.org/packages/ef/30/4b0746848746ed5941f052479e7c23d2b56d174b82f4fd34a25e389831f5/prettytable-0.7.2.tar.bz2
    Requirement already satisfied: six in /usr/lib/python3.6/site-packages (from PyU4V==9.1.1.0)
    Requirement already satisfied: setuptools in /usr/lib/python3.6/site-packages (from PyU4V==9.1.1.0)
    Collecting requests (from PyU4V==9.1.1.0)
      Downloading https://files.pythonhosted.org/packages/1a/70/1935c770cb3be6e3a8b78ced23d7e0f3b187f5cbfab4749523ed65d7c9b1/requests-2.23.0-py2.py3-none-any.whl (58kB)
        100% |████████████████████████████████| 61kB 4.4MB/s
    Collecting chardet<4,>=3.0.2 (from requests->PyU4V==9.1.1.0)
      Downloading https://files.pythonhosted.org/packages/bc/a9/01ffebfb562e4274b6487b4bb1ddec7ca55ec7510b22e4c51f14098443b8/chardet-3.0.4-py2.py3-none-any.whl (133kB)
        100% |████████████████████████████████| 143kB 3.8MB/s
    Collecting certifi>=2017.4.17 (from requests->PyU4V==9.1.1.0)
      Downloading https://files.pythonhosted.org/packages/57/2b/26e37a4b034800c960a00c4e1b3d9ca5d7014e983e6e729e33ea2f36426c/certifi-2020.4.5.1-py2.py3-none-any.whl (157kB)
        100% |████████████████████████████████| 163kB 3.8MB/s
    Requirement already satisfied: idna<3,>=2.5 in /usr/lib/python3.6/site-packages (from requests->PyU4V==9.1.1.0)
    Installing collected packages: urllib3, prettytable, chardet, certifi, requests, PyU4V
      Running setup.py install for prettytable ... done
    Successfully installed PyU4V-9.1.1.0 certifi-2020.4.5.1 chardet-3.0.4 prettytable-0.7.2 requests-2.23.0 urllib3-1.25.8
    

    Once completed you can check installed version using

    bash-4.4# pip3 list | grep PyU4V
    PyU4V (9.1.1.0)
    

    At this point you have AWX up and running and can be reached on http://localhost:80.

    Tower is now running on the host at port 80.  The rest of the setup is handled by the web interface .  If you did this on the system you are using you can use http://localhost.

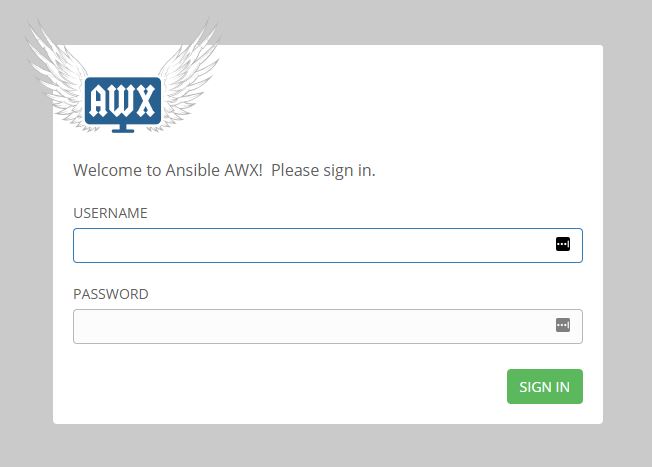
    If everything went well then you can see login prompt similar to the below screenshot. Login credentials for AWX are as per inventory file.

    undefined

    This concludes Ansible Tower (AWX) installation process. In next posts we will discuss on configuring Ansible Tower / AWX.

  • Installation of AWX using Ansible fails with error – “Unable to load docker-compose. Try `pip install docker-compose`, ImportError: No module named zipp, ImportError: No module named configparser

    Installation of AWX using Ansible fails with error – “Unable to load docker-compose. Try `pip install docker-compose`, ImportError: No module named zipp, ImportError: No module named configparser

    Recently while I was trying to install AWX using Ansible I came across below error on Centos.

    Docker-compose error while installing AWX
    fatal: [localhost]: FAILED! => {"changed": false, "msg": "Unable to load docker-compose. Try `pip install docker-compose`. Error: Traceback (most recent call last):\n  File \"/tmp/ansible_docker_compose_payload_jNhEZ8/ansible_docker_compose_payload.zip/ansible/modules/cloud/docker/docker_compose.py\", line 483, in <module>\n  File \"/usr/lib/python2.7/site-packages/compose/cli/command.py\", line 12, in <module>\n    from .. import config\n  File \"/usr/lib/python2.7/site-packages/compose/config/__init__.py\", line 6, in <module>\n    from .config import ConfigurationError\n  File \"/usr/lib/python2.7/site-packages/compose/config/config.py\", line 51, in <module>\n    from .validation import match_named_volumes\n  File \"/usr/lib/python2.7/site-packages/compose/config/validation.py\", line 12, in <module>\n    from jsonschema import Draft4Validator\n  File \"/usr/lib/python2.7/site-packages/jsonschema/__init__.py\", line 33, in <module>\n    import importlib_metadata as metadata\n  File \"/usr/lib/python2.7/site-packages/importlib_metadata/__init__.py\", line 9, in <module>\n    import zipp\nImportError: No module named zipp\n"}
    

    While this error was referring to missing pip package “docker-compose”, but when I tried to install the same it gave below error stating that it’s already installed.

    [root@dw-test-1 installer]# pip install docker-compose
    Requirement already satisfied (use --upgrade to upgrade): docker-compose in /usr/lib/python2.7/site-packages
    Requirement already satisfied (use --upgrade to upgrade): texttable<2,>=0.9.0 in /usr/lib/python2.7/site-packages (from docker-compose)
    Requirement already satisfied (use --upgrade to upgrade): requests<3,>=2.20.0 in /usr/lib/python2.7/site-packages (from docker-compose)
    Requirement already satisfied (use --upgrade to upgrade): dockerpty<1,>=0.4.1 in /usr/lib/python2.7/site-packages (from docker-compose)
    Requirement already satisfied (use --upgrade to upgrade): six<2,>=1.3.0 in /usr/lib/python2.7/site-packages (from docker-compose)
    Requirement already satisfied (use --upgrade to upgrade): docopt<1,>=0.6.1 in /usr/lib/python2.7/site-packages (from docker-compose)
    Requirement already satisfied (use --upgrade to upgrade): ipaddress<2,>=1.0.16; python_version < "3.3" in /usr/lib/python2.7/site-packages (from docker-compose)
    Requirement already satisfied (use --upgrade to upgrade): subprocess32<4,>=3.5.4; python_version < "3.2" in /usr/lib64/python2.7/site-packages (from docker-compose)
    Requirement already satisfied (use --upgrade to upgrade): enum34<2,>=1.0.4; python_version < "3.4" in /usr/lib/python2.7/site-packages (from docker-compose)
    Requirement already satisfied (use --upgrade to upgrade): websocket-client<1,>=0.32.0 in /usr/lib/python2.7/site-packages (from docker-compose)
    Requirement already satisfied (use --upgrade to upgrade): jsonschema<4,>=2.5.1 in /usr/lib/python2.7/site-packages (from docker-compose)
    Requirement already satisfied (use --upgrade to upgrade): backports.shutil-get-terminal-size==1.0.0; python_version < "3.3" in /usr/lib/python2.7/site-packages (from docker-compose)
    Requirement already satisfied (use --upgrade to upgrade): backports.ssl-match-hostname<4,>=3.5; python_version < "3.5" in /usr/lib/python2.7/site-packages (from docker-compose)
    Requirement already satisfied (use --upgrade to upgrade): cached-property<2,>=1.2.0 in /usr/lib/python2.7/site-packages (from docker-compose)
    Requirement already satisfied (use --upgrade to upgrade): PyYAML<6,>=3.10 in /usr/lib64/python2.7/site-packages (from docker-compose)
    Requirement already satisfied (use --upgrade to upgrade): docker[ssh]<5,>=3.7.0 in /usr/lib/python2.7/site-packages (from docker-compose)
    Requirement already satisfied (use --upgrade to upgrade): urllib3!=1.25.0,!=1.25.1,<1.26,>=1.21.1 in /usr/lib/python2.7/site-packages (from requests<3,>=2.20.0->docker-compose)
    Requirement already satisfied (use --upgrade to upgrade): idna<3,>=2.5 in /usr/lib/python2.7/site-packages (from requests<3,>=2.20.0->docker-compose)
    Requirement already satisfied (use --upgrade to upgrade): chardet<4,>=3.0.2 in /usr/lib/python2.7/site-packages (from requests<3,>=2.20.0->docker-compose)
    Requirement already satisfied (use --upgrade to upgrade): certifi>=2017.4.17 in /usr/lib/python2.7/site-packages (from requests<3,>=2.20.0->docker-compose)
    Requirement already satisfied (use --upgrade to upgrade): pyrsistent>=0.14.0 in /usr/lib64/python2.7/site-packages (from jsonschema<4,>=2.5.1->docker-compose)
    Requirement already satisfied (use --upgrade to upgrade): setuptools in /usr/lib/python2.7/site-packages (from jsonschema<4,>=2.5.1->docker-compose)
    Requirement already satisfied (use --upgrade to upgrade): attrs>=17.4.0 in /usr/lib/python2.7/site-packages (from jsonschema<4,>=2.5.1->docker-compose)
    Requirement already satisfied (use --upgrade to upgrade): importlib-metadata; python_version < "3.8" in /usr/lib/python2.7/site-packages (from jsonschema<4,>=2.5.1->docker-compose)
    Requirement already satisfied (use --upgrade to upgrade): functools32; python_version < "3" in /usr/lib/python2.7/site-packages (from jsonschema<4,>=2.5.1->docker-compose)
    Requirement already satisfied (use --upgrade to upgrade): paramiko>=2.4.2; extra == "ssh" in /usr/lib/python2.7/site-packages (from docker[ssh]<5,>=3.7.0->docker-compose)
    Collecting configparser>=3.5; python_version < "3" (from importlib-metadata; python_version < "3.8"->jsonschema<4,>=2.5.1->docker-compose)
      Using cached https://files.pythonhosted.org/packages/e5/7c/d4ccbcde76b4eea8cbd73b67b88c72578e8b4944d1270021596e80b13deb/configparser-5.0.0.tar.gz
      Running setup.py (path:/tmp/pip-build-c4RmaK/configparser/setup.py) egg_info for package configparser produced metadata for project name unknown. Fix your #egg=configparser fragments.
      Requirement already satisfied (use --upgrade to upgrade): unknown from https://files.pythonhosted.org/packages/e5/7c/d4ccbcde76b4eea8cbd73b67b88c72578e8b4944d1270021596e80b13deb/configparser-5.0.0.tar.gz#sha256=2ca44140ee259b5e3d8aaf47c79c36a7ab0d5e94d70bd4105c03ede7a20ea5a1 in /usr/lib/python2.7/site-packages (from importlib-metadata; python_version < "3.8"->jsonschema<4,>=2.5.1->docker-compose)
    Collecting zipp>=0.5 (from importlib-metadata; python_version < "3.8"->jsonschema<4,>=2.5.1->docker-compose)
      Using cached https://files.pythonhosted.org/packages/ce/8c/2c5f7dc1b418f659d36c04dec9446612fc7b45c8095cc7369dd772513055/zipp-3.1.0.tar.gz
      Running setup.py (path:/tmp/pip-build-c4RmaK/zipp/setup.py) egg_info for package zipp produced metadata for project name unknown. Fix your #egg=zipp fragments.
      Requirement already satisfied (use --upgrade to upgrade): unknown from https://files.pythonhosted.org/packages/ce/8c/2c5f7dc1b418f659d36c04dec9446612fc7b45c8095cc7369dd772513055/zipp-3.1.0.tar.gz#sha256=c599e4d75c98f6798c509911d08a22e6c021d074469042177c8c86fb92eefd96 in /usr/lib/python2.7/site-packages (from importlib-metadata; python_version < "3.8"->jsonschema<4,>=2.5.1->docker-compose)
    Requirement already satisfied (use --upgrade to upgrade): contextlib2; python_version < "3" in /usr/lib/python2.7/site-packages (from importlib-metadata; python_version < "3.8"->jsonschema<4,>=2.5.1->docker-compose)
    Requirement already satisfied (use --upgrade to upgrade): pathlib2; python_version < "3" in /usr/lib/python2.7/site-packages (from importlib-metadata; python_version < "3.8"->jsonschema<4,>=2.5.1->docker-compose)
    Requirement already satisfied (use --upgrade to upgrade): pynacl>=1.0.1 in /usr/lib64/python2.7/site-packages (from paramiko>=2.4.2; extra == "ssh"->docker[ssh]<5,>=3.7.0->docker-compose)
    Requirement already satisfied (use --upgrade to upgrade): cryptography>=2.5 in /usr/lib64/python2.7/site-packages (from paramiko>=2.4.2; extra == "ssh"->docker[ssh]<5,>=3.7.0->docker-compose)
    Requirement already satisfied (use --upgrade to upgrade): bcrypt>=3.1.3 in /usr/lib64/python2.7/site-packages (from paramiko>=2.4.2; extra == "ssh"->docker[ssh]<5,>=3.7.0->docker-compose)
    Requirement already satisfied (use --upgrade to upgrade): scandir; python_version < "3.5" in /usr/lib64/python2.7/site-packages (from pathlib2; python_version < "3"->importlib-metadata; python_version < "3.8"->jsonschema<4,>=2.5.1->docker-compose)
    Requirement already satisfied (use --upgrade to upgrade): cffi>=1.4.1 in /usr/lib64/python2.7/site-packages (from pynacl>=1.0.1->paramiko>=2.4.2; extra == "ssh"->docker[ssh]<5,>=3.7.0->docker-compose)
    Requirement already satisfied (use --upgrade to upgrade): pycparser in /usr/lib/python2.7/site-packages (from cffi>=1.4.1->pynacl>=1.0.1->paramiko>=2.4.2; extra == "ssh"->docker[ssh]<5,>=3.7.0->docker-compose)
    You are using pip version 8.1.2, however version 20.0.2 is available.
    You should consider upgrading via the 'pip install --upgrade pip' command.


    After trying multiple solutions on several forums and reinstalling everything from scratch finally I thought of upgrading pip.

    [root@dw-test-1 installer]# pip install --upgrade pip
    Collecting pip
      Downloading https://files.pythonhosted.org/packages/54/0c/d01aa759fdc501a58f431eb594a17495f15b88da142ce14b5845662c13f3/pip-20.0.2-py2.py3-none-any.whl (1.4MB)
        100% |████████████████████████████████| 1.4MB 787kB/s
    Installing collected packages: pip
      Found existing installation: pip 8.1.2
        Uninstalling pip-8.1.2:
          Successfully uninstalled pip-8.1.2
    Successfully installed pip-20.0.2
    

    Post upgrading pip to latest version I reinstalled docker-compose.

    [root@dw-test-1 installer]# pip install docker-compose
    DEPRECATION: Python 2.7 reached the end of its life on January 1st, 2020. Please upgrade your Python as Python 2.7 is no longer maintained. A future version of pip will drop support for Python 2.7. More details about Python 2 support in pip, can be found at https://pip.pypa.io/en/latest/development/release-process/#python-2-support
    Requirement already satisfied: docker-compose in /usr/lib/python2.7/site-packages (1.25.5)
    Requirement already satisfied: backports.shutil-get-terminal-size==1.0.0; python_version < "3.3" in /usr/lib/python2.7/site-packages (from docker-compose) (1.0.0)
    Requirement already satisfied: six<2,>=1.3.0 in /usr/lib/python2.7/site-packages (from docker-compose) (1.9.0)
    Requirement already satisfied: PyYAML<6,>=3.10 in /usr/lib64/python2.7/site-packages (from docker-compose) (3.10)
    Requirement already satisfied: docker[ssh]<5,>=3.7.0 in /usr/lib/python2.7/site-packages (from docker-compose) (4.2.0)
    Requirement already satisfied: dockerpty<1,>=0.4.1 in /usr/lib/python2.7/site-packages (from docker-compose) (0.4.1)
    Requirement already satisfied: jsonschema<4,>=2.5.1 in /usr/lib/python2.7/site-packages (from docker-compose) (3.2.0)
    Requirement already satisfied: requests<3,>=2.20.0 in /usr/lib/python2.7/site-packages (from docker-compose) (2.23.0)
    Requirement already satisfied: enum34<2,>=1.0.4; python_version < "3.4" in /usr/lib/python2.7/site-packages (from docker-compose) (1.0.4)
    Requirement already satisfied: websocket-client<1,>=0.32.0 in /usr/lib/python2.7/site-packages (from docker-compose) (0.57.0)
    Requirement already satisfied: cached-property<2,>=1.2.0 in /usr/lib/python2.7/site-packages (from docker-compose) (1.5.1)
    Requirement already satisfied: ipaddress<2,>=1.0.16; python_version < "3.3" in /usr/lib/python2.7/site-packages (from docker-compose) (1.0.16)
    Requirement already satisfied: docopt<1,>=0.6.1 in /usr/lib/python2.7/site-packages (from docker-compose) (0.6.2)
    Requirement already satisfied: subprocess32<4,>=3.5.4; python_version < "3.2" in /usr/lib64/python2.7/site-packages (from docker-compose) (3.5.4)
    Requirement already satisfied: texttable<2,>=0.9.0 in /usr/lib/python2.7/site-packages (from docker-compose) (1.6.2)
    Requirement already satisfied: backports.ssl-match-hostname<4,>=3.5; python_version < "3.5" in /usr/lib/python2.7/site-packages (from docker-compose) (3.5.0.1)
    Requirement already satisfied: paramiko>=2.4.2; extra == "ssh" in /usr/lib/python2.7/site-packages (from docker[ssh]<5,>=3.7.0->docker-compose) (2.7.1)
    Requirement already satisfied: setuptools in /usr/lib/python2.7/site-packages (from jsonschema<4,>=2.5.1->docker-compose) (0.9.8)
    Requirement already satisfied: pyrsistent>=0.14.0 in /usr/lib64/python2.7/site-packages (from jsonschema<4,>=2.5.1->docker-compose) (0.16.0)
    Requirement already satisfied: attrs>=17.4.0 in /usr/lib/python2.7/site-packages (from jsonschema<4,>=2.5.1->docker-compose) (19.3.0)
    Requirement already satisfied: importlib-metadata; python_version < "3.8" in /usr/lib/python2.7/site-packages (from jsonschema<4,>=2.5.1->docker-compose) (1.6.0)
    Requirement already satisfied: functools32; python_version < "3" in /usr/lib/python2.7/site-packages (from jsonschema<4,>=2.5.1->docker-compose) (3.2.3.post2)
    Requirement already satisfied: idna<3,>=2.5 in /usr/lib/python2.7/site-packages (from requests<3,>=2.20.0->docker-compose) (2.9)
    Requirement already satisfied: chardet<4,>=3.0.2 in /usr/lib/python2.7/site-packages (from requests<3,>=2.20.0->docker-compose) (3.0.4)
    Requirement already satisfied: urllib3!=1.25.0,!=1.25.1,<1.26,>=1.21.1 in /usr/lib/python2.7/site-packages (from requests<3,>=2.20.0->docker-compose) (1.25.8)
    Requirement already satisfied: certifi>=2017.4.17 in /usr/lib/python2.7/site-packages (from requests<3,>=2.20.0->docker-compose) (2020.4.5.1)
    Requirement already satisfied: bcrypt>=3.1.3 in /usr/lib64/python2.7/site-packages (from paramiko>=2.4.2; extra == "ssh"->docker[ssh]<5,>=3.7.0->docker-compose) (3.1.7)
    Requirement already satisfied: pynacl>=1.0.1 in /usr/lib64/python2.7/site-packages (from paramiko>=2.4.2; extra == "ssh"->docker[ssh]<5,>=3.7.0->docker-compose) (1.3.0)
    Requirement already satisfied: cryptography>=2.5 in /usr/lib64/python2.7/site-packages (from paramiko>=2.4.2; extra == "ssh"->docker[ssh]<5,>=3.7.0->docker-compose) (2.9)
    Requirement already satisfied: pathlib2; python_version < "3" in /usr/lib/python2.7/site-packages (from importlib-metadata; python_version < "3.8"->jsonschema<4,>=2.5.1->docker-compose) (2.3.5)
    Requirement already satisfied: contextlib2; python_version < "3" in /usr/lib/python2.7/site-packages (from importlib-metadata; python_version < "3.8"->jsonschema<4,>=2.5.1->docker-compose) (0.6.0.post1)
    Collecting zipp>=0.5
      Downloading zipp-1.2.0-py2.py3-none-any.whl (4.8 kB)
    Collecting configparser>=3.5; python_version < "3"
      Downloading configparser-4.0.2-py2.py3-none-any.whl (22 kB)
    Requirement already satisfied: cffi>=1.1 in /usr/lib64/python2.7/site-packages (from bcrypt>=3.1.3->paramiko>=2.4.2; extra == "ssh"->docker[ssh]<5,>=3.7.0->docker-compose) (1.14.0)
    Requirement already satisfied: scandir; python_version < "3.5" in /usr/lib64/python2.7/site-packages (from pathlib2; python_version < "3"->importlib-metadata; python_version < "3.8"->jsonschema<4,>=2.5.1->docker-compose) (1.10.0)
    Requirement already satisfied: pycparser in /usr/lib/python2.7/site-packages (from cffi>=1.1->bcrypt>=3.1.3->paramiko>=2.4.2; extra == "ssh"->docker[ssh]<5,>=3.7.0->docker-compose) (2.14)
    Installing collected packages: zipp, configparser
    Successfully installed configparser-4.0.2 zipp-1.2.0


    This time zipp and configparser packages also got installed with docker-compose. This resolved my issue and I was able to go ahead with successful AWX installation.

    In summary –

    • First upgrade pip to latest version
    • Then install docker-compose. Make sure zipp and configparser are getting installed with the same.

    Cheers and happy automating!

  • Installation of docker fails on CentOS 8 with Error – package containerd.io-1.2.10-3.2.el7.x86_64 is excluded

    Installation of docker fails on CentOS 8 with Error – package containerd.io-1.2.10-3.2.el7.x86_64 is excluded

    I recently came across a strange issue while installing Docker on CentOS (version 8) machine.

    Issue

    When I tried below options to install docker on my machine I got the same error every time.

    Installation Commands Used

    yum install -y -q docker-ce
    or
    yum install -y docker-ce.x86_64
    or
    yum install docker-ce

    Error message received

    Error:
     Problem: package docker-ce-3:19.03.8-3.el7.x86_64 requires containerd.io >= 1.2.2-3, but none of the providers can be installed
      - cannot install the best candidate for the job
      - package containerd.io-1.2.10-3.2.el7.x86_64 is excluded
      - package containerd.io-1.2.13-3.1.el7.x86_64 is excluded
      - package containerd.io-1.2.2-3.3.el7.x86_64 is excluded
      - package containerd.io-1.2.2-3.el7.x86_64 is excluded
      - package containerd.io-1.2.4-3.1.el7.x86_64 is excluded
      - package containerd.io-1.2.5-3.1.el7.x86_64 is excluded
      - package containerd.io-1.2.6-3.3.el7.x86_64 is excluded

    Resolution

    To resolve this issue, first we need to manually install the containerd.io package.

    [root@test_centos8 /]# yum install -y https://download.docker.com/linux/centos/7/x86_64/stable/Packages/containerd.io-1.2.6-3.3.el7.x86_64.rpm
    Last metadata expiration check: 0:02:53 ago on Thu 02 Apr 2020 09:29:41 AM UTC.
    containerd.io-1.2.6-3.3.el7.x86_64.rpm                                                                                                                                 18 MB/s |  26 MB     00:01
    Dependencies resolved.
    ======================================================================================================================================================================================================
     Package                                               Architecture                    Version                                                            Repository                             Size
    ======================================================================================================================================================================================================
    Installing:
     containerd.io                                         x86_64                          1.2.6-3.3.el7                                                      @commandline                           26 M
    Installing dependencies:
     container-selinux                                     noarch                          2:2.124.0-1.module_el8.1.0+272+3e64ee36                            AppStream                              47 k
     checkpolicy                                           x86_64                          2.9-1.el8                                                          BaseOS                                348 k
     libselinux-utils                                      x86_64                          2.9-2.1.el8                                                        BaseOS                                243 k
     policycoreutils                                       x86_64                          2.9-3.el8_1.1                                                      BaseOS                                377 k
     policycoreutils-python-utils                          noarch                          2.9-3.el8_1.1                                                      BaseOS                                250 k
     python3-audit                                         x86_64                          3.0-0.13.20190507gitf58ec40.el8                                    BaseOS                                 85 k
     python3-libselinux                                    x86_64                          2.9-2.1.el8                                                        BaseOS                                283 k
     python3-libsemanage                                   x86_64                          2.9-1.el8                                                          BaseOS                                127 k
     python3-policycoreutils                               noarch                          2.9-3.el8_1.1                                                      BaseOS                                2.2 M
     python3-setools                                       x86_64                          4.2.2-1.el8                                                        BaseOS                                600 k
     rpm-plugin-selinux                                    x86_64                          4.14.2-25.el8                                                      BaseOS                                 73 k
     selinux-policy                                        noarch                          3.14.3-20.el8                                                      BaseOS                                602 k
     selinux-policy-targeted                               noarch                          3.14.3-20.el8                                                      BaseOS                                 15 M
    Enabling module streams:
     container-tools                                                                       rhel8
    
    Transaction Summary
    ======================================================================================================================================================================================================
    Install  14 Packages
    
    Total size: 46 M
    Total download size: 20 M
    Installed size: 158 M
    Downloading Packages:
    (1/13): libselinux-utils-2.9-2.1.el8.x86_64.rpm                                                                                                                       2.4 MB/s | 243 kB     00:00
    (2/13): container-selinux-2.124.0-1.module_el8.1.0+272+3e64ee36.noarch.rpm                                                                                            375 kB/s |  47 kB     00:00
    (3/13): checkpolicy-2.9-1.el8.x86_64.rpm                                                                                                                              2.5 MB/s | 348 kB     00:00
    (4/13): python3-audit-3.0-0.13.20190507gitf58ec40.el8.x86_64.rpm                                                                                                      2.5 MB/s |  85 kB     00:00
    (5/13): policycoreutils-2.9-3.el8_1.1.x86_64.rpm                                                                                                                      3.0 MB/s | 377 kB     00:00
    (6/13): python3-libsemanage-2.9-1.el8.x86_64.rpm                                                                                                                      2.2 MB/s | 127 kB     00:00
    (7/13): policycoreutils-python-utils-2.9-3.el8_1.1.noarch.rpm                                                                                                         685 kB/s | 250 kB     00:00
    (8/13): python3-libselinux-2.9-2.1.el8.x86_64.rpm                                                                                                                     810 kB/s | 283 kB     00:00
    (9/13): rpm-plugin-selinux-4.14.2-25.el8.x86_64.rpm                                                                                                                   288 kB/s |  73 kB     00:00
    (10/13): python3-setools-4.2.2-1.el8.x86_64.rpm                                                                                                                       1.1 MB/s | 600 kB     00:00
    (11/13): selinux-policy-3.14.3-20.el8.noarch.rpm                                                                                                                      936 kB/s | 602 kB     00:00
    (12/13): python3-policycoreutils-2.9-3.el8_1.1.noarch.rpm                                                                                                             1.3 MB/s | 2.2 MB     00:01
    (13/13): selinux-policy-targeted-3.14.3-20.el8.noarch.rpm                                                                                                             3.0 MB/s |  15 MB     00:05
    ------------------------------------------------------------------------------------------------------------------------------------------------------------------------------------------------------
    Total                                                                                                                                                                 2.8 MB/s |  20 MB     00:07
    Running transaction check
    Transaction check succeeded.
    Running transaction test
    Transaction test succeeded.
    Running transaction
      Preparing        :                                                                                                                                                                              1/1
      Installing       : python3-libselinux-2.9-2.1.el8.x86_64                                                                                                                                       1/14
      Installing       : libselinux-utils-2.9-2.1.el8.x86_64                                                                                                                                         2/14
      Installing       : policycoreutils-2.9-3.el8_1.1.x86_64                                                                                                                                        3/14
      Running scriptlet: policycoreutils-2.9-3.el8_1.1.x86_64                                                                                                                                        3/14
      Installing       : rpm-plugin-selinux-4.14.2-25.el8.x86_64                                                                                                                                     4/14
      Installing       : selinux-policy-3.14.3-20.el8.noarch                                                                                                                                         5/14
      Running scriptlet: selinux-policy-3.14.3-20.el8.noarch                                                                                                                                         5/14
      Running scriptlet: selinux-policy-targeted-3.14.3-20.el8.noarch                                                                                                                                6/14
      Installing       : selinux-policy-targeted-3.14.3-20.el8.noarch                                                                                                                                6/14
      Running scriptlet: selinux-policy-targeted-3.14.3-20.el8.noarch                                                                                                                                6/14
      Installing       : python3-libsemanage-2.9-1.el8.x86_64                                                                                                                                        7/14
      Installing       : python3-setools-4.2.2-1.el8.x86_64                                                                                                                                          8/14
      Installing       : python3-audit-3.0-0.13.20190507gitf58ec40.el8.x86_64                                                                                                                        9/14
      Installing       : checkpolicy-2.9-1.el8.x86_64                                                                                                                                               10/14
      Installing       : python3-policycoreutils-2.9-3.el8_1.1.noarch                                                                                                                               11/14
      Installing       : policycoreutils-python-utils-2.9-3.el8_1.1.noarch                                                                                                                          12/14
      Running scriptlet: container-selinux-2:2.124.0-1.module_el8.1.0+272+3e64ee36.noarch                                                                                                           13/14
      Installing       : container-selinux-2:2.124.0-1.module_el8.1.0+272+3e64ee36.noarch                                                                                                           13/14
      Running scriptlet: container-selinux-2:2.124.0-1.module_el8.1.0+272+3e64ee36.noarch                                                                                                           13/14
      Installing       : containerd.io-1.2.6-3.3.el7.x86_64                                                                                                                                         14/14
      Running scriptlet: containerd.io-1.2.6-3.3.el7.x86_64                                                                                                                                         14/14
      Running scriptlet: container-selinux-2:2.124.0-1.module_el8.1.0+272+3e64ee36.noarch                                                                                                           14/14
      Running scriptlet: containerd.io-1.2.6-3.3.el7.x86_64                                                                                                                                         14/14
      Verifying        : container-selinux-2:2.124.0-1.module_el8.1.0+272+3e64ee36.noarch                                                                                                            1/14
      Verifying        : checkpolicy-2.9-1.el8.x86_64                                                                                                                                                2/14
      Verifying        : libselinux-utils-2.9-2.1.el8.x86_64                                                                                                                                         3/14
      Verifying        : policycoreutils-2.9-3.el8_1.1.x86_64                                                                                                                                        4/14
      Verifying        : policycoreutils-python-utils-2.9-3.el8_1.1.noarch                                                                                                                           5/14
      Verifying        : python3-audit-3.0-0.13.20190507gitf58ec40.el8.x86_64                                                                                                                        6/14
      Verifying        : python3-libselinux-2.9-2.1.el8.x86_64                                                                                                                                       7/14
      Verifying        : python3-libsemanage-2.9-1.el8.x86_64                                                                                                                                        8/14
      Verifying        : python3-policycoreutils-2.9-3.el8_1.1.noarch                                                                                                                                9/14
      Verifying        : python3-setools-4.2.2-1.el8.x86_64                                                                                                                                         10/14
      Verifying        : rpm-plugin-selinux-4.14.2-25.el8.x86_64                                                                                                                                    11/14
      Verifying        : selinux-policy-3.14.3-20.el8.noarch                                                                                                                                        12/14
      Verifying        : selinux-policy-targeted-3.14.3-20.el8.noarch                                                                                                                               13/14
      Verifying        : containerd.io-1.2.6-3.3.el7.x86_64                                                                                                                                         14/14
    
    Installed:
      containerd.io-1.2.6-3.3.el7.x86_64   container-selinux-2:2.124.0-1.module_el8.1.0+272+3e64ee36.noarch checkpolicy-2.9-1.el8.x86_64                         libselinux-utils-2.9-2.1.el8.x86_64
      policycoreutils-2.9-3.el8_1.1.x86_64 policycoreutils-python-utils-2.9-3.el8_1.1.noarch                python3-audit-3.0-0.13.20190507gitf58ec40.el8.x86_64 python3-libselinux-2.9-2.1.el8.x86_64
      python3-libsemanage-2.9-1.el8.x86_64 python3-policycoreutils-2.9-3.el8_1.1.noarch                     python3-setools-4.2.2-1.el8.x86_64                   rpm-plugin-selinux-4.14.2-25.el8.x86_64
      selinux-policy-3.14.3-20.el8.noarch  selinux-policy-targeted-3.14.3-20.el8.noarch
    
    Complete!
    

    Once containerd.io package is installed you can go ahead and install the docker without any error.

    [root@test_centos8 /]# yum install docker-ce
    Last metadata expiration check: 0:19:09 ago on Thu 02 Apr 2020 09:29:41 AM UTC.
    Dependencies resolved.
    ======================================================================================================================================================================================================
     Package                                                Architecture                           Version                                         Repository                                        Size
    ======================================================================================================================================================================================================
    Installing:
     docker-ce                                              x86_64                                 3:19.03.8-3.el7                                 docker-ce-stable                                  25 M
    Installing dependencies:
     iptables                                               x86_64                                 1.8.2-16.el8                                    BaseOS                                           586 k
     libcgroup                                              x86_64                                 0.41-19.el8                                     BaseOS                                            70 k
     libnetfilter_conntrack                                 x86_64                                 1.0.6-5.el8                                     BaseOS                                            65 k
     libnfnetlink                                           x86_64                                 1.0.1-13.el8                                    BaseOS                                            33 k
     libnftnl                                               x86_64                                 1.1.1-4.el8                                     BaseOS                                            83 k
     docker-ce-cli                                          x86_64                                 1:19.03.8-3.el7                                 docker-ce-stable                                  40 M
    
    Transaction Summary
    ======================================================================================================================================================================================================
    Install  7 Packages
    
    Total download size: 65 M
    Installed size: 276 M
    Is this ok [y/N]: y
    Downloading Packages:
    (1/7): libnetfilter_conntrack-1.0.6-5.el8.x86_64.rpm                                                                                                                  1.0 MB/s |  65 kB     00:00
    (2/7): libcgroup-0.41-19.el8.x86_64.rpm                                                                                                                               1.0 MB/s |  70 kB     00:00
    (3/7): libnfnetlink-1.0.1-13.el8.x86_64.rpm                                                                                                                           1.0 MB/s |  33 kB     00:00
    (4/7): libnftnl-1.1.1-4.el8.x86_64.rpm                                                                                                                                2.3 MB/s |  83 kB     00:00
    (5/7): iptables-1.8.2-16.el8.x86_64.rpm                                                                                                                               3.3 MB/s | 586 kB     00:00
    (6/7): docker-ce-19.03.8-3.el7.x86_64.rpm                                                                                                                             8.2 MB/s |  25 MB     00:02
    (7/7): docker-ce-cli-19.03.8-3.el7.x86_64.rpm                                                                                                                          10 MB/s |  40 MB     00:03
    ------------------------------------------------------------------------------------------------------------------------------------------------------------------------------------------------------
    Total                                                                                                                                                                  14 MB/s |  65 MB     00:04
    warning: /var/cache/dnf/docker-ce-stable-091d8a9c23201250/packages/docker-ce-19.03.8-3.el7.x86_64.rpm: Header V4 RSA/SHA512 Signature, key ID 621e9f35: NOKEY
    Docker CE Stable - x86_64                                                                                                                                              39 kB/s | 1.6 kB     00:00
    Importing GPG key 0x621E9F35:
     Userid     : "Docker Release (CE rpm) <docker@docker.com>"
     Fingerprint: 060A 61C5 1B55 8A7F 742B 77AA C52F EB6B 621E 9F35
     From       : https://download.docker.com/linux/centos/gpg
    Is this ok [y/N]: y
    Key imported successfully
    Running transaction check
    Transaction check succeeded.
    Running transaction test
    Transaction test succeeded.
    Running transaction
      Preparing        :                                                                                                                                                                              1/1
      Installing       : libnfnetlink-1.0.1-13.el8.x86_64                                                                                                                                             1/7
      Running scriptlet: libnfnetlink-1.0.1-13.el8.x86_64                                                                                                                                             1/7
      Installing       : libnetfilter_conntrack-1.0.6-5.el8.x86_64                                                                                                                                    2/7
      Running scriptlet: libnetfilter_conntrack-1.0.6-5.el8.x86_64                                                                                                                                    2/7
      Installing       : docker-ce-cli-1:19.03.8-3.el7.x86_64                                                                                                                                         3/7
      Running scriptlet: docker-ce-cli-1:19.03.8-3.el7.x86_64                                                                                                                                         3/7
      Installing       : libnftnl-1.1.1-4.el8.x86_64                                                                                                                                                  4/7
      Running scriptlet: libnftnl-1.1.1-4.el8.x86_64                                                                                                                                                  4/7
      Running scriptlet: iptables-1.8.2-16.el8.x86_64                                                                                                                                                 5/7
      Installing       : iptables-1.8.2-16.el8.x86_64                                                                                                                                                 5/7
      Running scriptlet: iptables-1.8.2-16.el8.x86_64                                                                                                                                                 5/7
      Running scriptlet: libcgroup-0.41-19.el8.x86_64                                                                                                                                                 6/7
      Installing       : libcgroup-0.41-19.el8.x86_64                                                                                                                                                 6/7
      Running scriptlet: libcgroup-0.41-19.el8.x86_64                                                                                                                                                 6/7
      Installing       : docker-ce-3:19.03.8-3.el7.x86_64                                                                                                                                             7/7
      Running scriptlet: docker-ce-3:19.03.8-3.el7.x86_64                                                                                                                                             7/7
      Verifying        : iptables-1.8.2-16.el8.x86_64                                                                                                                                                 1/7
      Verifying        : libcgroup-0.41-19.el8.x86_64                                                                                                                                                 2/7
      Verifying        : libnetfilter_conntrack-1.0.6-5.el8.x86_64                                                                                                                                    3/7
      Verifying        : libnfnetlink-1.0.1-13.el8.x86_64                                                                                                                                             4/7
      Verifying        : libnftnl-1.1.1-4.el8.x86_64                                                                                                                                                  5/7
      Verifying        : docker-ce-3:19.03.8-3.el7.x86_64                                                                                                                                             6/7
      Verifying        : docker-ce-cli-1:19.03.8-3.el7.x86_64                                                                                                                                         7/7
    
    Installed:
      docker-ce-3:19.03.8-3.el7.x86_64     iptables-1.8.2-16.el8.x86_64             libcgroup-0.41-19.el8.x86_64     libnetfilter_conntrack-1.0.6-5.el8.x86_64     libnfnetlink-1.0.1-13.el8.x86_64
      libnftnl-1.1.1-4.el8.x86_64          docker-ce-cli-1:19.03.8-3.el7.x86_64
    
    Complete!
    

    Once docker is successfully installed you can run docker -v to check the installed version.

    [root@test_centos8 /]# docker -v
    Docker version 19.03.8, build afacb8b
    

    Hope this helps everyone (and saves productive time).

  • [WARNING]: The value 1 (type int) in a string field was converted to u’1′ (type string)

    [WARNING]: The value 1 (type int) in a string field was converted to u’1′ (type string)

    I have seen this error multiple times during my Ansible playbooks execution but always ignored it because I always got the expected result.

    Eventually, I wanted to get rid of any errors/warnings from my final version of the playbook and wanted to take care of this error as well. Hence I had to do little readings in this error/warning.

    [WARNING]: The value 1 (type int) in a string field was converted to u'1' (type string). If this does not look like what you expect, quote the entire value to ensure it does
    not change.

    As per the Ansible official documentation this is the Default behavior of starting Ansible version 2.8. Ansible will warn if a module expects a string, but a non-string value is passed and automatically converted to a string.

    For example – If your playbook inputs a value version number 1.10 (parsed as float value) would be converted to '1.1'. Such conversions can result in unexpected behavior depending on context and also will/might change playbook’s expected outcomes

    There are two solutions to address this issue.

    1. ANSIBLE_STRING_CONVERSION_ACTION Environment Variable

    This behavior can be changed to be an error or to be ignored by setting the ANSIBLE_STRING_CONVERSION_ACTION environment variable, or by setting the string_conversion_action configuration in the defaults section of ansible.cfg.

    You can refer to this link to change the string_conversion_action parameter in defaults section of Ansible.cfg. This will make sure Ansible will not change the input to String

    2. Quote the input values in playbook

    I personally prefer this method instead of editing Ansible.cfg file. To make sure you’re not getting string field conversion Warning message you can simply quote the input value. Below is the example for the same.

      - name: Sample sysctl task
        sysctl:
         name: net.bridge.bridge-nf-call-iptables
         value: '1'
         state: present

    Below are the playbook screen captures of before and after quoting the values in playbook

    The value 1 (type int) in a string field was converted to u'1' (type string) - Before Solution
    The value 1 (type int) in a string field was converted to u’1′ (type string) –
    Before making changes
    The value 1 (type int) in a string field was converted to u'1' (type string) - After Solution
    The value 1 (type int) in a string field was converted to u’1′ (type string) – After making changes

    I hope this helps everyone.

  • Fix Error – Failed to reload sysctl: sysctl: cannot stat /proc/sys/net/bridge/bridge-nf-call-ip6tables

    Fix Error – Failed to reload sysctl: sysctl: cannot stat /proc/sys/net/bridge/bridge-nf-call-ip6tables

    I have been working with Ansible for automating Kubernetes deployment using CentOS VM templates. As a pre-requisite we need to ensure net.bridge.bridge-nf-call-iptables and net.bridge.bridge-nf-call-ip6tables is set to 1.

    I created below tasks in my Ansible role playbook.

    # Set net.bridge.bridge-nf-call-ip6tables value to 1 all K8S cluster nodes
      - name: ensure net.bridge.bridge-nf-call-ip6tables is set to 1
        sysctl:
         name: net.bridge.bridge-nf-call-ip6tables
         value: 1
         state: present
       
    # Set net.bridge.bridge-nf-call-iptables value to 1 all K8S cluster nodes
      - name: ensure net.bridge.bridge-nf-call-iptables is set to 1
        sysctl:
         name: net.bridge.bridge-nf-call-iptables
         value: 1
         state: present
       

    But when I executed this playbook I got below error

    fatal: [prod-k8s-master01]: FAILED! => {"changed": false, "msg": "Failed to reload sysctl: sysctl: cannot stat /proc/sys/net/bridge/bridge-nf-call-ip6tables: No such file or dire                                                ctory\nsysctl: cannot stat /proc/sys/net/bridge/bridge-nf-call-iptables: No such file or directory\n"}
    fatal: [prod-k8s-worker01]: FAILED! => {"changed": false, "msg": "Failed to reload sysctl: sysctl: cannot stat /proc/sys/net/bridge/bridge-nf-call-ip6tables: No such file or dire                                                ctory\nsysctl: cannot stat /proc/sys/net/bridge/bridge-nf-call-iptables: No such file or directory\n"}

    After lots of reading and researching I found that I did not escalate the privileges on in my main YML file. After adding Become: yes in the main YML resolved my issue. Below is the syntax of my main playbook.

    - hosts: all
      gather_facts: false
      become: yes
      vars_files:
        - answerfile.yml

    Sometimes common mistakes are the most time consuming because we take it for granted.

    Note that in my example I am using CentOS.

  • Automating Kubernetes deployment on VMs using Ansible

    Automating Kubernetes deployment on VMs using Ansible

    In this post, we will discuss automating Kubernetes deployment using Ansible.

    In my example, I have used CentOS VMs (on VMware) for deploying Kubernetes. But technically Kubernetes deployment steps don’t differ irrespective of the platform you use.

    Before getting started to make sure you have

    • Ansible server up and running on the network. Also, make sure Ansible can reach the VMware environment.
    • Make sure you’ve added Ansible server SSH authentication keys into VMware virtual machine before converting the same into the template. Follow this blog post for steps.

    Once you have the pre-requisites in place follow the below steps.

    Step 1 – Clone my GitHub repository which consists of required playbooks and instructions.

    [root@alb-ansible dw-pm-csi]# git clone https://github.com/waghmaredb/ansible-k8s
    Cloning into 'ansible-k8s'…
    remote: Enumerating objects: 41, done.
    remote: Counting objects: 100% (41/41), done.
    remote: Compressing objects: 100% (40/40), done.
    remote: Total 41 (delta 12), reused 0 (delta 0), pack-reused 0
    Unpacking objects: 100% (41/41), done.
    [root@alb-ansible dw-pm-csi]# cd ansible-k8s/
    [root@alb-ansible ansible-k8s]# ls
    k8s-deployment.yml README.md

    Step 2 – Edit k8s-deployment.yml file and edit below lines from VARS

    common environment details
    #ntp_server: - Replace with your NTP server IP/hostname
    domain: "" - Replace with your DOMAIN NAME
    dns_server: - Replace with your DNS server IP/hostname
    vmware environment details
    vcenter_ip: - Replace with your vCenter server IP/hostname
    vcenter_username: - Replace with vCenter admin account username
    vcenter_password: - Replace with vCenter admin account password
    vmware_datacenter: - Replace with VMware datacenter you want to use
    vmware_cluster: - Replace with VMware cluster you want to use
    vm_network: "" - Replace with VM network you want kubernetes VMs to connect
    k8s_vm_folder: - Replace with VM folder in which you want to place kubernetes VMs
    k8s_template_name: - Replace with VMware CentOS template name
    K8S environment details
    k8s_master_ip: 192.168.172.100 - Replace IP address with kubernetes master server IP address you want to use
    k8s_network_netmask: 255.255.255.0 - Replace subnet mask with netmask of kubernetes network
    k8s_network_gateway: 192.168.172.1 - Replace gateway with kubernetes network gateway
    k8s_node1_ip: 192.168.172.101 - Repalce IP address with kubernetes node IP address
    #k8s_node2_ip: 192.168.1.102
    #k8s_node3_ip: 192.168.1.103
    #k8s_node4_ip: 192.168.1.104
    #k8s_node5_ip: 192.168.1.105
    #k8s_node6_ip: 192.168.1.106
    #k8s_node7_ip: 192.168.1.107
    #k8s_node8_ip: 192.168.1.108

    Step 3 – Edit the /etc/ansible hosts file and insert the Kubernetes environment details. Make sure IP address details are inline with your Kubernetes environment

    [kube_cluster1]
    k8s-master ansible_host=192.168.172.100 ansible_user=root
    worker1 ansible_host=192.168.172.101 ansible_user=root
    worker2 ansible_host=192.168.172.102 ansible_user=root
    worker3 ansible_host=192.168.172.103 ansible_user=root
    worker4 ansible_host=192.168.172.104 ansible_user=root
    
    [master]
    k8s-master ansible_host=192.168.172.100 ansible_user=root
    
    [worker]
    worker1 ansible_host=192.168.172.101 ansible_user=root
    worker2 ansible_host=192.168.172.102 ansible_user=root
    worker3 ansible_host=192.168.172.103 ansible_user=root
    worker4 ansible_host=192.168.172.104 ansible_user=root
    

    Step 4 – Run the k8s-deployment.yml playbook.