In this blog let’s talk more around Ansible architecture and it’s concepts. So let’ get started.
Similar to any other platform or software Ansible also has it’s own concepts which you should understand. This will help you get better hands-on with Ansible.
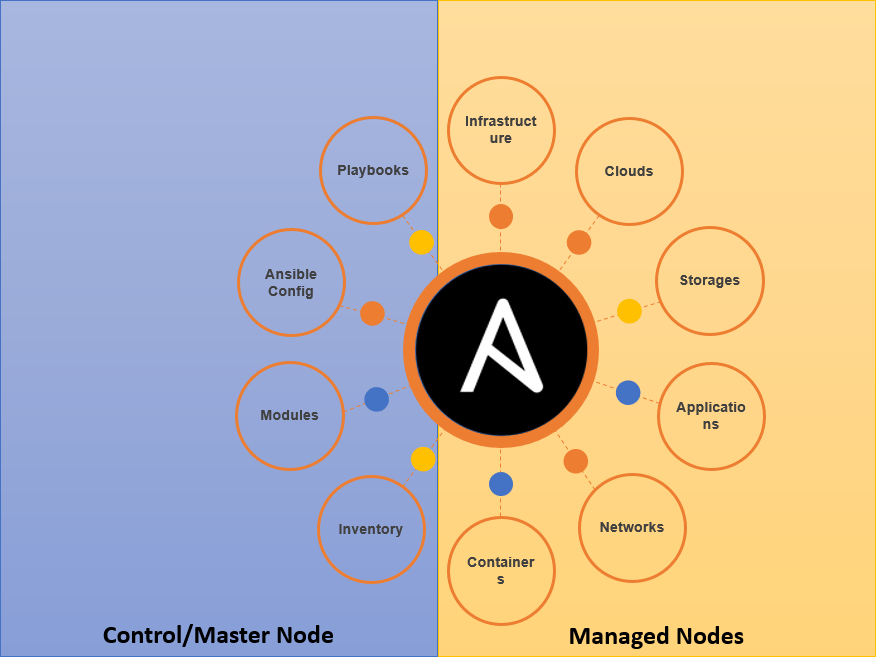
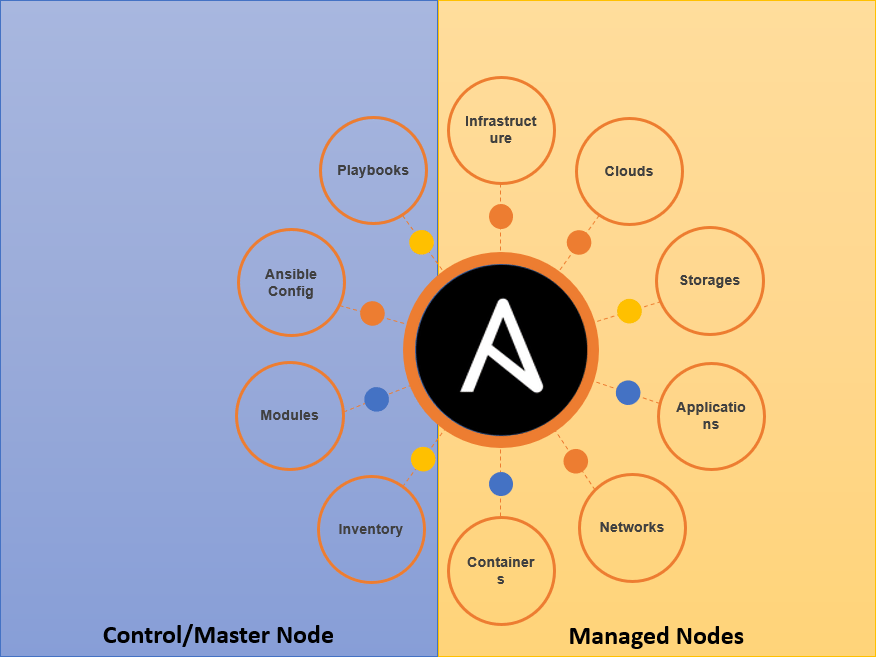
Below diagram is the high level depiction of the Ansible concepts.
Ansible Concepts
On high level there are two types of nodes
Managed Nodes (Right side of the diagram) – Managed nodes are the devices or software you’ll manage using Ansible. Note that managed nodes don’t need Ansible installed.
Control/Master Node (Left side of the diagram) – This the machine Ansible is installed. On which you’ll login to run Ansible commands.
Master node as multiple components which work together. Below are the high level details
Inventory – This is the list of managed nodes which Ansible will talk to. Ansible always refers to node details from inventory file for executing any tasks. Inventory file support grouping, nesting, etc. which makes it easier for management and administration
Modules – Each module defines certain Ansible function. You can execute modules using defining multiple tasks as part of playbooks
Ansible Config – Consider this file as database of Ansible environment variables. Variables set in Ansible config supersedes any other setting configured in Ansible. Usually default configurations in this file are enough for many environments but there will be situations where you need to edit this file (/etc/ansible/ansible.cfg).
Playbooks – Consider playbooks as list of many tasks which Ansible will execute in the sequence. Playbooks are written in YAML (.yml) and hence they are very easy to create and manage without the extensive knowledge of the coding.
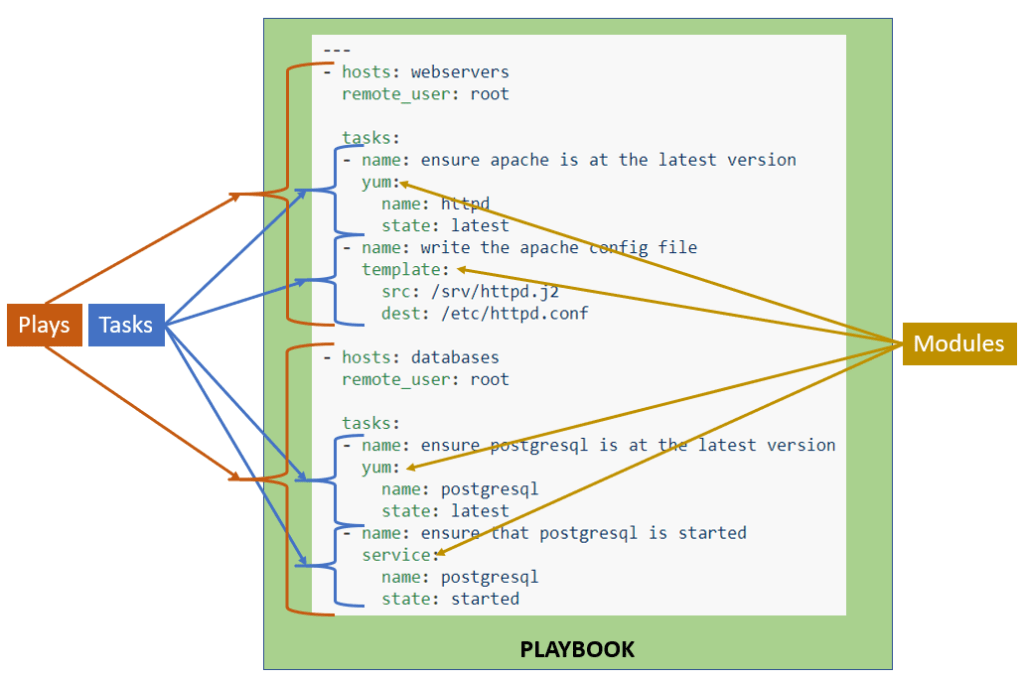
To simplify the playbook understanding just remember that
Playbooks contains Plays
Plays contains Tasks
Tasks call Modules
Below is the example of Ansible Playbook
sample Ansible playbook
There are more concepts when it comes to Ansible (like Tower, Vault, Variables, etc.) but in my personal experience this is the good starting point.
If you find this information stimulating enough and you want to read further then I would highly recommend that you start from here.
I hope these bite sized blogs are helping you pickup Ansible faster. More to come 🙂
There are many blogs which cover what is Ansible and why we should care. But this multi-part blog series will cover how DellEMC and Ansible can help you automate many storage tasks.
Ansible is being used in many organizations nowadays to manage a vast range of infrastructure, ranging from traditional configuration management to cloud resources in public clouds to physical infrastructure such as network and storage devices. There are multiple reasons why you might want to use Ansible, including – but not limited to – below examples.
You’re trying to have efficient DevOps environment
Automate Day 1/2 tasks
Need centralized configuration management
Getting Started with Ansible
Even if you’ve not installed Ansible before, it’s very easy to get started. There are many different ways to install Ansible and many dependencies will be needed based on your environment and systems you’ll be managing.
Once your Linux machine is up and running (CentOS in my case) you can follow next steps
Apart from Ansible itself there will be many dependencies which needs to be installed. In the case of DellEMC PowerMax storage we will need
In this blog we will talk about how DellEMC can help you to store you databases smartly and efficiently.
But firstly let’s talks about CDM and why it’s important. In the world of DBAs everyone’s always talking about performance, million IOPS and double/triple digit bandwidth with lowest possible latency. But the biggest question is whether performance is the only solution to all problems?
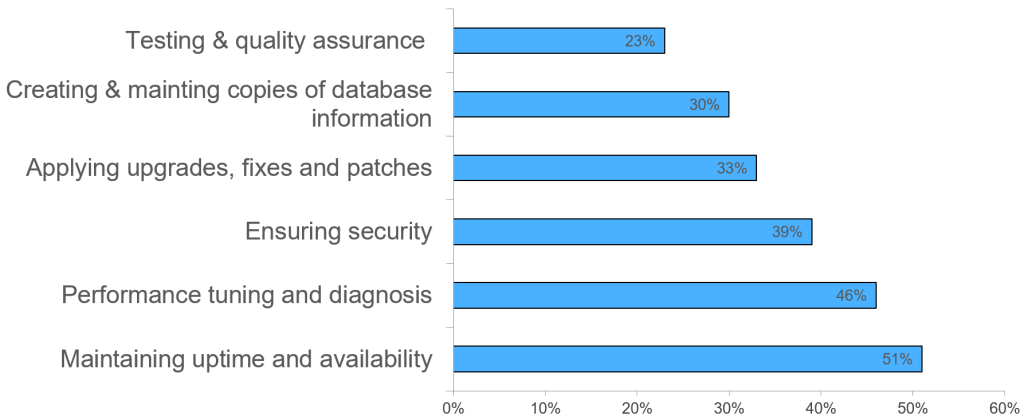
For example in one of the survey members of Independent Oracle User Group (IOUG) were asked what DB activities are taking up most of the time each week?
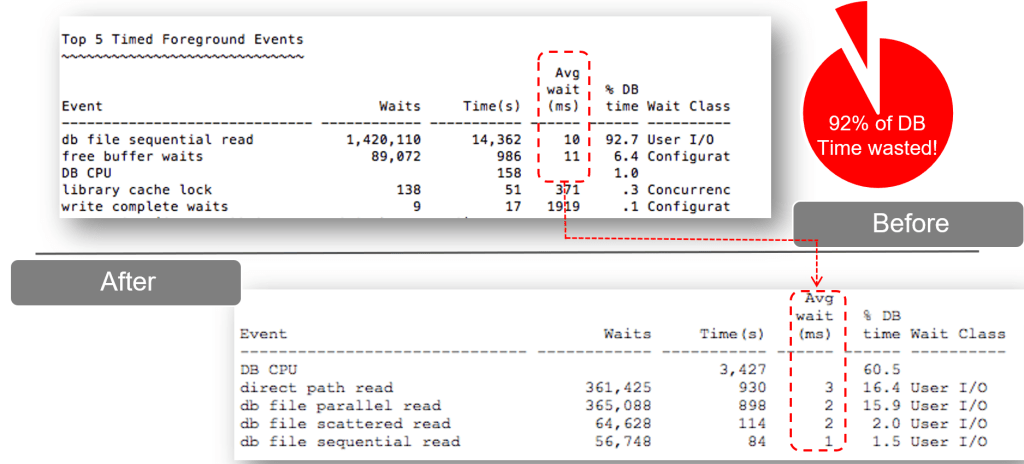
You can also see that performance troubleshooting is rated as second most time consuming activity, but the question is how to solve it. One of the ways people try to solve this is by upgrading their database stack. In below AWR example snippets you can see that how one of the customer has solved their performance issue by moving to DellEMC solution. Earlier they were having 92% User I/O wait time, which also means 92% of the time DB is waiting for database subsystem to respond.
But as I have mentioned earlier upgrading the stack will always give the benefits but it does not solve all the problems. Which also means most customer apply their older process and best practices to new stack which often is the culprit of the new problems. (another blog on this later)
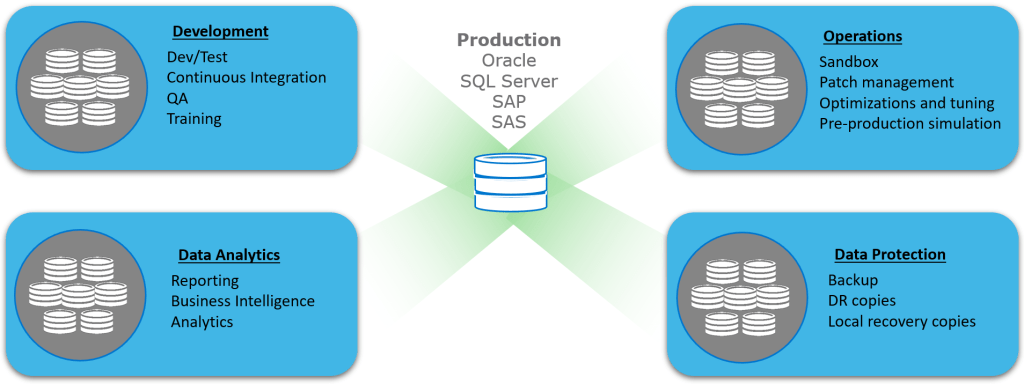
But the real problem is what do you do with those databases and data? Most businesses today are trying to keep more data online. This allows them to understand the patterns and anomalies using AI/ML, which helps them taking right decisions or course correction. All this is driven using copy data, which means you need actual source production database instances to analyze, test, develop etc. Below picture is the great depiction of multiple use cases which needs source database.
Now think of all those use cases and start thinking of the approach DBAs will take to manage the show. Usually there’s no standard way of managing this. Processes to achieve the end goal depends on the experience of the DBA and also availability of the resources.
IDC has done some work on this problem area to understand the gravity of the situation and uncover some facts. IDC polled over 700 customers for this survey. Some of the interesting facts are –
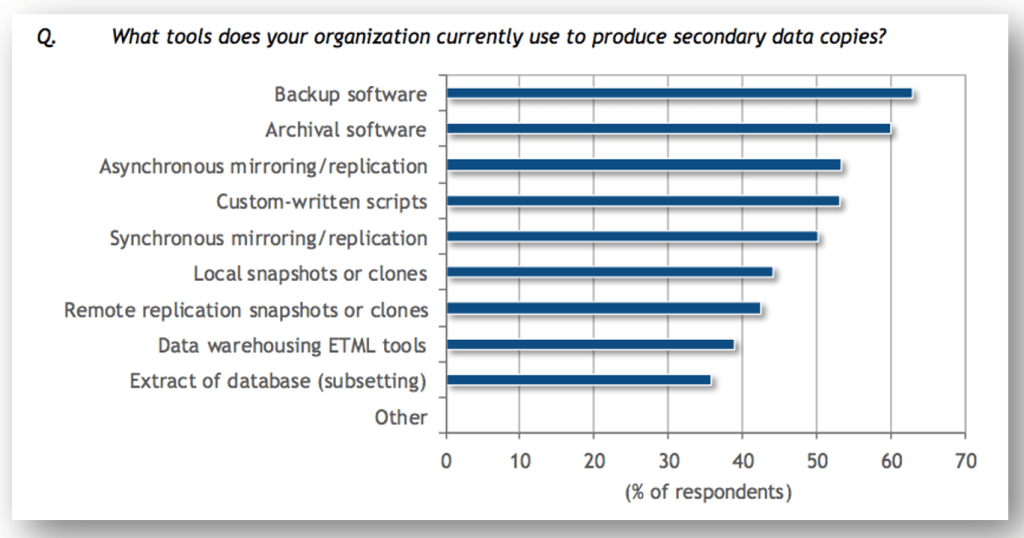
Tools used for producing secondary data copies
As per the IDC survey most popular way is to rely on backup software but interestingly 53% of the respondents said that they use custom-written scripts to manage the CDM show.
How long does it take to refresh copies?
To which 62% of organizations, copies take ½ day or more to create (up to days). And this is very real as I have personally worked with one of my customer who used to take 2 ½ days to create single secondary copy starting weekend, on which 60 member developer team used to work.
At which frequency are copies of dev/test or analytics refreshed?
Copies are refreshed every few days by 32% of organizations, and weekly by 42%.
One of the most striking detail in this IDC document is – How many Database instances do you currently have in production in your data center environment? 77% customers said that they have more that 200 database instances and 82% said that they have more than 10 copies per database.
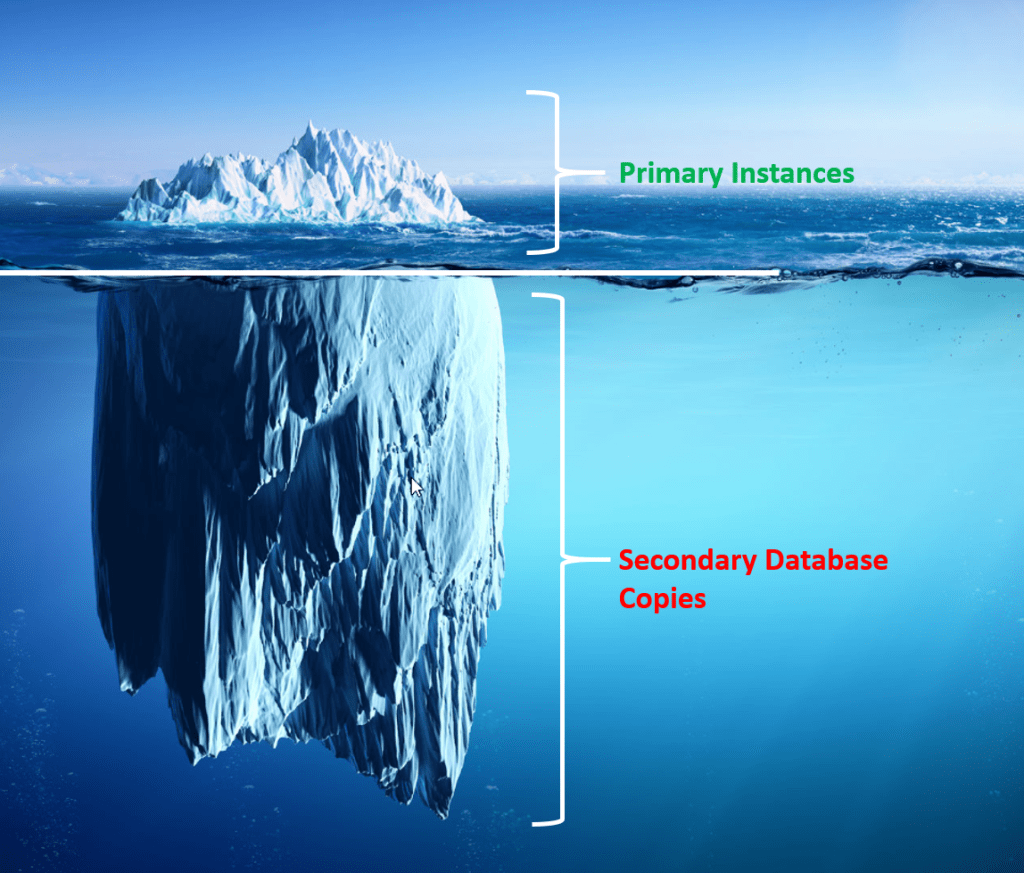
In simplified words this problem looks like the iceberg. People only count their production/primary database instances but secondary/re-purpose copies are usually taken for granted. If you do the quick math on IDC numbers you’ll quickly realize that this is one of the biggest operational issue in database environments.
For Example –
1 Production DB x 250GB DB size x 346 DB Instances = 87TB of Production data
14 Copies of each Production DB x 250GB DB size x 346 DB Instances = 1.2PB of Copy Sprawl
Now that we understand what copy data management issue is. Now let’s understand how DellEMC can help in simplifying the CDM problem
Integrated Copy Data Management (iCDM)
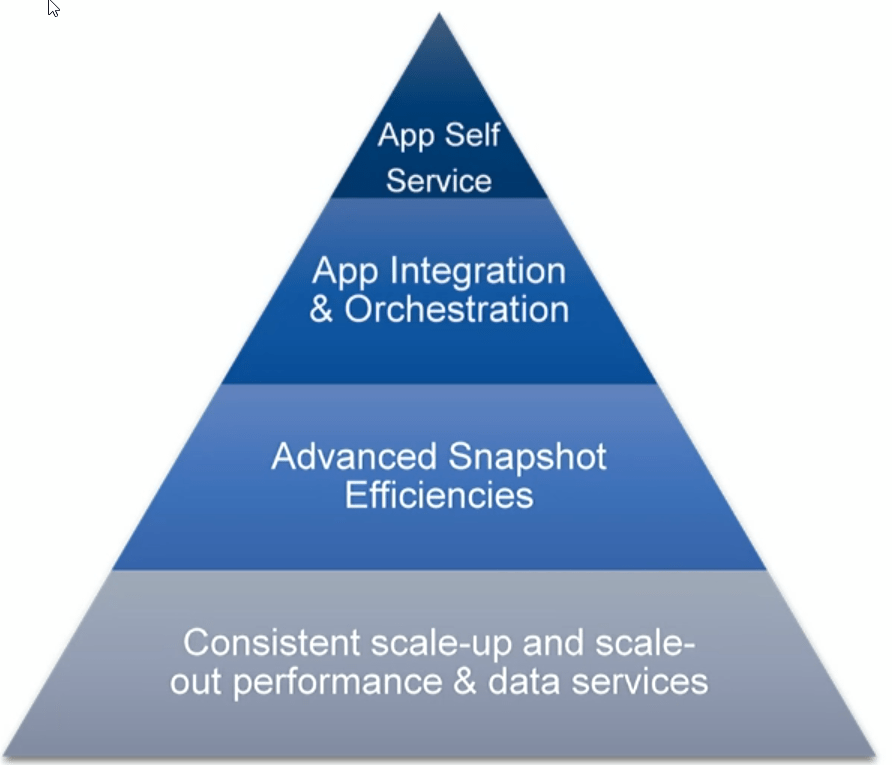
As per my personal experience below snippet is the best way to understand how iCDM functions. Providing self service to application/database teams with application integration. iCDM leverages advanced copy/snapshot function of the DellEMC storage system, which also means you need DellEMC storage in order to use iCDM 🙂
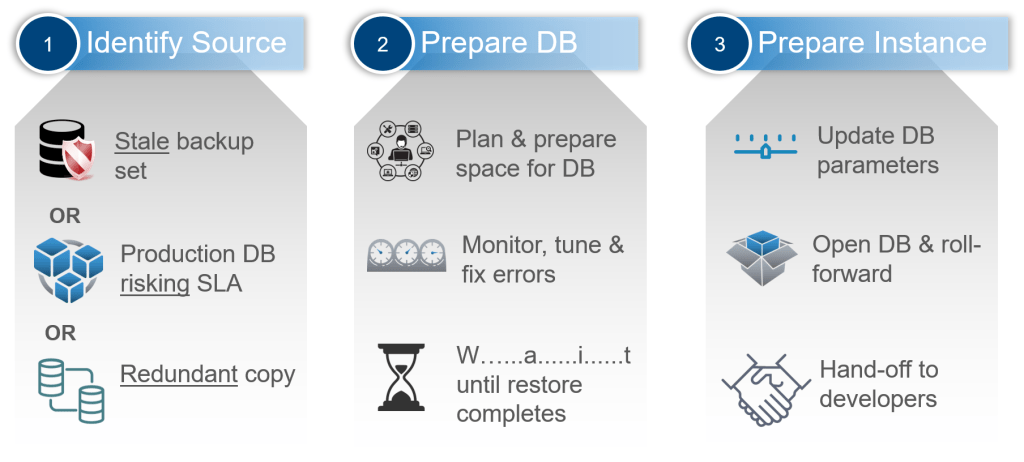
To simplify things even further – in most environments you follow 3 steps process for database copy creation.
Identify source database
Prepare database
Prepare instance
Details for these 3 steps are as below but on high level it lacks automation, it’s (very) time consuming and most importantly it lacks automation.
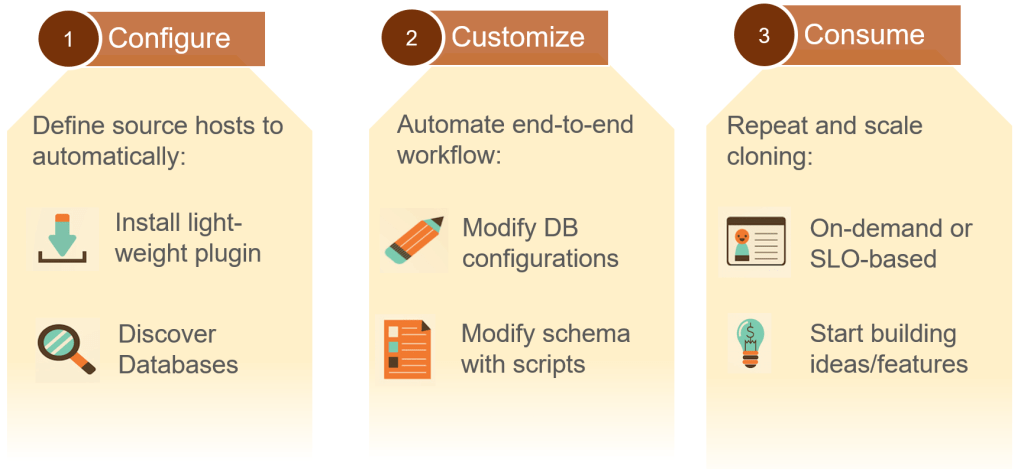
But with iCDM you can change this legacy process and adapt to something which is more modern and fits with today’s cloud native world. You can simply
Containers are everywhere and they are here to stay. They are great level-playing ground to break the infrastructure dependency and allow developers to release their code to any environment.
Containers also help customers to operate at greater scales with ability to quickly scaling up and down, patching with disruptions, withstand infrastructure component failures, moving easily from on-premises to public clouds, etc.
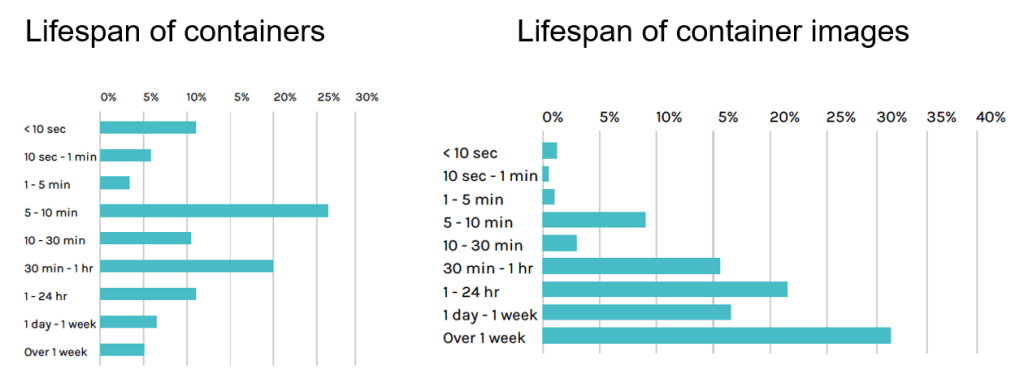
As per the survey from sysdig lifespan of containers and container images is also very short.
At this stage of the popularity of containers there are two thought processes in the container fan club – Persistent or Non-Persistent Containers
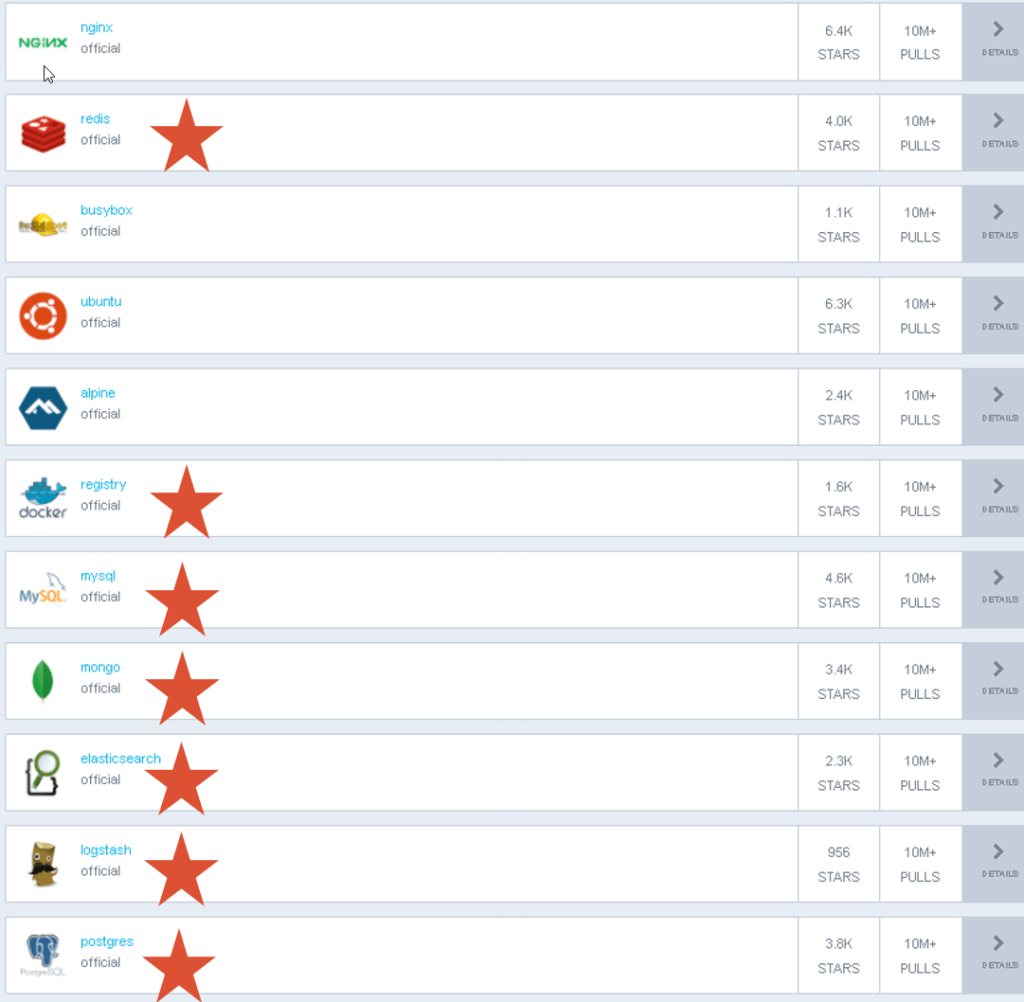
If you explore docker hub top downloads you’ll notice that 7/10 top downloads require data persistence (snippet below)
Let’s understand persistent containers in more details.
Prior to Container Storage Integration CSI, Kubernetes provided in-tree (ie as part of the core code) plugins to support volumes but that posed a problem in that storage vendors had to align to the Kubernetes release process to fix a bug or to release new features among other problems. This also means every storage vendor had their own process to present volumes to Kubernetes.
This heterogeneous non-standard integrations were one of the biggest reasons why CSI was created. CSI was developed as a standard for exposing block and file storage storage systems to containerized workloads on Container Orchestration Systems (COs) like Kubernetes. With the adoption of the Container Storage Interface (CSI), the Kubernetes volume layer becomes truly extensible. Using CSI, third-party storage providers like DellEMC can write and deploy plugins exposing new storage systems in Kubernetes without ever having to touch the core Kubernetes code. This gives Kubernetes users more options for storage and makes the system more secure and reliable. Also this approach makes sure that every vendor has standard way of interacting with Kubernetes.
With CSI Kubernetes supports Persistent Volumes (PV). PVs life-cycle independent of any Kubernetes POD. Kubernetes supports 2 ways to provision PVs
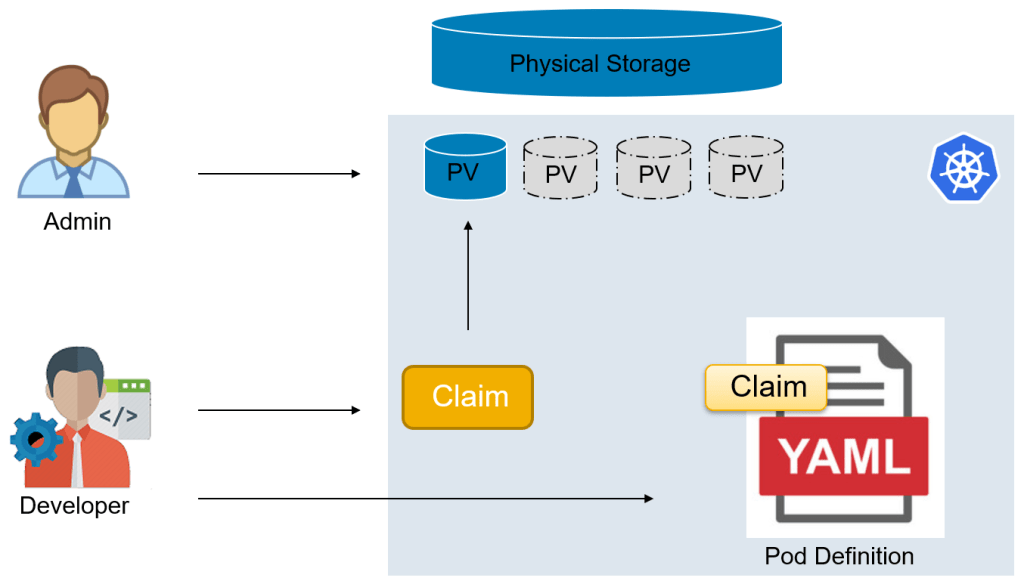
Static – Admin Pre-provisions / creates a number of PVs
Static PV provisioning
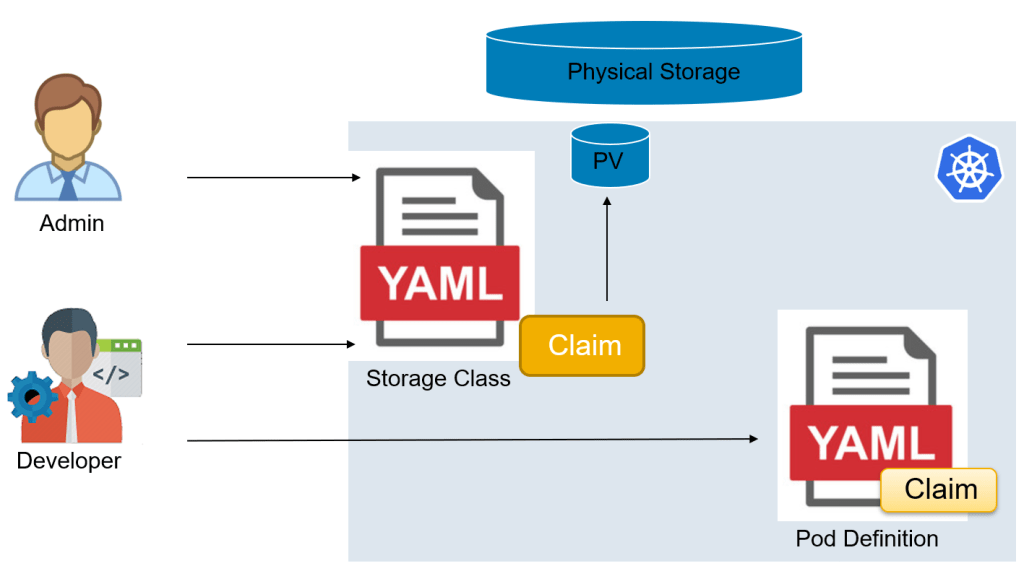
Dynamic – Cluster “automatically” provisions a volume
Dynamic PV provisioning
No matter which is the method of PV provisioning it can support varying properties such as performance, QOS, backup policies, etc. These properties are defined by StorageClass
There are 3 access modes which are supported on PV. Storage volume cannot be mounted simultaneously in more than one access mode.
ReadWriteOnce (RWO) – Volume can be mounted as ready-write by a single node
ReadOnlyMany (ROX) – Volume can be mounted read-only by many nodes
ReadWriteMany (RWX) – Volume can be mounted as read-write by many nodes
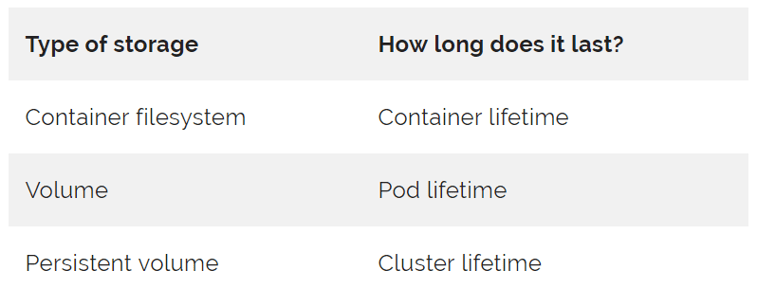
Below is the summary of persistence
DellEMC CSI Support
DellEMC understands that that Enterprise applications require persistent storage. As of now (Nov 2019) DellEMC supports CSI plugins for below storage arrays
In daily life of an administrator worst day is when you’ve to co-relate logs across the stack for performance troubleshooting or when you need to troubleshoot an issue which is not consistent. Usually for such issues you’ll need to enable continuous log collection and hope that issue will reappear during the log collection time. Phew!
But gone are those days where you were reactive in troubleshooting, now with CloudIQ you can be proactive.
CloudIQ is SaaS based monitoring application which is available to all DellEMC customers without any additional investment.
Though CloudIQ allows customers to have centralized monitoring of DellEMC storage products, proactive health score and predictive analytics, but this blog is about VMware monitoring with CloudIQ. With latest update of CloudIQ now it supports monitoring of entire VMware landscape (along with storage and Connectrix).
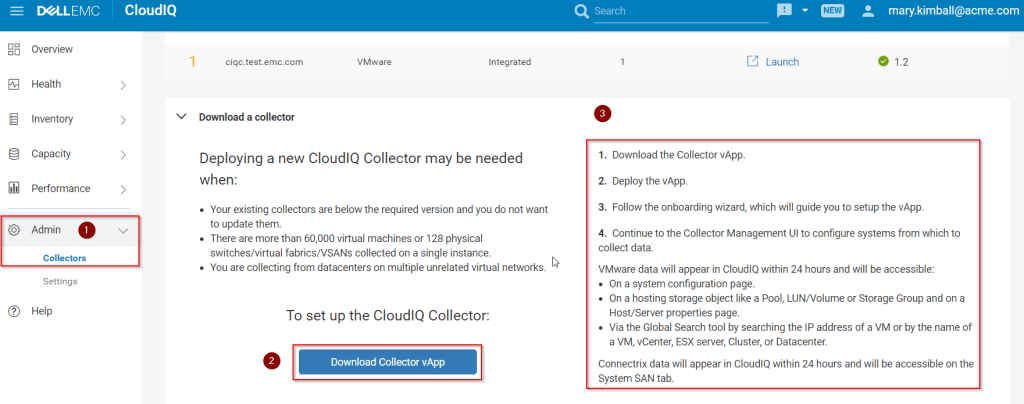
As I have already mentioned CloudIQ has integration with VMware for end-to-end monitoring for the virtualization environments. For enabling the CloudIQ to collect and report VMware data you need to download the CloudIQ collector, which can be downloaded directly from the CloudIQ portal (details below)
Once the collector is downloaded follow the steps (step 3 in above exhibit) listed on the CloudIQ collector download page.
Note that single instance of CloudIQ collector supports collecting data for upto 60000 virtual machines. Once collector is enabled it will take ~24 hours to populate the data on CloudIQ portal.
There are many details available on CloudIQ and more enhancements are getting added very frequently. You can refer to this CloudIQ whitepaper which has details around CloudIQ overview. In this blog post is to highlight few CloudIQ features which I personally like.
Storage LUN to Datastore to VM Mapping
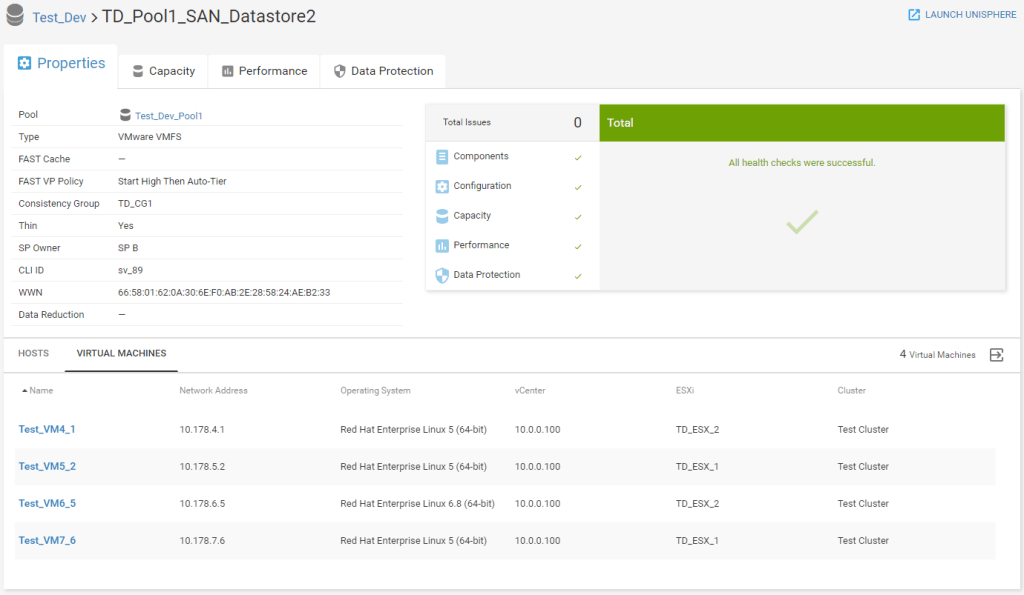
From the CloudIQ you can see the list of all the virtual machines which running on particular datastore. This is great asset as you no more have to login to vCenter console for this.
Storage LUN –> VMware Datastore –> VM Mapping
Co-relate VM Performance With Anomaly Detection
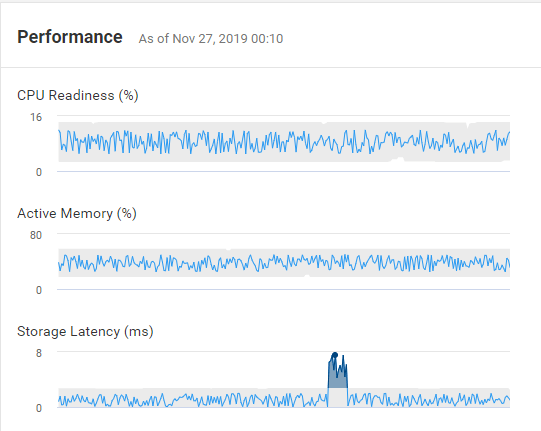
You can view all required performance charts for virtual machine in single view. Additionally CloudIQ performance charts will highlight any performance anomalies during the last 24 hours. In below example you can see that for selected virtual machine storage response time was suddenly increased and went back to normal.
Co-relate VM Performance With Anomaly Detection
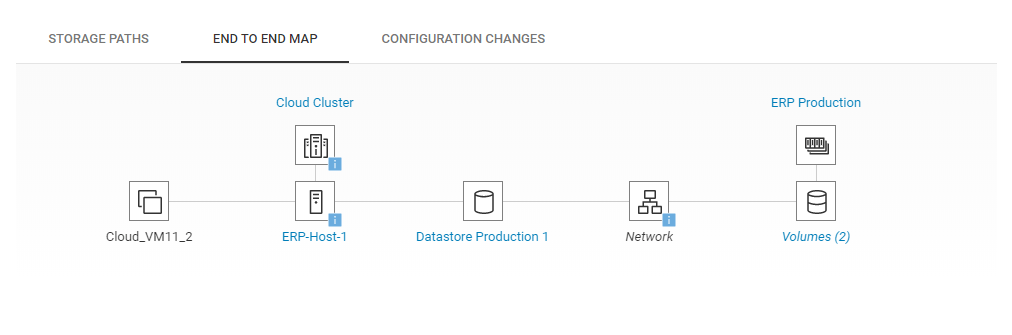
End to End Map
Customers who have tried to deploy monitoring tools understand that it’s very difficult to get the application/virtual machine footprint map in the data center. Usually this is very useful if you want to understand all the dependent infrastructure components which you application touches in the virtualization stack. CloudIQ gives you out of box functionality to provide virtual machine end-to-end map — from Virtual machine to storage volumes/LUNs
These are the top 3 VMware monitoring features which I personally like. Apart from this there are many features including but not limited to
Tracking configuration changes per VM level
Storage path details for each datastore
Also I would like to mention that CloudIQ can be accessed using
Web view using any device having connectivity to CloudIQ
Mobile application – Supported on Apple and Android devices
This section seems pretty straight-forward but is the must for all the Ansible deployments.
Follow below steps to get through the password maze in Ansible environments
Firstly we will need to generate the SSH authentication keys. This needs to be done on the server from which you want to login to other hosts. In my case it’s Ansible master server.
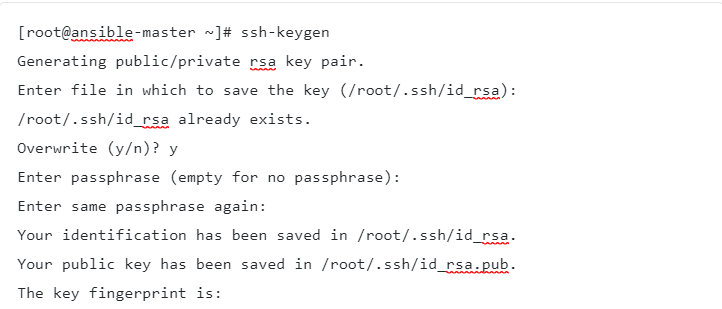
Generate your key – Run the ssh-keygen command (as below). By default system will create and store the SSH key into /root/.ssh/id_rsa, which you can change. Passphrase is optional and you can leave it blank.
Note that if you already have generated the SSH key you have option to overwrite the same, but make sure that earlier key is not used anywhere for authentication. Below example shows option to replace existing SSH keys
[root@ansible-master ~]# ssh-keygen
Generating public/private rsa key pair.
Enter file in which to save the key (/root/.ssh/id_rsa):
/root/.ssh/id_rsa already exists.
Overwrite (y/n)? y
Enter passphrase (empty for no passphrase):
Enter same passphrase again:
Your identification has been saved in /root/.ssh/id_rsa.
Your public key has been saved in /root/.ssh/id_rsa.pub.
The key fingerprint is:
SHA256:D52Rvc2F7JMlbikpj7G96Ys3bSLRUz4tNmsfNP4E2Vg root@ansible-master
The key's randomart image is:
+---[RSA 2048]----+
|                 |
|           o . . |
|          o . + E|
|         . o B.@ |
|        S =.+o&+.|
|         o.BooOoo|
|          +.o+ B.|
|          ..+o=.o|
|          .+=* .o|
+----[SHA256]-----+
If you want to use existing keys then you can simply read the existing key which is saved in the file. Below is the example of the reading existing public key
Once you have generated the SSH key next step is to add the key into target system.
For copying the SSH keys into target system simply follow below process.
[root@ansible-master ~]# ssh-copy-id root@192.168.1.101
/usr/bin/ssh-copy-id: INFO: Source of key(s) to be installed: "/root/.ssh/id_rsa.pub"
The authenticity of host '192.168.1.101 (192.168.1.101)' can't be established.
ECDSA key fingerprint is SHA256:qnOPcE09JqKALwLLaL+SqNMy2oubvhF/EevGCcK9S9A.
ECDSA key fingerprint is MD5:4d:65:b7:e0:e8:09:41:a8:f9:4c:2d:b6:47:55:b2:09.
Are you sure you want to continue connecting (yes/no)? yes
/usr/bin/ssh-copy-id: INFO: attempting to log in with the new key(s), to filter out any that are already installed
/usr/bin/ssh-copy-id: INFO: 1 key(s) remain to be installed -- if you are prompted now it is to install the new keys
root@192.168.1.101's password:

Number of key(s) added: 1

Now try logging into the machine, with:   "ssh 'root@192.168.1.101'"
and check to make sure that only the key(s) you wanted were added.
You’ll notice in the command output that this process has added the key into the target system. Note that 192.168.1.101 in above example is target system in which I wanted Ansible master to login without username and password.
Once the SSH keys are added into the target system now you can try SSH into the target system and it won’t ask for password anymore.
[root@ansible-master ~]# ssh root@192.168.1.101
Last login: Tue Nov 26 09:01:16 2019 from gateway
[root@target-system ~]#
Recently when I was creating Python automation script I faced this weird error. This literally wasted my couple of days and needless to mentioned frustration it caused.
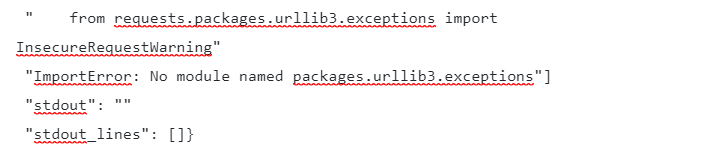
Below is the error message which I was getting
*
fatal: [127.0.0.1]: FAILED! => {"changed": true
 "cmd": "python CreateFileSystem.py i-06a848f20bafd0475 10G"
 "delta": "0:00:00.077332"
 "end": "2019-11-21 06:58:53.018383"
 "msg": "non-zero return code"
 "rc": 1
 "start": "2019-11-21 06:58:52.941051"
 "stderr": "CreateFileSystem.py:49: SyntaxWarning: name 'unity_headers' is used prior to global declaration\n  global unity_headers\nTraceback (most recent call last):\n  File \"CreateFileSystem.py\"
 line 5
 in <module>\n    from requests.packages.urllib3.exceptions import InsecureRequestWarning\nImportError: No module named packages.urllib3.exceptions"
 "stderr_lines": ["CreateFileSystem.py:49: SyntaxWarning: name 'unity_headers' is used prior to global declaration"
 "  global unity_headers"
 "Traceback (most recent call last):"
 "  File \"CreateFileSystem.py\"
 line 5
 in <module>"
 "    from requests.packages.urllib3.exceptions import InsecureRequestWarning"
 "ImportError: No module named packages.urllib3.exceptions"]
 "stdout": ""
 "stdout_lines": []}
As you can see from the error it keeps saying that there’s error importing “urllib3” package. But This was already installed in the system
For resolving this I had to follow below steps.
Uninstall below packages
python-devel
libevent-devel
openssl-devel
libffi-devel
Requests (pip)
urllib3 (pip)
Install below packages
python-devel
libevent-devel
openssl-devel
libffi-devel
Run below command
pip install requests urllib3
These steps resolved the issue I was facing.
Also, DO NOT install pip packges (requests and urllib3) individually, run them as single command. This makes sure that required pip dependencies are also auto installed. Strangely I haven’t seen dependencies getting installed when you install them one by one.
Part of my job is to talk about the latest geeky technologies and many times I also have to demonstrate the same – Kind of “Show me” discussions.
When I started working on getting my hands dirty on Kubernetes (aka K8S) I faced many issues to get started. Now I am at the level where deploying K8S isn’t a big deal at all. The reason I am writing this blog is that often more than not I always get into discussions where someone is just starting with the K8S journey and has the same queries and questions which I also had. Hopefully, this summary will help people to get started with K8S.
Before I get started it’s important to understand the K8S lingo 🙂 This will help understand the implementation steps. Also, note that the purpose of this page is not to re-iterate the K8S components and architecture. It’s purely intended to list the steps o have hassle-free K8S deployment
Make sure that the VMware template which will be used has Ansible master server SSH keys added before you convert the VM image to the template. I have already documented this process of enabling SSH-based authentication in this blog
Part 1 – Dependencies
Below are the list of dependencies which needs to be installed on all the K8S nodes (master and worker)
Disable SELinux
sudo setenforce 0
sudo sed -i 's/^SELINUX=enforcing$/SELINUX=permissive/' /etc/selinux/config
Turnoff swap (also remove swap entry from /etc/fstab)
At this moment your K8S master is installed and configured. Next step is to configure worker nodes and add them into the K8S cluster
Part 3 – Kubernetes Worker
Final part is to have worker nodes configured and add them in K8S cluster. This steps involves running commands on Master and Worker nodes.
Master node – For adding worker nodes into the K8S cluster we first need to get the join command from the master server. Run the below command on Master server
kubeadm token create --print-join-command
Note/copy the join command output. We need to run this join command on all worker nodes.
Finally run below command on the K8S Master. If everything was successful then you should see list of all the nodes (Master and Worker) of your K8S cluster.
kubectl get nodes
This concludes K8S installation and configuration 🙂




 {{ vExpose }}.Blog