Tag: restapi

  • Ansible URI Response JSON Data Parsing

    While most of the vendors and their platforms (including DellEMC) are having Ansible modules published, but there are instances where functionality you’re trying to use isn’t covered in the available module or simply modules aren’t available at all.

    In such situations you’ve no choice than using Ansible URI module. It allows you to interact with HTTP and HTTPS web services, in this particular example REST API endpoints to be precise. There are several benefits of using URI module with REST API, including but not limited to

    • Perform automation if there’s no Ansible module available
    • Use functionality that hasn’t been implemented in Ansible modules
    • Easier to redeploy your workflow to another automation tool

    While I was using the URI module I came across issue of data parsing for REST API response payload. In case of Dell EMC platforms response payload is in JSON and based on the API endpoint response can be 1000s of lines. It’s very difficult to make sense of this data and also process the same in ansible to extract required information. In this blog post I am trying to list down the process I’ve followed to parse the JSON data and extract the required information.

    Below is the sample playbook having uri module. In this example we’re talking about GET call for sample URI endpoint – which is getting device details of the existing server (BMaaS use case).

      tasks:
      - name: listdevices
        uri:
          url: https://api.sample.com/base/version/endpoint
          method: GET
          validate_certs: no
          headers:
            X-Auth-Token: "{{ api_key }}"
          status_code: 200
        register: output
        
      - name: printoutput
        ansible.builtin.debug: 
          var: output

    In this playbook there are multiple parameters used under uri task. More on using uri module with REST API coming in another blog post.

    In above example you can see that we’ve registering the output and then printing the same. Problem with this is there could be 100s of lines which probably doesn’t make sense. So for parsing this data we will need

    Below is the sample of the GET call JSON response.

    [
        {
            "id": "2b12858454174f03aece5a71bb382318",
            "name": "Drive_0_0_11",
            "extra_details": {
                "firmware_version": "GPJ99E5Q",
                "drive_type": "NVMe_SSD",
                "encryption_status": "Supported_Locked_Cluster_PIN",
                "fips_status": "FIPS_Compliance_Level_1",
                "size": 3840755982336
            }
        },
        {
            "id": "2dd2c43f2582415585a9ce0bbb961a4f",
            "name": "Drive_0_0_0",
            "extra_details": {
                "firmware_version": "GPJ99E5Q",
                "drive_type": "NVMe_SSD",
                "encryption_status": "Supported_Locked_Cluster_PIN",
                "fips_status": "FIPS_Compliance_Level_1",
                "size": 3840755982336
            }
        },
        {
            "id": "325e5abc34ed4be398715285cf2e2826",
            "name": "Drive_0_0_8",
            "extra_details": {
                "firmware_version": "GPJ99E5Q",
                "drive_type": "NVMe_SSD",
                "encryption_status": "Supported_Locked_Cluster_PIN",
                "fips_status": "FIPS_Compliance_None",
                "size": 3840755982336
            }
        },
        {
            "id": "3c9449f55ade4c04a801e804f3872eff",
            "name": "Drive_0_0_5",
            "extra_details": {
                "firmware_version": "GPJ99E5Q",
                "drive_type": "NVMe_SSD",
                "encryption_status": "Supported_Locked_Cluster_PIN",
                "fips_status": "FIPS_Compliance_None",
                "size": 3840755982336
            }
        },
        {
            "id": "426d706ef7d443a887a450e6ac4abed5",
            "name": "Drive_0_0_23",
            "extra_details": {
                "firmware_version": "3.0.45.6",
                "drive_type": "NVMe_NVRAM",
                "encryption_status": "Supported_Locked_Cluster_PIN",
                "fips_status": "FIPS_Compliance_None",
                "size": 8484552704
            }
        },
        {
            "id": "42f2145cc5ef4a5f86ec1dfe8bdc5ca3",
            "name": "Drive_0_0_24",
            "extra_details": {
                "firmware_version": "3.0.45.6",
                "drive_type": "NVMe_NVRAM",
                "encryption_status": "Supported_Locked_Cluster_PIN",
                "fips_status": "FIPS_Compliance_None",
                "size": 8484552704
            }
        },
        {
            "id": "4ed0b8b74eff4113ad85ded6f342ab34",
            "name": "Drive_0_0_6",
            "extra_details": {
                "firmware_version": "GPJ99E5Q",
                "drive_type": "NVMe_SSD",
                "encryption_status": "Supported_Locked_Cluster_PIN",
                "fips_status": "FIPS_Compliance_None",
                "size": 3840755982336
            }
        },
        {
            "id": "5bca4db416c342ebab6d3b795c604963",
            "name": "Drive_0_0_2",
            "extra_details": {
                "firmware_version": "GPJ99E5Q",
                "drive_type": "NVMe_SSD",
                "encryption_status": "Supported_Locked_Cluster_PIN",
                "fips_status": "FIPS_Compliance_None",
                "size": 3840755982336
            }
        },
        {
            "id": "6eb66e909f4b414193922e4de63cfa9f",
            "name": "Drive_0_0_1",
            "extra_details": {
                "firmware_version": "GPJ99E5Q",
                "drive_type": "NVMe_SSD",
                "encryption_status": "Supported_Locked_Cluster_PIN",
                "fips_status": "FIPS_Compliance_None",
                "size": 3840755982336
            }
        },
        {
            "id": "b413b5e98e6245b58134c0d5a8d001e1",
            "name": "Drive_0_0_7",
            "extra_details": {
                "firmware_version": "GPJ99E5Q",
                "drive_type": "NVMe_SSD",
                "encryption_status": "Supported_Locked_Cluster_PIN",
                "fips_status": "FIPS_Compliance_None",
                "size": 3840755982336
            }
        },
        {
            "id": "bae7ed28120e43a8b322b8d8b2fedc0d",
            "name": "Drive_0_0_10",
            "extra_details": {
                "firmware_version": "GPJ99E5Q",
                "drive_type": "NVMe_SSD",
                "encryption_status": "Supported_Locked_Cluster_PIN",
                "fips_status": "FIPS_Compliance_None",
                "size": 3840755982336
            }
        },
        {
            "id": "bea9d084e49248359e3191d8f648a37c",
            "name": "Drive_0_0_3",
            "extra_details": {
                "firmware_version": "GPJ99E5Q",
                "drive_type": "NVMe_SSD",
                "encryption_status": "Supported_Locked_Cluster_PIN",
                "fips_status": "FIPS_Compliance_None",
                "size": 3840755982336
            }
        },
        {
            "id": "f3af5ea2e84d4181a9068c6e85c4b750",
            "name": "Drive_0_0_4",
            "extra_details": {
                "firmware_version": "GPJ99E5Q",
                "drive_type": "NVMe_SSD",
                "encryption_status": "Supported_Locked_Cluster_PIN",
                "fips_status": "FIPS_Compliance_None",
                "size": 3840755982336
            }
        },
        {
            "id": "fca0678677cf48f5a51c28ea1e47b514",
            "name": "Drive_0_0_9",
            "extra_details": {
                "firmware_version": "GPJ99E5Q",
                "drive_type": "NVMe_SSD",
                "encryption_status": "Supported_Locked_Cluster_PIN",
                "fips_status": "FIPS_Compliance_None",
                "size": 3840755982336
            }
        }
    ]

    In above JSON example if I have to extract only name and id from the JSON, then we will need to parse the data in playbook as a separate task. Sample task is as mentioned below.

      - name: devicenames
        set_fact: 
          devicenames: "{{ devices | json_query(jmesquery) }}"
        vars:
          jmesquery: '*.devices[*].[name, id]'

    So, overall the playbook will look like below

    ---
    - hosts: localhost
      gather_facts: no
    
      tasks:
      - name: getdevices
        uri:
          url: https://<target_api_server>/v1/definition/endpoint
          method: GET
          #body_format: json
          validate_certs: no
          headers:
            X-Auth-Token: "{{ api_key }}"
          #body:
          #- [ name, your_username ]
          #- [ password, your_password ]
          #- [ enter, Sign in ]
          status_code: 200
        register: devices
        
      #- name: save the json as variable
      #  set_fact: 
      #    jsondata: "{{ devices.stdout | from_json }}"
      
      - name: devicenames
        set_fact: 
          devicenames: "{{ devices | json_query(jmesquery) }}"
        vars:
          jmesquery: '*.devices[*].[hostname, id]'
          
      - name: print devicenames
        debug:
          msg: "{{ item }}"
        with_items:
        - "{{ devicenames }}"

    In this example I’ve printed the captured device value. But in real life scenario it can be captured as a variable and use as input for subsequent tasks.
  • Dell EMC VxRAIL – Using REST API

    Dell EMC VxRAIL – Using REST API

    There are many use cases where VxRAIL manager, VMware vCenter Console, or vSuite will not be enough for your goals in mind. So, for monitoring and management of your VxRAIL cluster, you can utilize the VxRAIL REST API for achieving your end goal in mind.

    There are multiple ways to get your hands around the VxRAIL REST API

    1. VxRAIL REST API Cookbook – PDF Guide
    2. VxRAIL SwaggerUI

    VxRAIL Swagger UI is always (default) runs on the VxRAIL cluster and can be accessed using a browser. Link for accessing the VxRAIL Swagger UI is – https://<VxRAIL_Manager_IP>/rest/vxm/api-doc.html

    VxRAIL – Swagger UI

    From the Swagger UI (top right – Select a definition drop-down) you can select the categories of API calls. By default, Swagger UI opens into the Day 1 Bring Up Configuration.

    Additionally VxRAIL Swagger UI allows you to play with the APIs on the same page. For this you’ll need to Authorize the page using VxRAIL manager credentials. This is to make sure that user is restricted to the right level of authorization based on their user type.

    For executing / trying the APIs on the VxRAIL cluster you can simply choose the definition from the drop-down. In this case I’ve selected Cluster definition.

    VxRAIL – Select Definition

    If you expand the selected API it will show you multiple sections (Cluster Information in this example)

    VxRAIL – Cluster Information
    • Parameters – Some APIs needs parameters as input for the successful exectution. If applicable they will be listed here
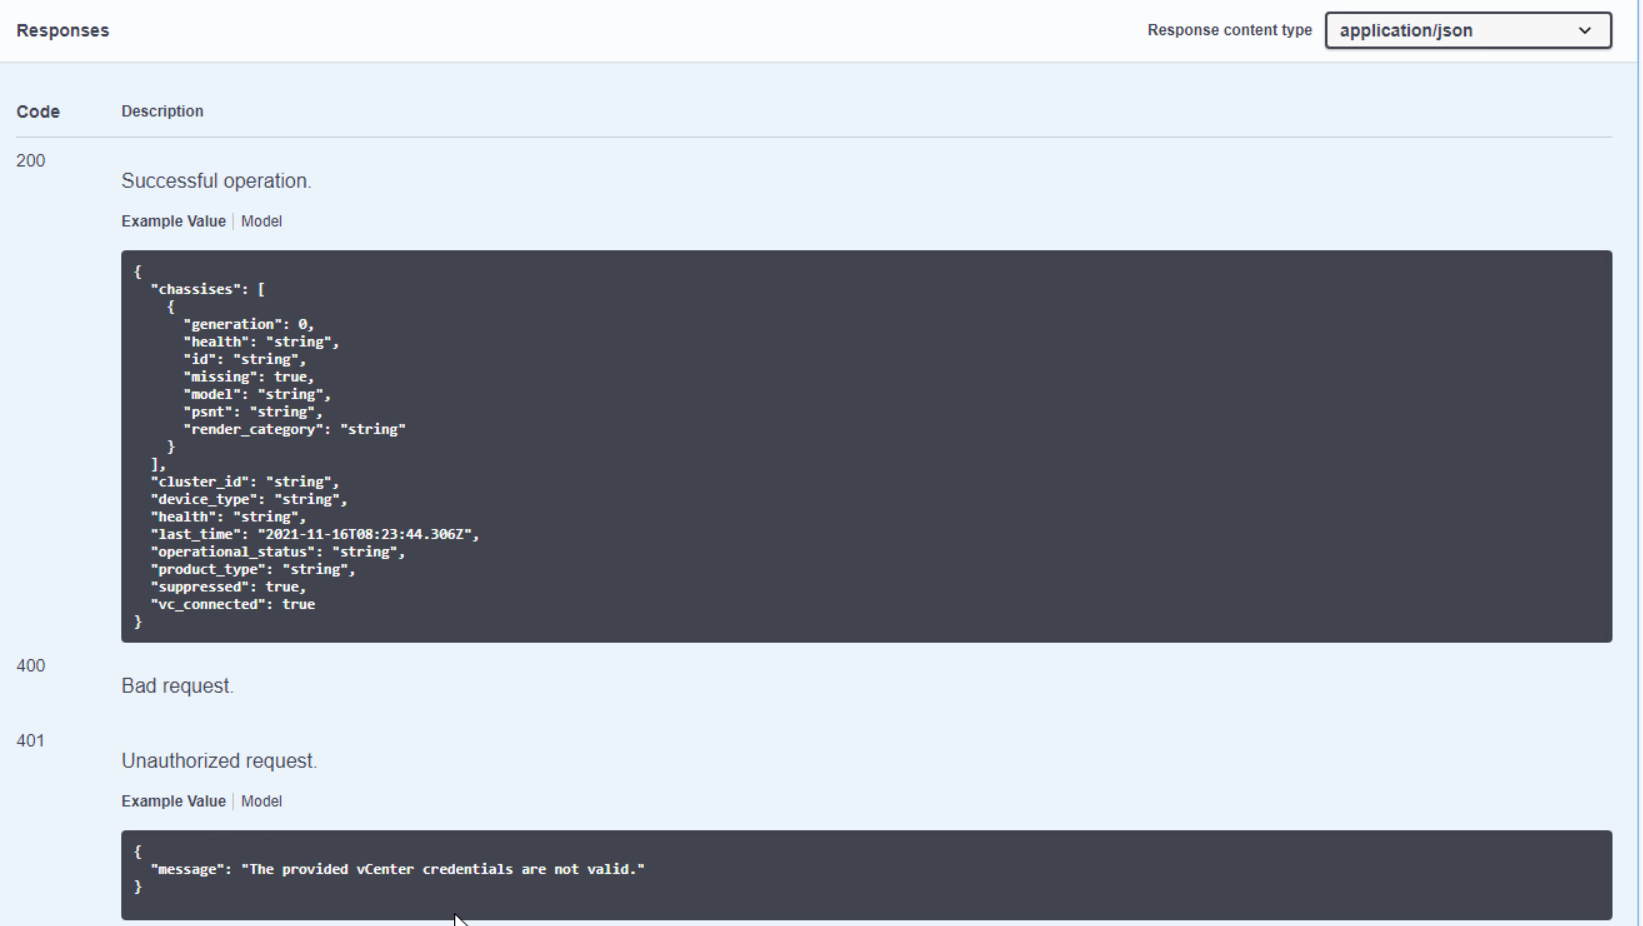
    • Responses – This section shows you the possible response codes for selected API with example output snippet.

    When you click on the Try it out button page gets into the run-mode. Once you enter required parameters (not required in this example) you can click on Execute. At this point request will be sent to VxRAIL manage and response (body and headers) will be shown on the same screen.

    Way Forward

    I hope this gave you the high level overview of VxRAIL APIs and how to access them. Though Swagger has built-in option to try the APIs, but that is the just a API explorer tool. Additionally you can also use the REST clients – like Postman – to interact with the API. Eventually you’ll integrate these APIs with your automation tools – those can be VMware vRA, Ansible, Terraform, or it can be your own developed tool. Technically speaking you can use any tool as far as it has option to interact with REST API.

    More on this coming in next blog posts 🙂

  • Creating ServiceNow Incidents via REST API

    Creating ServiceNow Incidents via REST API

    In this article we will explore how to create incidents in ServiceNow using the REST API. This article was a stepping stone for this video that shows how to integrate ServiceNow, Microsoft Teams and alerts from infrastructure. You might also be interested in the second post in this series: ServiceNow CMDB REST API tutorial

    The very first thing to do when working with a REST API is to get your hands on the reference guide and hopefully the getting started guide if there is one. The first thing to look for is how to authenticate with the API and whether there are any requirements for special headers or things like that. Afterwards things tend to flow faster and easier. Fortunately, ServiceNow supports basic authentication so there is no learning curve there, although it does support more secure authentication through OAuth if you need it

    In terms of documentation the online help is great. Here you can get an overview of the API. And this is the starting point for the online REST API reference. There are many branches or child API’s hanging of this root. In the screenshot below you can see how, for every call, the online help shows the URL (default or for a specific version) and parameters (path, query and request body). Further down it shows headers for the request and the response and even two coding examples for curl and python … as complete as it gets

    But the tool you will learn to love very quickly is the “REST API Explorer”. Please note that this is a tool that you can only access from within your instance. Once you log in go to “System Web Services” and then locate “REST API Explorer” as shown here

    You will then end up with a menu like this. Notice how you can select the specific child API in the top-left corner and the version of your environment.

    ServiceNow stores all data in tables. This is also true for Incidents which unsurprisingly are stored in the “incident” table. To manipulate tables we need to use the Table API. Different HTTP methods will enable us to do the various CRUD operations. For example if we want to create an incident we will have to use the POST method. Notice in the previous image how I have selected the “Table API” and within that API the “Create a record (POST)” call. Then on the right I have selected the “incident” table.

    When you scroll down you can see a dialog that allows you to build the request body for the incident creation. With the drop-down menu you can select from all the available fields. As you select new fields and assign values, the REST API Explorer builds the body for you in the text box immediately below. At the very bottom you can generate code in multiple languages

    We have grouped the API calls we are using in this article into a Postman collection. You can download the collection from the following the following GitHub repo :

    https://github.com/cermegno/postman-servicenow

    The collection uses 2 variables that you must add to an environment. If you are new to Postman environments check out this older article:

    • {{pwd}}. This is the password for the “admin” user of your ServiceNow instance. If you need to use a different user, you can change it in the collection settings
    • {{instance}}. This is your ServiceNow instance name, i.e. excluding the “.service-now.com” suffix. If you don’t have one or you cannot test this with your production instance, you can open your very own developer instance with ServiceNow

    The collection provides 4 calls and a saved example for each call:

    • Get details for all incidents. This will produce a 98 line JSON structure for each incident
    • Get details for a single incident. This requires you to pass the “sys_id” of the incident as part of the URL as shown below. You can get the “sys_id” for a specific incident from the body of the response during the creation (POST) operation
    • Create incident (POST). The JSON Body parameter can take “a lot” of fields but you can start small. For example the following Body produces the incident below:
    • Modify incident (PUT). This will allow you to make changes to incidents. In particular you can use it to resolve/close incidents by setting the state to “7” as shown in the screenshot below. This call also requires you to pass the “sys_id” of the incident you are modifying as part of the URL

    In this article we have used the REST API to interact with ServiceNow because this is the way I will do it in the upcoming video demo. But depending on what you are trying to do you might want to use Ansible. In that case you can use the official Ansible modules provided by ServiceNow themselves. The collection is available in Ansible Galaxy and provides just two modules designed to interact with ServiceNow tables. Follow the instructions in the Ansible Galaxy page to install the dependencies including the “pysnow” Python library

    As a next step you can visit the second post in this series: ServiceNow CMDB REST API tutorial

    We hope you find this article helpful. Let us know your thoughts in the comment section.

  • REST API and DellEMC Storage Part 3 – Unity

    REST API and DellEMC Storage Part 3 – Unity

    This blog post is 3rd part of REST API with DellEMC Storage blog series.

    • In the first part of this blog series, we discussed what is REST API and different usage options
    • Second part was about managing DellEMC PowerMax storage arrays using REST API

    In this post, we will discuss how you can use manage DellEMC Unity storage using REST API. We will be using the Postman tool during the entire blog series. So let’s get started with automating the DellEMC Unity storage system.

    The DellEMC Unity REST API Background

    DellEMC Unity is of the most user-friendly storage systems. The most common management tools for Unity systems are

    • Unisphere UI (Embedded) – An HTML5 graphical user interface used to manage Dell EMC Unity systems
    • Unisphere Command Line Interface (UEMCLI) – UEMCLI allows a user to perform tasks on the storage system by typing commands instead of using the graphical user interface

    The Dell EMC Unity includes complete REST API support, providing a developer-friendly way to manage Dell EMC Unity systems and automate various tasks.

    Dell EMC Unity’s REST API fully supports all the management tasks that a user can perform in the Unisphere GUI. Dell EMC Unity’s REST API response formats all communication in JSON notation. Users can send REST API requests using their favorite REST API tools to manage Dell EMC Unity systems in their environment. This provides flexibility in management and opens possibilities for more complex operations.

    DellEMC Unity Management Options

    Assessing DellEMC Unity’s REST API

    Once a Unity system is up and running, users can navigate to the following web addresses to get access to the REST API documentation:

    REST API Programmer’s Guide – https://{{unisphere_management_address}}/apidocs/programmers-guide/index.html

    REST API Reference Guide https://{{unisphere_management_address}}/apidocs/index.html

    DellEMC Unity’s REST API is available via Unisphere running on the array via the following Base URL.

    https://{{unisphere_management_address}}/api

    • {{unisphere_management_address}} – Replace with IP Unisphere IP address or hostname

    Supported DellEMC Unity REST API Operations

    DellEMC Unity’s REST API supports the following types of REST calls.

    • GET – Get information on objects. For example – Get Unity storage system’s details
    • POST – Create an Object. For example – Create new LUN/s
    • PUT – Making changes to an objects. For example – Change size of the existing LUN
    • DELETE – Remove an object. For example – Delete existing LUN/s

    Usually the REST client (like Postman) can be used to help figure out what REST calls you want to run.

    Building your REST API calls

    Now let’s get started with creating REST API calls. In this example we will create sample REST API call to list all the available storage pools.

    Before we get started make sure you’ve Postman installed and Unisphere is reachable.

    • Open Postman and click on New. Under new drop-down, select Request
    DellEMC Unity REST API – Postman tool GUI – 1
    • In New Request pop-up enter Request nameDescription (optional) and Name of the Collection. Then click on Save.
    DellEMC Unity REST API – Postman tool GUI – 2
    • Click on the request type drop-down and select GET.
      • Please note that we are selecting GET because is this example we are creating sample REST API call to list all the available storage pools.
      • This option will be different based on type of REST API operation
    DellEMC Unity REST API – Postman tool GUI – 3
    • Enter below Request URL
      • 1.1.1.1 – Replace with Unisphere IP address/hostname

    https://1.1.1.1/api/types/pool/instances

    DellEMC Unity REST API – Postman tool GUI – 4
    • Click on the Authorization. Enter Unisphere Username and Password.
    DellEMC Unity REST API – Postman tool GUI – 5
    • Note that Unity REST API GET request needs below 3 headers. Click on Headers and enter below header details as shown in the screenshot. Then click Send
      • Accept – application/json
      • Content-type – application/json
      • X-EMC-REST-CLIENT – true
    DellEMC Unity REST API – Postman tool GUI – 5
    • In the Postman Response section you’ll see REST API response. In this case you’ll see list of all the storage pools in Unity array.
    DellEMC Unity REST API – Postman tool GUI – 6

    Additionally please note that POST/PUT/DELETE requests need one additional Header – EMC-CSRF-TOKEN. This token is generated using GET request.

    So, let’s create one POST request for creating new LUN.

    • Follow above-listed GET request steps. Click on Headers under GET Response. Copy the EMC-CSRF-TOKEN from the Headers
    DellEMC Unity REST API – Postman tool GUI – 7
    • Now click on New and Under new drop-down, select Request (screenshot in GET request steps)
    • In New Request pop-up enter Request nameDescription (optional) and Name of the Collection. Then click on Save. (screenshot in GET request steps)
    • Click on the request type drop-down and select POST.
      • Please note that we are selecting POST because is this second example we are creating REST API call to create new LUN.
    • Click on the Authorization. Enter Unisphere Username and Password.
    • Under Params enter below details.
      • Name – Name of the LUN
      • Pool – Storage Pool in which LUN will be created
      • Size – LUN size
    DellEMC Unity REST API – Postman tool GUI – 7
    • Click on Headers and enter below header details as shown in the screenshot. Then click Send
      • Accept – application/json
      • Content-type – application/json
      • X-EMC-REST-CLIENT – true
      • EMC-CSRF-TOKEN – Copied from GET response
    DellEMC Unity REST API – Postman tool GUI – 8

    Dell EMC and REST API – Way Forward

    I hope this clarifies many basics for getting started with REST API and DellEMC Unity storage. You might also have understood that creating creating valid URLs is very important aspect of using REST API. Having this in mind we have created ready Postman collection for DellEMC Unity storage. Here’s the GitHub link to the repository. Feel free to download and share.

    Below are the additional resources available for taking REST API usage to next level.

    I hope this post will get you started with your Dell EMC Unity automation journey.

  • REST API and DellEMC Storage Part 2 – PowerMax

    REST API and DellEMC Storage Part 2 – PowerMax

    This blog post is 2nd part of REST API with DellEMC Storage blog series. In the first part of this blog series, we discussed what is REST API and different usage options. I highly encourage you to go through the first part before you get started with this post.

    In this post, we will discuss how you can use manage DellEMC PowerMax storage using REST API. We will be using the Postman tool during the entire blog series. So let’s get started with automating the DellEMC PowerMax storage system.

    The PowerMax REST API Background

    There are many different ways to manage the PowerMax storage system. You can refer to this link for more details around each. Traditionally many customers using the VMAX family systems are using the Solutions Enabler tool. This is a comprehensive tool that allows storage administrators to automate many different storage tasks using scripting (Bash, Perl, Shell scripts, etc.).

    PowerMax Unisphere GUI is HTML5 based management interface, it’s beautiful and functional and provides a web-based interactive experience for users.  Unisphere has a lot of automation baked in, and it’s intuitive wizards eliminate complexity and can often provide the right amount of automation for organizations where there isn’t a lot of change. With Unisphere version 8 everything you can do in the GUI is supported using REST API.

    DellEMC PowerMax Management Options

    Assessing DellEMC PowerMax REST API

    DellEMC PowerMax’s REST API is available via Unisphere (installed or embedded) running on the array via the following Base URL.

    https://{{unisphere_management_address}}:{{8443}}/univmax/restapi/{{version}}

    • {{unisphere_management_address}} – Replace with IP Unisphere IP address or hostname
    • {{8443}} – Default port of Unisphere. Change this as per your environment
    • {{version}} – Replace this with Unisphere version. For Unisphere version 9, replace as 90

    Supported DellEMC PowerMax REST API Operations

    Unisphere for PowerMax’s REST API supports the following types of REST calls.

    • GET – Get information on objects. For example – list all the PowerMax serial numbers managed using Unisphere
    • POST – Create an Object. For example – Create new LUN/s
    • PUT – Making changes to an objects. For example – Change size of the existing LUN
    • DELETE – Remove an object. For example – Delete existing LUN/s

    Usually the REST client (like Postman) can be used to help figure out what REST calls you want to run.

    Building your REST API calls

    Now let’s get started with creating REST API calls. In this example we will create sample REST API call to list all the available SRPs.

    Before we get started make sure you’ve Postman installed and Unisphere is reachable.

    • Open Postman and click on New. Under new drop-down, select Request
    DellEMC PowerMax REST API – Postman tool GUI – 1
    • In New Request pop-up enter Request name, Description (optional) and Name of the Collection. Then click on Save.
    DellEMC PowerMax REST API – Postman tool GUI – 2
    • Click on the request type drop-down and select GET.
      • Please note that we are selecting GET because is this example we are creating sample REST API call to list all the available SRPs.
      • This option will be different based on type of REST API operation
    DellEMC PowerMax REST API – Postman tool GUI – 3
    • Enter below Request URL
      • 1.1.1.1 – Replace with Unisphere IP address/hostname
      • 000123456789 – Replace with Serial number of PowerMax array

    https://1.1.1.1:8443/univmax/restapi/90/sloprovisioning/symmetrix/000123456789/srp

    DellEMC PowerMax REST API – Postman tool GUI – 4
    • Click on the Authorization. Enter Unisphere Username and Password. Then click Send
    DellEMC PowerMax REST API – Postman tool GUI – 5
    • In the Postman Response section you’ll see REST API response. In this case you’ll see list of all the SRPs in PowerMax array.
    DellEMC PowerMax REST API – Postman tool GUI – 6

    Dell EMC and REST API – Way Forward

    I hope this clarifies many basics for getting started with REST API and DellEMC storage. You might also have understood that creating creating valid URLs is very important aspect of using REST API. Having this in mind we have created ready Postman collection for DellEMC PowerMax storage. Here’s the GitHub link to the repository. Feel free to download and share.

    Below are the additional resources available for taking REST API usage to next level.

    1. REST API client for Unisphere – This is simple GUI tool which allows you to to construct REST API calls. Best part of this tool is having a tree view of all resources on the Unisphere to which the users can navigate through to select the desired REST call.
    2. DellEMC PowerMax REST API Concepts and Programmer’s Guide – This link has REST API document for Dell EMC PowerMax array.

    I hope this post will get you started with your Dell EMC PowerMax automation journey.

    Follow my blog with Bloglovin

  • REST API and DellEMC Storage Part 1 – Introduction

    REST API and DellEMC Storage Part 1 – Introduction

    This post is the first post of multi-part blog series to understand and use RestAPI with DellEMC XtremIO storage.

    REST API with Dell EMC

    REST stands for Representational State Transfer. REST provides access to resources (DellEMC XtremIO resources in our case) on a tree-like structure. REST uses HTTP/S for communication and replies on HTTP’s CRUD operations, which are GET, POST, PUT, DELETE. REST is stateless, which means it does not store application state information. Since REST is stateless client responses are self-documenting. For this introduction post we will talk about XtremIO, but note that each storage system has different URNs.

    REST enables each XtremIO resource (like volumes, initiator groups, etc) having its own URI (Uniform Resource Identifier). Typically REST response is received in JSON or XML format. In the case of XtremIO responses are in JSON format.

    XtremIO REST API can be accessed using the below option

    • REST Clients – Like Postman
    • CLI – Using tools like CURL
    • Programming – Using Python, Ruby, etc.

    Since XtremIO storage array is having API-first design, it allows all the operations using REST which can be done using CLI/GUI.

    Connecting to XtremIO using REST API

    XtremIO is a scale-out storage architecture and has out-of-band management server – aka XMS. You can refer to below high level diagram to check your connectivity.

    DellEMC XtremIO REST API – High Level Connectivity

    Below are the supported types of REST API with XtremIO.

    XtremIO – Supported REST API commands

    Below is the example and details of using XtremIO REST API using CURL

    # curl -k --request GET https://<user>:<pass>@1.1.1.1/api/json/v2/types
    • -k – Allow insecure SSL connection. This is needed in case you’ve self-signed certificate.
    • –request GET – This is the REST API request type.
    • https://:@1.1.1.1/api/json/v2/types – URI
      • https:// – Protocol used for REST API
      • <user>:<pass> – XtremIO XMS credentials
      • @1.1.1.1 – XtremIO XMS IP address
      • /api/json/v2/types – API Path

    In next post we will discuss on using REST API with Dell EMC storage systems