Category: VMware

  • Dell EMC VxRAIL – Using REST API

    Dell EMC VxRAIL – Using REST API

    There are many use cases where VxRAIL manager, VMware vCenter Console, or vSuite will not be enough for your goals in mind. So, for monitoring and management of your VxRAIL cluster, you can utilize the VxRAIL REST API for achieving your end goal in mind.

    There are multiple ways to get your hands around the VxRAIL REST API

    1. VxRAIL REST API Cookbook – PDF Guide
    2. VxRAIL SwaggerUI

    VxRAIL Swagger UI is always (default) runs on the VxRAIL cluster and can be accessed using a browser. Link for accessing the VxRAIL Swagger UI is – https://<VxRAIL_Manager_IP>/rest/vxm/api-doc.html

    VxRAIL – Swagger UI

    From the Swagger UI (top right – Select a definition drop-down) you can select the categories of API calls. By default, Swagger UI opens into the Day 1 Bring Up Configuration.

    Additionally VxRAIL Swagger UI allows you to play with the APIs on the same page. For this you’ll need to Authorize the page using VxRAIL manager credentials. This is to make sure that user is restricted to the right level of authorization based on their user type.

    For executing / trying the APIs on the VxRAIL cluster you can simply choose the definition from the drop-down. In this case I’ve selected Cluster definition.

    VxRAIL – Select Definition

    If you expand the selected API it will show you multiple sections (Cluster Information in this example)

    VxRAIL – Cluster Information
    • Parameters – Some APIs needs parameters as input for the successful exectution. If applicable they will be listed here
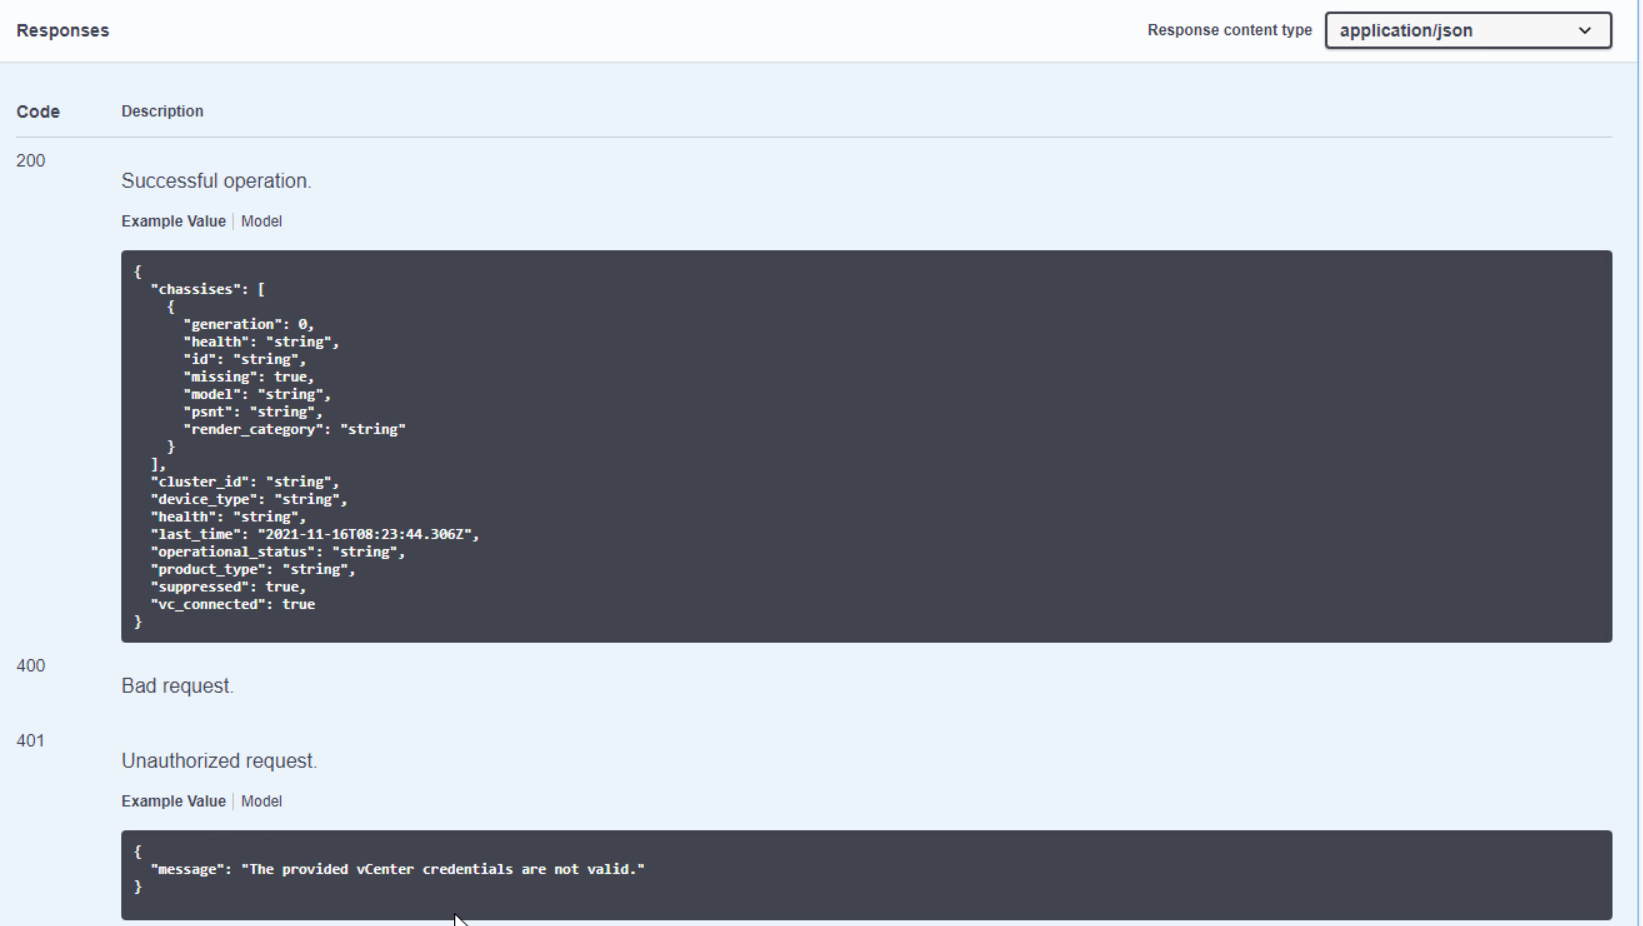
    • Responses – This section shows you the possible response codes for selected API with example output snippet.

    When you click on the Try it out button page gets into the run-mode. Once you enter required parameters (not required in this example) you can click on Execute. At this point request will be sent to VxRAIL manage and response (body and headers) will be shown on the same screen.

    Way Forward

    I hope this gave you the high level overview of VxRAIL APIs and how to access them. Though Swagger has built-in option to try the APIs, but that is the just a API explorer tool. Additionally you can also use the REST clients – like Postman – to interact with the API. Eventually you’ll integrate these APIs with your automation tools – those can be VMware vRA, Ansible, Terraform, or it can be your own developed tool. Technically speaking you can use any tool as far as it has option to interact with REST API.

    More on this coming in next blog posts 🙂

  • Automating Kubernetes deployment on VMs using Ansible

    Automating Kubernetes deployment on VMs using Ansible

    In this post, we will discuss automating Kubernetes deployment using Ansible.

    In my example, I have used CentOS VMs (on VMware) for deploying Kubernetes. But technically Kubernetes deployment steps don’t differ irrespective of the platform you use.

    Before getting started to make sure you have

    • Ansible server up and running on the network. Also, make sure Ansible can reach the VMware environment.
    • Make sure you’ve added Ansible server SSH authentication keys into VMware virtual machine before converting the same into the template. Follow this blog post for steps.

    Once you have the pre-requisites in place follow the below steps.

    Step 1 – Clone my GitHub repository which consists of required playbooks and instructions.

    [root@alb-ansible dw-pm-csi]# git clone https://github.com/waghmaredb/ansible-k8s
    Cloning into 'ansible-k8s'…
    remote: Enumerating objects: 41, done.
    remote: Counting objects: 100% (41/41), done.
    remote: Compressing objects: 100% (40/40), done.
    remote: Total 41 (delta 12), reused 0 (delta 0), pack-reused 0
    Unpacking objects: 100% (41/41), done.
    [root@alb-ansible dw-pm-csi]# cd ansible-k8s/
    [root@alb-ansible ansible-k8s]# ls
    k8s-deployment.yml README.md

    Step 2 – Edit k8s-deployment.yml file and edit below lines from VARS

    common environment details
    #ntp_server: - Replace with your NTP server IP/hostname
    domain: "" - Replace with your DOMAIN NAME
    dns_server: - Replace with your DNS server IP/hostname
    vmware environment details
    vcenter_ip: - Replace with your vCenter server IP/hostname
    vcenter_username: - Replace with vCenter admin account username
    vcenter_password: - Replace with vCenter admin account password
    vmware_datacenter: - Replace with VMware datacenter you want to use
    vmware_cluster: - Replace with VMware cluster you want to use
    vm_network: "" - Replace with VM network you want kubernetes VMs to connect
    k8s_vm_folder: - Replace with VM folder in which you want to place kubernetes VMs
    k8s_template_name: - Replace with VMware CentOS template name
    K8S environment details
    k8s_master_ip: 192.168.172.100 - Replace IP address with kubernetes master server IP address you want to use
    k8s_network_netmask: 255.255.255.0 - Replace subnet mask with netmask of kubernetes network
    k8s_network_gateway: 192.168.172.1 - Replace gateway with kubernetes network gateway
    k8s_node1_ip: 192.168.172.101 - Repalce IP address with kubernetes node IP address
    #k8s_node2_ip: 192.168.1.102
    #k8s_node3_ip: 192.168.1.103
    #k8s_node4_ip: 192.168.1.104
    #k8s_node5_ip: 192.168.1.105
    #k8s_node6_ip: 192.168.1.106
    #k8s_node7_ip: 192.168.1.107
    #k8s_node8_ip: 192.168.1.108

    Step 3 – Edit the /etc/ansible hosts file and insert the Kubernetes environment details. Make sure IP address details are inline with your Kubernetes environment

    [kube_cluster1]
    k8s-master ansible_host=192.168.172.100 ansible_user=root
    worker1 ansible_host=192.168.172.101 ansible_user=root
    worker2 ansible_host=192.168.172.102 ansible_user=root
    worker3 ansible_host=192.168.172.103 ansible_user=root
    worker4 ansible_host=192.168.172.104 ansible_user=root
    
    [master]
    k8s-master ansible_host=192.168.172.100 ansible_user=root
    
    [worker]
    worker1 ansible_host=192.168.172.101 ansible_user=root
    worker2 ansible_host=192.168.172.102 ansible_user=root
    worker3 ansible_host=192.168.172.103 ansible_user=root
    worker4 ansible_host=192.168.172.104 ansible_user=root

    Step 4 – Run the k8s-deployment.yml playbook.

  • Monitoring your VMware Environment From Anywhere Using DellEMC CloudIQ

    Monitoring your VMware Environment From Anywhere Using DellEMC CloudIQ

    In daily life of an administrator worst day is when you’ve to co-relate logs across the stack for performance troubleshooting or when you need to troubleshoot an issue which is not consistent. Usually for such issues you’ll need to enable continuous log collection and hope that issue will reappear during the log collection time. Phew!

    But gone are those days where you were reactive in troubleshooting, now with CloudIQ you can be proactive.

    CloudIQ is SaaS based monitoring application which is available to all DellEMC customers without any additional investment.

    Though CloudIQ allows customers to have centralized monitoring of DellEMC storage products, proactive health score and predictive analytics, but this blog is about VMware monitoring with CloudIQ. With latest update of CloudIQ now it supports monitoring of entire VMware landscape (along with storage and Connectrix).

    As I have already mentioned CloudIQ has integration with VMware for end-to-end monitoring for the virtualization environments. For enabling the CloudIQ to collect and report VMware data you need to download the CloudIQ collector, which can be downloaded directly from the CloudIQ portal (details below)

    Once the collector is downloaded follow the steps (step 3 in above exhibit) listed on the CloudIQ collector download page.

    Note that single instance of CloudIQ collector supports collecting data for upto 60000 virtual machines. Once collector is enabled it will take ~24 hours to populate the data on CloudIQ portal.

    There are many details available on CloudIQ and more enhancements are getting added very frequently. You can refer to this CloudIQ whitepaper which has details around CloudIQ overview. In this blog post is to highlight few CloudIQ features which I personally like.

    Storage LUN to Datastore to VM Mapping

    From the CloudIQ you can see the list of all the virtual machines which running on particular datastore. This is great asset as you no more have to login to vCenter console for this.

    Storage LUN –> VMware Datastore –> VM Mapping

    Co-relate VM Performance With Anomaly Detection

    You can view all required performance charts for virtual machine in single view. Additionally CloudIQ performance charts will highlight any performance anomalies during the last 24 hours. In below example you can see that for selected virtual machine storage response time was suddenly increased and went back to normal.

    Co-relate VM Performance With Anomaly Detection

    End to End Map

    Customers who have tried to deploy monitoring tools understand that it’s very difficult to get the application/virtual machine footprint map in the data center. Usually this is very useful if you want to understand all the dependent infrastructure components which you application touches in the virtualization stack. CloudIQ gives you out of box functionality to provide virtual machine end-to-end map — from Virtual machine to storage volumes/LUNs

    These are the top 3 VMware monitoring features which I personally like. Apart from this there are many features including but not limited to

    • Tracking configuration changes per VM level
    • Storage path details for each datastore

    Also I would like to mention that CloudIQ can be accessed using

    • Web view using any device having connectivity to CloudIQ
    • Mobile application – Supported on Apple and Android devices

  • Installing Kubernetes on CentOS

    Installing Kubernetes on CentOS

    Part of my job is to talk about the latest geeky technologies and many times I also have to demonstrate the same – Kind of “Show me” discussions.

    When I started working on getting my hands dirty on Kubernetes (aka K8S) I faced many issues to get started. Now I am at the level where deploying K8S isn’t a big deal at all. The reason I am writing this blog is that often more than not I always get into discussions where someone is just starting with the K8S journey and has the same queries and questions which I also had. Hopefully, this summary will help people to get started with K8S.

    Before I get started it’s important to understand the K8S lingo 🙂 This will help understand the implementation steps. Also, note that the purpose of this page is not to re-iterate the K8S components and architecture. It’s purely intended to list the steps o have hassle-free K8S deployment

    Make sure that the VMware template which will be used has Ansible master server SSH keys added before you convert the VM image to the template. I have already documented this process of enabling SSH-based authentication in this blog

    Part 1 – Dependencies

    Below are the list of dependencies which needs to be installed on all the K8S nodes (master and worker)

    • Disable SELinux
    sudo setenforce 0
    sudo sed -i 's/^SELINUX=enforcing$/SELINUX=permissive/' /etc/selinux/config
    • Turnoff swap (also remove swap entry from /etc/fstab)
    swapoff -a
    yum -y install docker
    systemctl enable docker
    systemctl start docker
    systemctl status docker
    • Ensure net.bridge.bridge-nf-call-ip6tables is set to 1
    • Ensure net.bridge.bridge-nf-call-iptables is set to 1
    sudo bash -c 'cat <<EOF >  /etc/sysctl.d/k8s.conf
    net.bridge.bridge-nf-call-ip6tables = 1
    net.bridge.bridge-nf-call-iptables = 1
    EOF'
    • Add Kubernetes YUM repository
    cat <<EOF > /etc/yum.repos.d/kubernetes.repo
    [kubernetes]
    name=Kubernetes
    baseurl=https://packages.cloud.google.com/yum/repos/kubernetes-el7-x86_64
    enabled=1
    gpgcheck=1
    repo_gpgcheck=1
    gpgkey=https://packages.cloud.google.com/yum/doc/yum-key.gpg https://packages.cloud.google.com/yum/doc/rpm-package-key.gpg
    EOF
    • Install kubelet (I installed version 1.14)
    • install kubeadm (I installed version 1.14)
    • Start kubelet service
    yum -y install kubelet kubeadm

    Below listed dependencies are only for K8S master

    • Install kubectl
    yum -y install kubectl
    kubectl version

    Part 2 – Kubernetes Master

    Below listed steps are for configuring K8S Master

    • Initialize the cluster using below command
    kubeadm init --pod-network-cidr=10.244.0.0/16 >> cluster_initialized.txt
    • Create ~/.kube directory (chmod 0755)
    • Copy admin.conf to user’s kube config
    cp -i /etc/kubernetes/admin.conf $HOME/.kube/config
    • Install Pod network. In my case I have used Flannel, but you can choose relevant cluster networking from certified options from this link.
    kubectl apply -f https://raw.githubusercontent.com/coreos/flannel/a70459be0084506e4ec919aa1c114638878db11b/Documentation/kube-flannel.yml >> pod_network_setup.txt

    At this moment your K8S master is installed and configured. Next step is to configure worker nodes and add them into the K8S cluster

    Part 3 – Kubernetes Worker

    Final part is to have worker nodes configured and add them in K8S cluster. This steps involves running commands on Master and Worker nodes.

    • Master node – For adding worker nodes into the K8S cluster we first need to get the join command from the master server. Run the below command on Master server
    kubeadm token create --print-join-command
    • Note/copy the join command output. We need to run this join command on all worker nodes.

    Finally run below command on the K8S Master. If everything was successful then you should see list of all the nodes (Master and Worker) of your K8S cluster.

    kubectl get nodes

    This concludes K8S installation and configuration 🙂